
How to build your own green roof
Always thought the flat roof above your kitchen was ugly? Not a fan of your dingy garage roof, or, fancy it’s time to spruce up your shed? Well there’s no better time than now to get out those tools, pop your DIY cap and make a change to a boring space by building your own green roof!
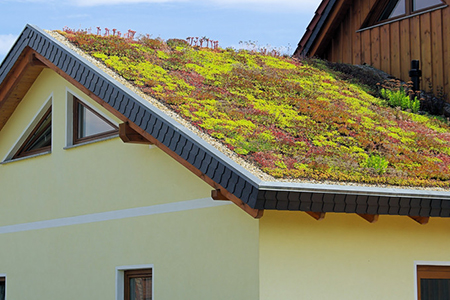
By creating your very own roof garden, you can add a new and interesting feature to your home exterior and introduce a new hub for wildlife. And if you love gardening, it’s another space to work your wonders. But how easy is it to construct a green roof? In this article, we’ll show you how.
Strengthening your roof
It’s very important that you check the strength of your roof before putting anything on top it. Unfortunately, this might not be something you can check yourself so you may need to call in the services of a roofing specialist. A green roof can weigh anything up to 150kg per sq. metres, so the checks should accommodate this strain. If your roof does need strengthening then make sure you don’t go any further until the measures are put in place.
Shopping for materials
Once your roof is ready to go then you can start shopping for materials. Green roofs can incorporate anything from a few shrubs to a pool and water features. But, as this is a DIY project, we’ll be keeping it simple. Your green roof will just be for growing plants, but here’s what you’ll need altogether to get it set up:
- 2 pond liners – to prevent water/damp from getting to the roof
- Landscaping fabric – a sheet that prevents weeds from growing under paths/decking) to prevent the soil from slipping through to the lower gravel layer of your green roof
- Moisture blanket (as used in hanging blankets) to help retain moisture in the soil
- Wood chips – for extra help with retaining soil moisture. Make sure it isn’t chemically treated as this could prevent your plants from growing
- Compost – food for the plants
- Top soil - to provide extra substance to the compost
- Large stones – to assist with drainage at the edges of the roof and prevent plants from growing into the building
- Your chosen selection of plants

Preparing the roof
The pond liner makes the first layer of your green roof. Cut the liner to size, taking care to leave enough each side to be tucked beneath any leading at the edges. This is important for preventing any rainwater from getting under the liner. Aim for at least a 20 centimetre lip around the edge of the entire area. Repeat the process with the second liner.
Installing the drainage
The next step involves setting up the drainage for your green roof. Apply gravel evenly across the top pond liner, making sure that the entire area is covered. Then, roll the landscape fabric or membrane across the top before adding more gravel. The second layer of gravel should be approximately 1.5x as much as the first.
Keeping in the moisture
Next, we get to setting up camp for your plants. First, roll out the moisture blanket across the gravel, leaving a few centimetres of space at all of the edges. Then, add another layer of gravel to hold down the blanket. Following this, add larger gravel or pebbles around the edge of the roof to help with drainage and prevent any plants from growing into the building. At this stage, it’s also a good idea to use fishing tape to seal the pond liner to the edges of the building and provide further protection from water getting under the liner.
Setting down the soil
Now it’s time to get down to business with the gardening stuff... Lay out the wood chippings evenly across the roof to provide another layer of damp goodness. Then it’s time to add the compost. The easiest way to do this is by tipping piles onto the roof and then raking it into place. Although, make sure you’re careful not to disturb the bark.
Next, add the top soil and use a rake again to even it out. You can also use the rake to mix up the soil and compost a little. Then, it’s time for you to play a part – use your feet to flatten down the soil and firm it up. Then finally, add some paving stones to the soil – these are important as they allow you to walk around the roof without damaging any of the plants.
Planting
Time for the pretty stuff! The best types of plants for a green roof are those that spread wide, provide good coverage and last a long time, in all weather, all year around. Some examples of these include Sedum Hispanicum Glaucum, Thymus Serpyllum Minimus and Sedumm Reflexum. Once these start to settle in, they’re almost maintenance free for years to come.
Although, you’re free to choose whichever plants you prefer and you can change up your green roof per season if you so wish. It all depends on how much hands-on attention you’re willing to provide to this extra space.
Maintaining your Green Roof
After all the effort you’ve put in to build your very own green roof, it would be silly not to keep it in its best condition. And this isn’t difficult. Simply make sure you weed your roof garden and water it when required. Be good to your green roof and it’ll be good to you.
This guest article was written by Hannah Richards on behalf of www.mac-homeimprovements.co.uk