
Build a wendy house
INSTRUCTIONS FOR BUILDING THE WINDOWS

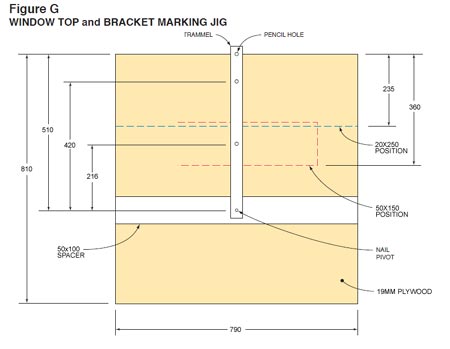
Figure G shows details for the marking jig. Step 1 below explains how to use this setup to draw the curves for the window pieces.
Step 1
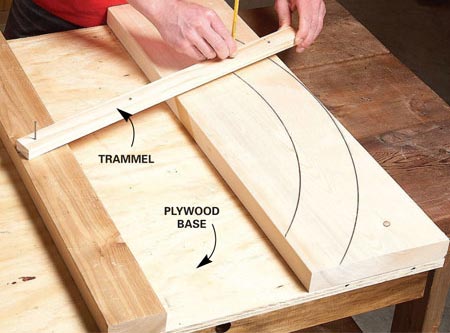
Mark the window arches
Mark out the arched window trim using a simple trammel. Use the same setup for marking the curved 2x10 header and the curved bracket support.

Step 2
Mark and cut the side trim pieces. Then set them in place on the top piece to mark the angled cuts.
Step 3
Cut the sill piece and assemble with pocket screws.
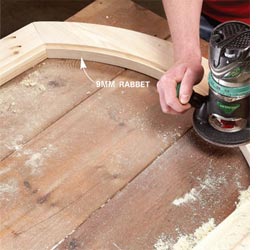
Step 4
Using a router with a 9mm rabbet bit, rout a recess on the back of the window to receive the 600 Plexiglas acrylic sheet.
Step 5
Set the window frame, recessed side down, over a piece of acrylic sheet and trace the shape with a permanent marker.
Step 6
Cut the curve with a fine-tooth jigsaw blade and the straight sections with a fine-tooth blade in a table saw or circular saw.
Step 7
Prime with universal undercoat and paint the window and let it dry. Then apply a thin bead of clear silicone in the recess and embed the acrylic sheet in it. Secure the acrylic sheet with glazing points. Let it set up overnight.

GOOD TO KNOW
A temporary support makes it simple to install the window.
Level a 50x100 and screw it to the wall 50mm below the window opening. Then rest the window on the 50x100 and centre it in the opening before driving screws to secure it.
Use silicone to fill the gaps left by the grooved siding.
DIAGRAM F - MADE ITEMS [PDF]
INSTRUCTIONS FOR BUILDING THE DOOR