
How to tile a floor
Planning to give your bathroom or kitchen floor a new look. Here's how to lay ceramic floor tiles for a professional finish/
HERE'S HOW:
1. Marking the layout
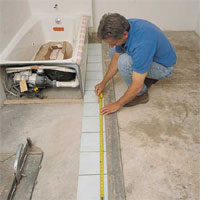
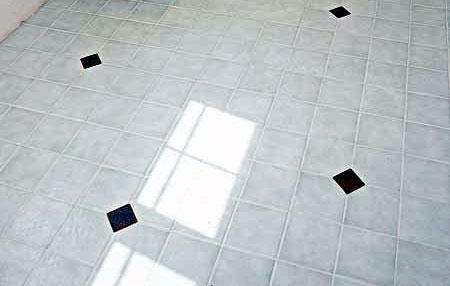
Find the midpoint of each wall and snap chalk lines on the floor to divide the room into quarters. The lines crossing at the centre of the room are the starting point of the tile. Space out to two rows of tiles towards the walls. If you need to cut a tile to fit against the wall it should not be less that 5cm in width. The tiles can be moved slightly to create a wider strip.
2. Spread thinset mortar

If you are using a pre-mixed tile adhesive you are ready to start. For powdered adhesive mix with water until it’s the consistency of mayonnaise. Mix only as much adhesive as you can use in 1 hours. Spread a thin layer of adhesive over a 30cm square area next to the chalk line. Hold the notched trowel at a 45-degree angle to the floor and spread evenly in broad curved strokes, then finish with a straight pass, which ensures the best adhesion. Combing into furrows allows air to escape as the tile is set.
DIY Tip:
When spreading adhesive, press down hard so that the trowel makes a scraping sound; the trowel’s notch size should equal the tile thickness.
3. Set the tile
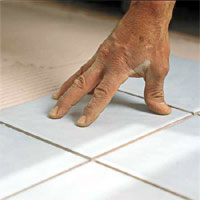
Gently lay a tile on adhesive and push down with your fingers with a slight twist of the wrist. Use this same technique to set each tile. Using tile spacers ensures even joints.
Lay the next row alongside the first and continue spreading adhesive and setting tiles, working from the centre of the room out toward the walls. Every few rows, hold a framing square alongside the edge of the tiles to check that they are square to each other.
4. Final cuts
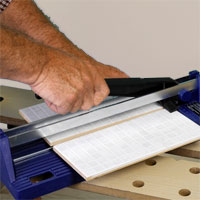
Make straight cuts as needed with a snap cutter.
To fit a tile around an outside corner, hold one edge against the wall and mark the tile where it touches the corner. Pencil a line all the way across the tile. Then, without turning the tile, move it to the other side of the corner and again mark where tile and corner meet. Mark an X on the part to be cut away.

For curved or scribed cuts you can use an angle grinder to cut out shapes and a tile nibbler for smaller cuts.
5. Fill the tile joints with grout
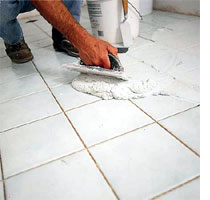
After tile sets overnight, mix up a batch of grout to a runnier-than-mayonnaise consistency. Add water a little at a time by squeezing it from a sponge. Scoop a trowelful of grout onto the floor and spread it with a rubber float held at a 45-degree angle to the floor. Push grout into the joints by first moving the float in line with the joints, then diagonal to them. Work from the edges of the room toward the centre.
6. Finishing touches
Allow the grout to set up for 20 or 30 minutes. It should be firm to the touch before you begin washing the surface of the tile. Wipe away grout haze with a damp, well-squeezed sponge rinsed often in a bucket of clean water. Again, wait for grout to haze over, then wipe with clean sponge. Repeat until the tile is clean.
TIP: Don’t be too aggressive when wiping up grout haze, or you could pull grout out of the joints.
this old house