How To Add Colour To Glass Jars And Glass Containers
When you enjoy recycling glass food containers or glass jars, being able to add some colour to these means you can find even more uses for them.
15/09/2020
If you read my posts regularly, you know that I am a huge fan of recycling and I try to recycle as much as possible before throwing anything in the trash. One item I regularly recycle and use for my DIY Divas Dremel Workshops is glass food containers. After reading a post on ModPodge Rocks, one of my favourite websites, I just had to share this easy way to add colour to glass jars or glass containers.
Amy, founder of ModPodge Rocks, has been working with ModPodge for many, many years and always manages to come up with some amazing ideas for using ModPodge for crafts and other projects. Pop onto her website when you get the chance and check out some of her ModPodge ideas that rock! You will find the original how to for this project here.
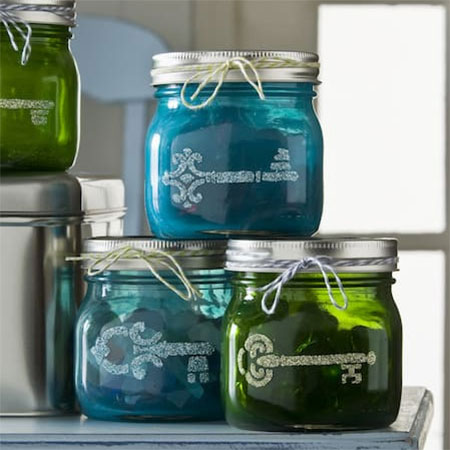
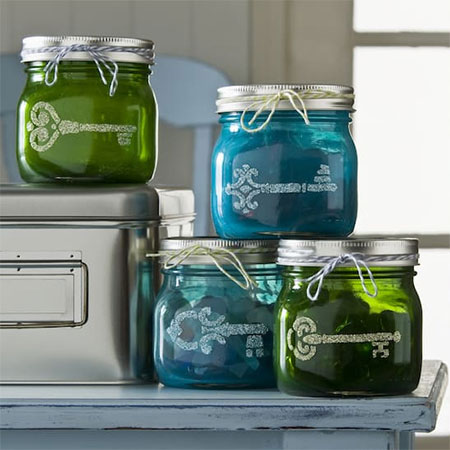
How to Add Colour to Glass Jars
It's easy enough to paint glass jars or containers, but what if you want a translucent colour; colour that you can see through and that looks gorgeous in the light. This has always been difficult and I'm so glad that Amy discovered an easy way to add a tint or colour to glass jars.
YOU WILL NEED:
Glass jars
ModPodge or clear acrylic sealer
Food colouring or acrylic craft paint
Roll of disposable kitchen towels
Bostik or Alcolin sprayable adhesive
Choice of stencil design
Choice of embellishments
Stencil brush
GOOD TO KNOW: If you struggle to find ModPodge, as it isn't always available, you can substitute with Fired Earth Glazecoat.
HERE'S HOW:
1. Before you start, make sure that your glass jars or bottles are squeaky clean and thoroughly dried. If you don't, chances are that the paint film won't stick onto the glass surface properly.
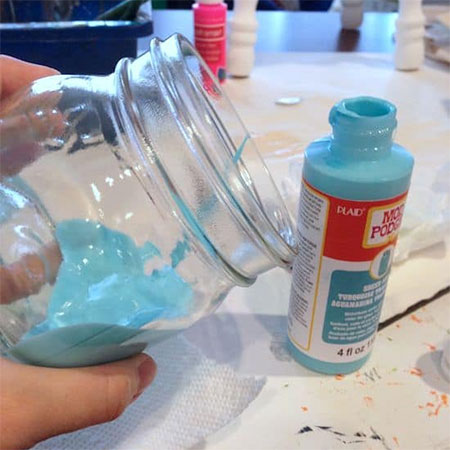
2. Add your choice of food colouring or acrylic paint to clear ModPodge until you are satisfied with the colour. If you are using paint, you need to be careful not to add too much paint; remember that you want to be able to see through the painted glass.
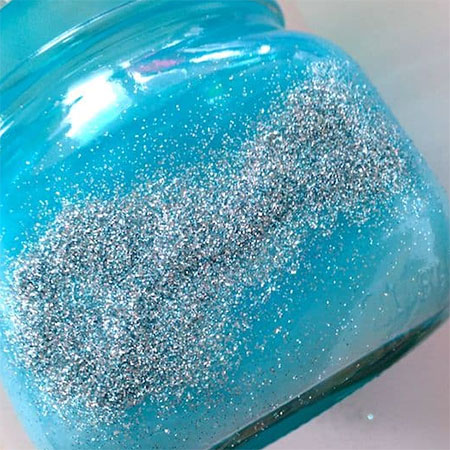
3. Pour the coloured ModPodge into your glass container and swirl around until the inside is entirely covered. Don't leave any spaces blank as this will spoil the finished look.
GOOD TO KNOW: Tip the jar upside down over a dustbin to remove any excess ModPodge.
4. Tip the jars upside down on a paper towel and let them dry overnight. Make sure that they are dry before moving on to the next step. Move the jars around occasionally so that they don't stick to the paper towel.
5. For the next step, you are going to apply a design on the outside of the jar. For this, you will need a stencil - or make your own. Use sprayable adhesive to stick the stencil onto the glass jar.
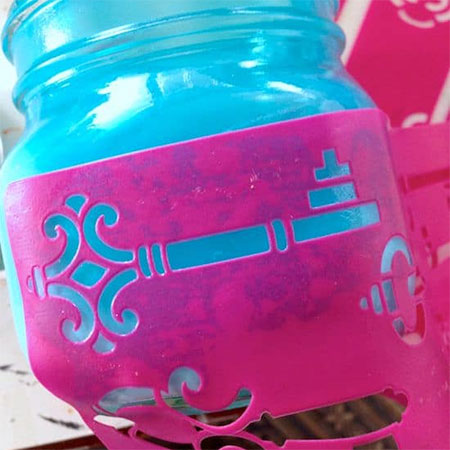
6. For this project, ModPodge was applied over the stencil and onto the glass jar, as shown below.
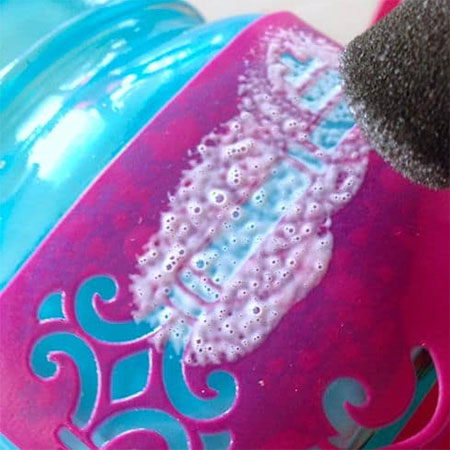
7. While still wet, the stencil was carefully removed and decorative glitter was sprinkled over the wet ModPodge. You need to work quickly as ModPodge dries quite fast.
Now that you have seen how easy it is to apply colour to glass jars and containers, I hope that you find more ways to recycle these and make accessories for yourself.