
Make your new home livable and your appliances last longer
A lot of first time buyers are faced with the legacy of a tired kitchen. Similarly, a lot of homeowners dream of giving their kitchen a makeover but are put off by the costs involved.
Painting and tiling doesn’t cost much and is a huge step towards your dream home. But how do you tackle the problem of the old appliances that you can’t afford to replace? Here is a guide to getting your kitchen appliances to look and perform like new. Following these tips can help have your appliances looking and working like new for years to come.
Cleaning the stove
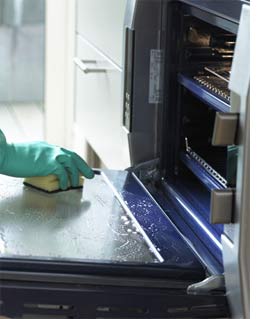
Step One
Clean all the years of accumulated cooking spills and grease from the cooker. Open your oven and sprinkle the door, bottom of the oven and oven roasting tray with bicarbonate of soda. Using a spray bottle filled with water, spray the soda until damp and leave this to sit for a few hours before wiping out with a wet sponge. This will get your oven clean without the requirement for harsh chemicals. Oven racks can be cleaned by leaving overnight in a solution of water and washing detergent. This will soften the baked-on grease for easy removal.
Step Two
Cleaning the glass on the oven door can be tricky, but is well worth the effort. Oven doors are generally comprised of 3 sheets of glass that over time can trap cooking grease on the inner glass. Find your cooker’s instruction manual (if you’ve lost it, most are available online) and use the guide on how to disassemble the oven door. Clean each sheet of glass with a degreasing spray and glass cleaner, then reassemble.
Step Three
Most parts of the cooker can be replaced; from the oven door and grill elements to hob control knobs. So if any part of your cooker is missing or beyond repair simply replace that item, rather than forking out for a whole new oven. Spares are readily available online; all you’ll need to know is your appliance model number, which can usually be found near the base of the cooker.
Cleaning the fridge
A fridge is a pricey item to replace, but it's also ecologically unsound to replace a fridge when it can easily and cheaply be repaired.
Step One
Remove all the shelves and drawers from the fridge and give these a thorough clean in the sink using washing up liquid and hot water.
Step Two
With the fridge still empty of drawers and shelves, thoroughly clean the exterior and interior with kitchen spray. Pay special attention to the plughole on the back interior wall of the fridge; if it is blocked it will cause water to pool up and cause bad smells. Blockages can generally be removed with a bit of cleaning solution and a cotton bud, being careful not to push the blockage further down the pipe.
Step Three
Clean the exterior of your fridge with a sponge, hot water and kitchen spray. Vacuum out all the dust and debris from the coils at the back of the fridge to help improve performance. Pay special attention to removing any build up of dirt that may have accumulated in the door seal.
Step Four
Once the unit and trays are dry, put all the shelves and drawers back into the refrigerator. If there is still an unpleasant odour then leave an opened pack of biocarbonate soda in your fridge to neutralise it.
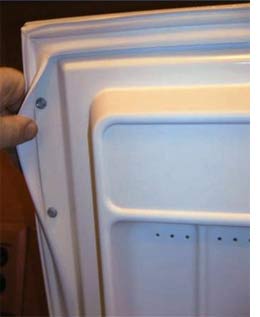
Step Five
Do an audit of your fridge functionality. If the fridge seal is mouldy beyond cleaning, or so brittle that cold air escapes, then replace it. Replacement refrigerator door seals, vegetable drawers, fridge milk shelves and glass shelves can all be purchased online through spare part retailers.
Cleaning the dishwasher
If your dishwasher hasn't been cleaned and maintained properly, it's not just the performance that's affected. It may also be running up a bigger electricity bill than necessary, and small problems can become terminal if not rectified promptly.
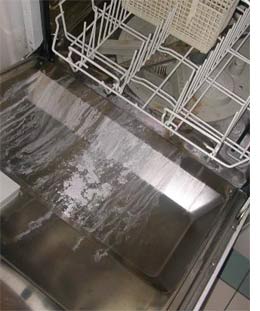
Step One
Start by removing the baskets from your dishwasher and doing a wipe out of the interior. Wipe down the exterior with kitchen cleaner.
Step Two
Check the filters - are they clean and are they functional? Replace any broken dishwasher filters.
Step Three
Check that the salt and rinse aid are at the appropriate levels, and then replace the baskets in your dishwasher.
Step Four
Use a limescale remover - available at your local supermarket - formulated for dishwashers and run the empty dishwasher to try and shift any calcium blockages. Specialist limescale remover will usually also clear away any foul smells.
Cleaning the washing machine
Notoriously unreliable, but an essential in every home - washing machines will last a lot longer if you take the time to keep yours in tip top condition.
Step One
Wipe down the exterior of the washing machine and clean the window glass.
Step Two
Clean the washing machine filter, which is usually located near the base of the appliance through a circular door.
Step Three
Check that the rubber seal around the washing machine door is free of debris and clean. If the rubber has black mould growing on it then replace the seal.
Step Four
Remove the soap tray from the machine and give it a thorough clean in the sink. Clean out the area where this drawer slots into with hot water and a sponge, removing any soap or mould.
Step Five
Run the machine empty with a limescale remover; this should help eliminate any lingering odours and help the machine perform better.
samara zittin - the daily green - flikr