
Kitchen Makeover for under R900!
It isn't often that you can boast of a kitchen makeover that costs under R1000, but that's exactly what this soon-to-be mom did in her kitchen.
20/10202
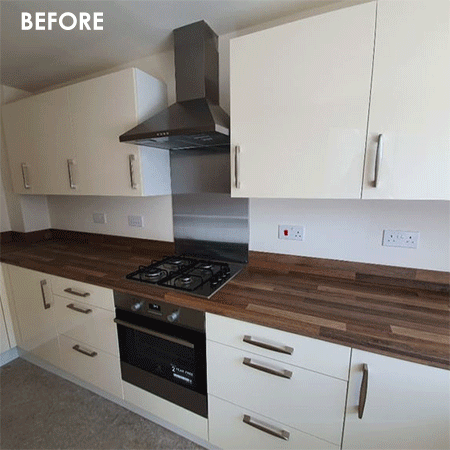
If you are still living with builders-grad kitchen cabinets and looking for a way to give your kitchen a new look - one that you can afford then take a look at this painted kitchen that was done at a cost of under R900.
I know I go on and on about painted kitchens and how you can save money by using a can of paint to transform your kitchen, and for good reason. Today's paints are nothing like they used to be years back, nowadays acrylic paints can be applied to almost any surface if properly prepared, chalk paint and milk paint require hardly any preparation, and spray paint, especially Rust-Oleum brand, gives you a professional finish in matt, satin, gloss or high-gloss lacquer. Now you really can give any kitchen a new look with paint, and that's exactly was this soon-to-be mom did in her kitchen.
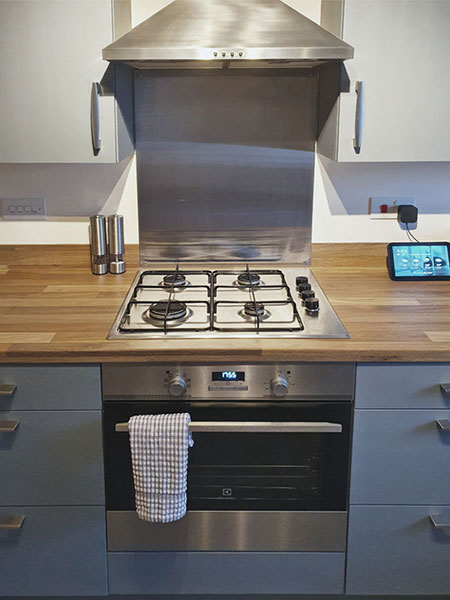
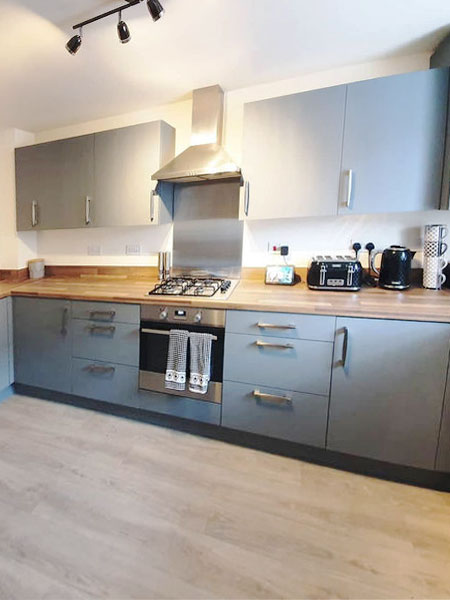
Having lived in their new home for just over a year, this paint savvy homeowner decided she just could not live with the builders-grade kitchen cabinets. She loved the butcher block finish countertop and was happy with the kitchen space overall, but hated the boring white kitchen cupboards.
Builders-grade kitchen cupboards are what you usually get on a spec house unless you have the option to change them on the plan before they get installed. You will also find the same kitchen cupboards in many homes up for sale, where the homeowners wanted to save a bit when originally buying the property. Builders-grade cupboards aren't anything to look at - just plain white cabinets with economical handles.
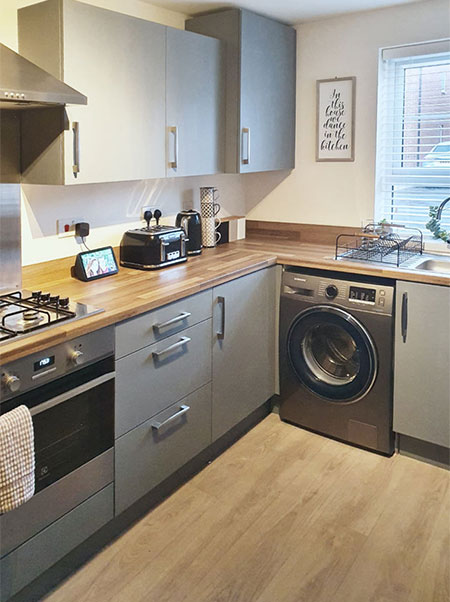
With a baby on the way, spending money on new cupboard doors just wasn't an option and the only alternative was the paint the cupboard doors and frames. Since most of the home is decorated in a grey colour palette, this also seemed to be the perfect colour for the kitchen cupboards.
How to get started
You need to do some preparation before you start painting kitchen cupboards. Kitchens get greasy over time and even when cleaned regularly, there's still a bit of grease left behind, especially if the doors have frames or detailing. That's why it is better to remove the doors from the cupboards and give them a good clean with sugar soap. Don't waste your time sanding them yet as the grease will only clog up the sandpaper. Scrub them down, dry them off and then give them a light sanding with 120-grit sandpaper.
GOOD TO KNOW: You should also do the prep work when applying chalk or milk paint. While these paints do stick better to the surface, they don't like grease. If you want a painted finish that lasts, clean the cupboards and lightly sand before painting.
You will also need to clean the front frames of the cupboard frames, as well as any visible sides that you will be painting. Any surface where you plan to apply paint should be clean, dry and lightly sanded beforehand.
How to apply paint
If you have done the prep work properly, now is the time to apply the paint. The best way to do this is with a paintbrush and foam paint roller. The paintbrush is used around the edges of the door and frames and you go over this with the foam paint roller to smooth out any brush strokes. With the edges done, you can then paint the larger, flat surface with the foam paint roller. ALWAYS let each coat dry properly as recommended before applying the next coat of paint.
GOOD TO KNOW: Don't apply a single, thick coat of paint. If you do you could end up with a mess on your hands when the paint starts to crack or peel off. It is far better to apply thin layers of paint and repeat this until you achieve the desired finish. This ensures that each light coat of paint dries properly and bonds with the surface or previous coat of paint.
When doing around the edges, there is sometimes a build-up of paint in these areas, so make sure to smooth these away with the foam paint roller.
How to protect painted finish
With the painting done, what's next? If you are using acrylic or spray paint you shouldn't need to apply any protective finish unless you are using a matt paint. My kitchen cupboards were painted with Polvin matt and then I applied 2 to 3 coats of a matt sealer to protect the painted finish.
If you are using chalk or milk paint for the cupboards, if you don't apply a topcoat or sealer coat, you won't be able to clean the kitchen cupboards. Any absorbent paint must be finished off with a sealer coat. You can use a matt, satin or gloss water-based polyurethane on top of these paints and they are worth the cost.
This homeowner says that she would definitely recommend painting kitchen cupboards to anyone interested in improving their kitchen on a budget. If you are willing to put in the time and effort, the results will be worthwhile.
latestdeals.co.uk