
How to make your own kitchen cabinets
Since most ready-made kitchen cabinets only come in standard sizes, you may need to make your own kitchen cabinets if you want custom or irregular-sized cabinet. Having demonstrated how to make at our DIY Divas Kitchen Cabinet Workshop, I want to share with you how easy it is to make your own kitchen cabinets from scratch.
When making your own kitchen cabinets you need to take the time to decide what materials you are going to use for the project.
White melamine cabinets
SupaLam and BisonLam are the best materials to use for plain white cabinet carcasses. The super white melamine finish on both products is ideal for inside finishing on white cabinets. You can also use this product for square or rectangular plain doors.
If you want to design a Shaker or cottage style kitchen cabinet, use 18mm MDF and add 6mm trim on the door fronts to build up panels. Additional trimming can be added by using pine moulding and trim.
To finish off the edges on white melamine cabinets, you can add edging strip to match the finish on the cabinet frames.
Painted cabinets
SupaWood provides a smooth surface that is easy to paint, either with a paintbrush, Rust-Oleum spray paints, or a Bosch PFS spray system. Using SupaLam or BisonLam with a single-face finish, the inside will have a tough melamine finish, while the outside can be painted in your choice of colour.
Wood cabinets
You can choose either genuine timber or MelaWood for wood cabinets, obviously depending upon the budget available. Timber is by far the most expensive option and for this reason, a wood kitchen is best left to the professionals unless you feel confident enough to do-it-yourself.
MelaWood is a melamine-impregnated board that provides a durable, scratch and moisture resistant surface. MelaWood is the ideal choice for kitchen cupboards and is available in three surface finishes, Peen (a textured, stippled finish), Executive (a smooth, matt finish) and Ashwood (an embossed, wood grain finish).
Edging strip is applied to the exposed edges to finish off and protect against moisture ingress
All the above products are available at your local Builders Warehouse. Have all your board products cut to the exact size required to make assembly and installation easier and simpler.
Assemble or DIY a kitchen cabinet carcass
YOU WILL NEED:
The cutting list below is for a standard 600mm kitchen cabinet.
2 of 550 x 900mm sides
2 of 550 x 568mm bottom /shelf
5 of 100 x 568mm supports
1 of 100 x 568mm individual kick plate
1 of 600 x 800mm door
HERE'S HOW:
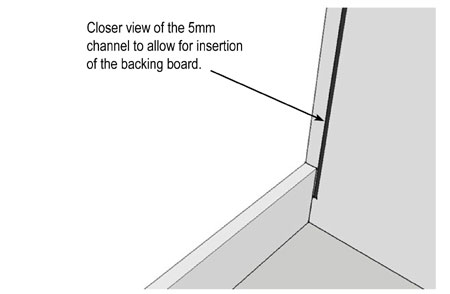
1. Before assembly, cut an 850mm long x 5mm-deep recess groove that is 20mm in from the back edge of each side. This groove will be used to allow for easy insertion of the backing once assembly is complete.
2. If there is a kickplate, use a jigsaw to cut a 100 x 100mm recess at the bottom of each cabinet. Once complete, this allows you to add a custom kickplate to your kitchen cabinets.
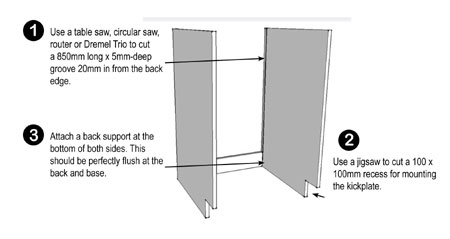
3. Start the assembly by attaching the bottom back support to both sides. You can attach by drilling through the sides or by using a pockethole jig. If drilling through the sides be sure to countersink all holes. The support should be flush with the back edge and base of the cabinet.
4. Attach the front support in the same way.

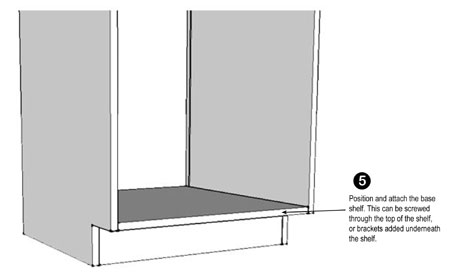
5. To mount the base shelf, drill through the top into the back and front supports and the top of the recessed cut.
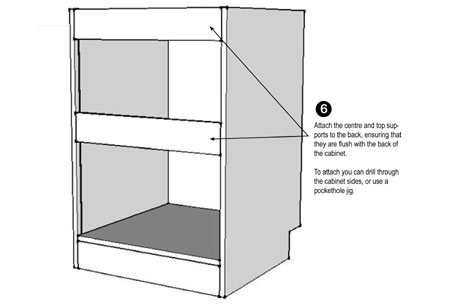
6. Attach the centre and top back supports as per step 3 above.
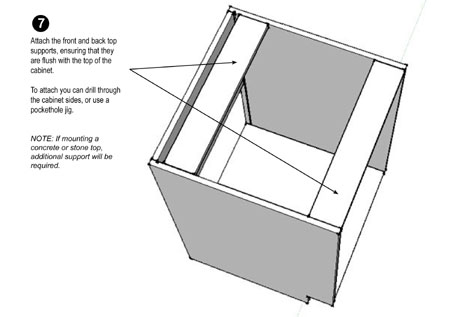
7. Attach the front and back supports on top. While this type of support is sufficient for a laminate countertop, additional support will be required if mounting a concrete or stone top.
8. Finish the carcass assembly by drilling mounting holes for any shelves. Take the diameter and depth of your shelf pins and drill mounting holes into the sides.
