
Build your own garden pond
If you've always wanted a pond, you're not alone. Hundreds of thousands of homeowners already have them and thousands more are installing them every year. Why all the fuss over a water-filled hole? Well, for one thing, gurgling waterfalls are inherently appealing. Also, with the growing popularity of water gardening, many people look at their ponds as an interesting, ongoing project.
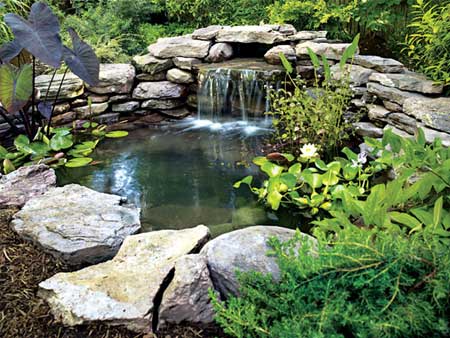
Before you start, keep in mind that the project doesn't have to be huge. The average pond measures about 1.5 x 2 metres, but it can be built to any size. In some designs, water trickles down a meandering stream before emptying into the pond. Many smaller ponds don't have streams; water runs over a large flat rock and spills directly into the pond. This style is easier to build and can fit into the smallest gardens. Basically, such a pond is just a hole lined with rubber, plus some tubing and a pump.
Once you've chosen a location for the pond, lay out the perimeter using rope or a garden hose. Next, mark the outline with sand and start digging.
Line the hole and the pit with soft sand and rake smooth. Fold the rubber liner lengthwise, centre it over the hole and unfold it. The liner should overlap equally on all sides. Using your hands and bare feet, carefully press the liner into the hole. Then, use a garden hose to fill the centre pit with water to hold the liner in place.
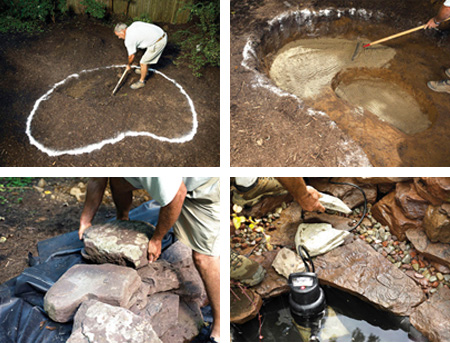
Start stacking stones on the pond floor. Lay stones in a 30cm-wide layer along the wall. Overlap stones between courses and use smaller stones to fill any sizable gaps.
Set the pump hose in position so that it extends from the centre pit to the top of the hole.
Carefully lay stone directly over the hose. Continue stacking stones until they're even with the ground. Set a single layer of flat stones along the plant shelf, aligning them flush with the edge of the centre pit. Then, place one flat rock in the bottom of the pit to serve as a base for the pump.
Connect the pump to the hose and set the pump on a flat stone in the bottom of the pit. Check with an electrician to ensure a safe installation of your pump and power cord. Here, the power cord ran through openings between and under stones to a protected electrical outlet with a weatherproof cover that shields the plug while it's connected. Don't damage the cord under a stone.
Now, use hose to fill the pond to within 50mm of coping stones. Set the waterfall weir in place atop a large, flat rock (the spillway stone) that is tipped forward slightly. Connect the weir hose to the pump hose coming out of the pond. Trim the rubber pond liner to match the waterfall opening at the front of the weir, then attach the liner to the weir using its screw-on faceplate. Backfill around the weir with dirt and continue piling up rocks around the waterfall area.
Conceal the weir by placing a rock on top of it. Once all the stones around the weir are set, secure them with waterproof black foam sealant. Also apply a thin bead of the sealant under the lip of the waterfall weir to adhere it to the spillway.
Plugging In
Fill the spaces between the stones on the pond floor with large gravel. Then, take a hose and wash down the stonework around the entire pond. Pump or bail the dirty water from the pit.
Once the pond is full, plug in the pump. In a few seconds, water will gently spill out of the weir.
Pond Safety
Ponds are inviting to small children and can constitute a drowning hazard. For safety's sake, place a steel grid over the entire surface of the pond. A pond that is adjacent to a path should be lit with low-voltage lights.