
Make a garden obelisk
Typically constructed of wood lattice, a garden obelisk is basically a free-standing trellis. When situated near climbing plants such as a black-eyed Susan or sweet pea, the obelisk showcases the vine and acts as a striking focal point.

You will need:
| A | 4 | 40 x 40 x 1680mm | legs | |
| B | 4 | 40 x 40 x 600mm | bottom crosspiece | |
| C | 4 | 40 x 40 x 22mm | top crosspiece | |
| D | 44 | cut to fit | copper pipe | |
| E | 1 | 100 x 100mm | post cap | |
2 of 50mm stainless steel screws
No More Nails exterior
Woodoc 50 (or Woodoc 55 for coastal regions)
Galvanized nails
Combination square
Clamps
16mm MAD or spade bit
Tape measure and pencil
Paintbrush
Woodoc steelwool
Hacksaw or jigsaw with blade for steel
Mitre box and saw or compound mitre saw

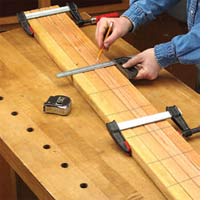
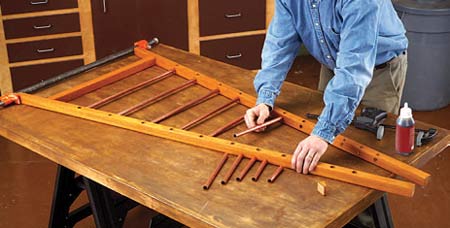
1. Begin by cutting the legs to length; mark the inside faces. Next, mark the pipe-hole locations on the inside faces of each leg. Marking all four legs at one time helps ensure that the pipes will be parallel when you assemble the pieces.
- Clamp all four legs together with one of the inside faces up.
- Measure and mark the pipe-hole locations using a pencil and combination square.
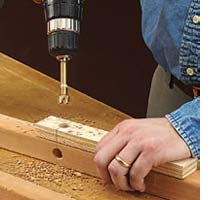
2. The holes for the pipes need to be drilled at a slight angle, about 10 degrees. I made a drill guide out of scrap plywood to help establish the angle and keep the holes centred on the leg. Drill 10 to 12mm-deep pipe holes in each leg using a 16mm MAD or spade bit.
- Use a piece of masking tape around the MAD or spade bit to act as a depth guide.
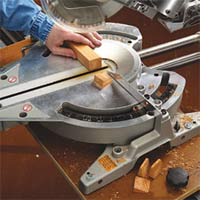
3. Mitre the ends of the crosspieces 10 degrees. You can also use a jigsaw (with adjustable plate) or mitre box and hand saw to cut the edges.
4. At this point you can seal all the parts, including the cap, with Woodoc 50 or Woodoc 55 exterior sealer before assembly. This step protects the wood from the elements. Be sure to mask off the crosspiece connection areas with tape to provide clean surfaces for glue penetration.
- Apply a liberal first coat, particular at end pieces where the grain is exposed. If the surface appears dry after 5 minutes, apply more sealer to the surface. Leave to dry.
- Lightly sand the surface with Woodoc steelwool before applying the second coat. This step ensure that the sealer will be absorbed into the wood. Leave to dry.
- Finally, apply the third and final coat.
5. The final preparation step before assembly is to measure and cut the copper tubing.
- Clamp two adjacent legs and their corresponding top and bottom crosspieces together on a work surface.
- Determine the pipe lengths by measuring between the legs at each pipe level and adding 10mm.
How to cut copper pipe
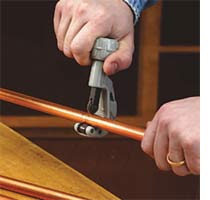
You can cut copper pipe several ways. A mitre saw equipped with a metal-cutting blade works well, especially when cutting multiple pieces of the same length. A hacksaw also works but is much more labour-intensive. I used a plumber’s copper tubing cutter, which scores through the tubing. Start by placing it over the tubing and tighten the handle until the cutting wheel hits the cut line. Score through the copper by rotating the cutter around the pipe, tightening the cutting wheel after every couple of rotations.
NOTE: The freshly cut ends will be sharp, so handle them with care.
6. The basic approach to assembling the obelisk is to join two opposite sides individually and then connect them to form the structure. The key, as with most assemblies, is to be calm and organised.
- Remove the top clamp from the side assembly and pull the tops of the legs apart just enough to allow the bottom pipe into its holes. Now fit the next piece of pipe into its holes and pull the tops of the legs together just enough to barely hold it in position.
7. Continue working up the legs until all the pipes are resting in their holes. Next, dry-fit (without glue) the top crosspiece between the two legs and clamp it in place.
- Check the fit of all the pipes. There can be a little play in each pipe but not so much that you can work it out of its holes. If a pipe is too loose, first check to see whether one of the other pipes is not fully seated in its holes. If the other pipes seem to fit correctly, you will need to replace the loose pipe with a longer piece.
- When you are satisfied with the fit of all the pipes, back off the top clamp just enough to slip out the top crosspiece.
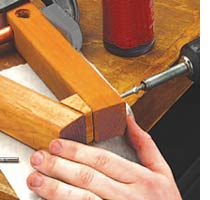
8. Apply glue to the ends of the top crosspiece. Insert the top crosspiece in place and retighten the clamp.
- Drill a pilot hole and then drive a stainless steel screw through one of the legs and the crosspiece and into the other leg.
- Now back off the bottom clamp and repeat the gluing process with the bottom crosspiece.
- Once the screws are in you can remove the clamps and repeat the process to create the opposite side. Scrape off any dried glue with a chisel or knife.
NOTE: Connecting the two side assemblies is easier with a helper.
Rather than try to line up all the pipes for both remaining sides at once, I found it much easier to complete one side at a time. Set the two side assemblies on their sides with the pipe holes facing each other. Screw and glue the top crosspiece in place — this helps stabilise the assembly. Fit the pipes into the holes just as you did on the individual sides, except this time work from top to bottom.
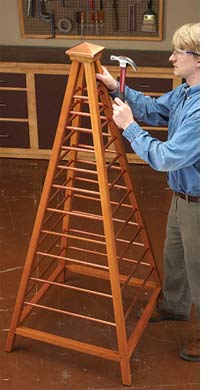
When you are happy with the fit of all the pipes, glue and screw the bottom crosspiece in place. Now flip the project over and repeat the steps for the final side. Secure the post cap with galvanized nails driven through the sides of the cap into each leg. Be sure to drill pilot holes for these nails first.
WHAT IS AN OBELISK?
In case you were wondering, the term obelisk originates from the Greek word obeliskos, a prong for roasting. The term is now used to describe structures typically built of stone, having four tapered sides and a pyramid at the top. These monoliths originated in Egyptian times and were built in pairs as protection for temples.