
Make a compost bin
If you love to garden, nothing feeds your plants better than compost from your very own garden, and its free!
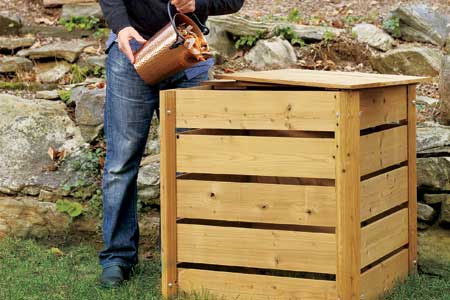
A pile of compost isn’t exactly an eye-catching feature. In this project, the gaps between the wood slats let air circulate around the pile to keep odours at bay and ensure that wastes are breaking down; removable slats, front panels, or doors make it easy to turn the pile and remove compost when it’s ready to spread. Follow these directions to make a rustic little structure that will help you keep your garden thriving year-round.
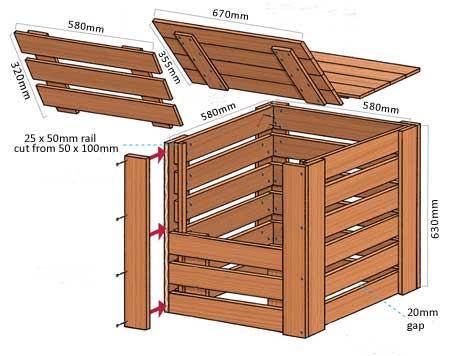
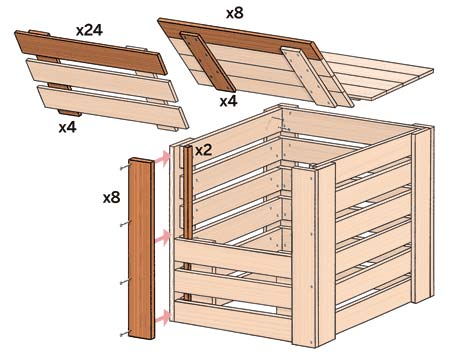
1. Using the dimensions shown, cut 1x4 lumber to make 24 horizontal slats, 8 vertical legs for the corners, 8 slats for the lid, and 8 battens for the lid and slide-in panels. Cut a plank to the height of the bin and rip it in half to make rails for the slide-in tracks.
2. For the back of the bin, lay two legs on the flat and attach six slats across them with 35mm wood screws, placing the ends of the slats 20mm from the outside edges of the legs. Be sure to leave a 20mm gap between each slat as well. (Use a plank turned on its edge as a spacer.) Make the sides the same way.
3. For the lower panel, secure three slats spaced 20mm apart to two battens spaced 50mm from the ends of the slats. Make the upper panel in the same manner, but be sure its battens extend 20mm past the bottom slat to create the gap between the slats.
4. Use wood glue and screw the sides of the bin to the inside edges of the back legs so that the legs form the back corners. To create the slide-in tracks for the front panels, attach the rails to the slats on the inside front edges of the side panels, flush with the ends of the slats. Glue and screw the remaining legs to the front edges of both sides to form the front corners. Slide the front panels into the tracks.
5.
Attach battens to four boards so that they’re flush with one edge and 65mm short on the other. Repeat for the second half of the lid. Flip the pieces over and top your bin; it will have a 20-25mm overhang all around.
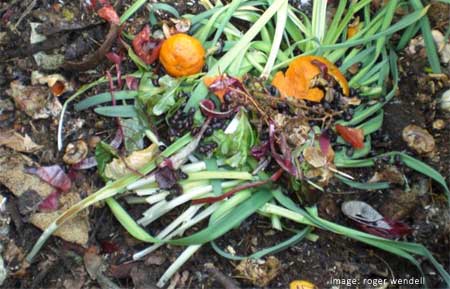
Now you have your very own compost bin. Here are some materials that you can add to your bin for creating a healthy compost mix for a garden:
- Start off with a layer of soil and a handful of garden earthworms (or bought worms) to begin the process. Cover this with slightly damp newspaper and cardboard boxes (broken up), old tea bags and coffee grounds or other moist materials to start the breakdown process.
- Continue to add dry and moist layers of food scraps, damp newspaper, egg cartons, straw, garden leaves, etc, in layers.
- Every few weeks give the pile a quick turn with a garden fork to aerate the pile. Oxygen is required for the process to work, and turning adds oxygen. You can skip this step if you have a ready supply of coarse material, like straw.
- If the compost bin starts to smell, you can add a layer of soil to the top to help to mask any odours, and micro-organisms in the soil will accelerate the composting process.
What NOT to put in a compost bin:
Do not compost meat, bones or fish scraps (they will attract pests), weeds or diseased plants.
Inorganic material such as metals and plastics or other types of synthetics that do not decompose should not be put into the compost bin.
Sawdust may be added to the compost, but should be mixed or scattered thinly to avoid clumping. Be sure sawdust is clean, with no machine oil or chain oil residues from cutting equipment.
With garden wastes, different composting materials will decompose at different rates but they will all break down eventually. If you want to speed up the composting process, chop the larger material into smaller pieces. Leaves and grass clippings (not kikuyu) are also excellent for compost, but should be sprinkled into the bin with other materials, or put on in thin layers. Otherwise they will mat together and take longer to compost.
this old house