
Circular Bricks Designs for Gardens
Create a stunning feature in the garden with one of these circular brick designs - easy to do and not that expensive either.
08/08/2020
https://pinterest.com - 563301865872049914/
In the months ahead, possibly for the next couple of years, we are going to be spending a lot of our time at home, which is why I am going to be focusing on articles and features that look at how you can improve your home, your garden and perhaps your lifestyle. As a homebody myself, I don't find it difficult to spend time at home and usually have one project or another to keep me busy. Which leads me to the topic of finding ways to fill up your time with practical projects that can add value to a home, be reasonably affordable to do and that provide a sense of satisfaction in a job well done.
Not all the project I will be featuring in the next month or so will necessitate the need for expensive tools or materials, but rather I want to focus on weekend projects, or those done over a few weekends, that won't cost a lot of money and, hopefully, can be done with tools that you already have.
https://pinterest.com - 796081671618128394/
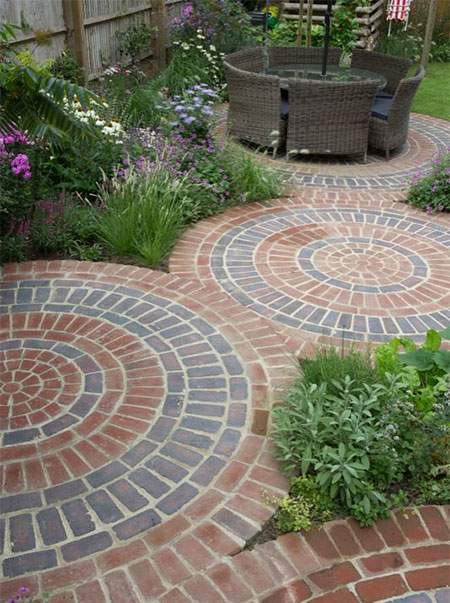
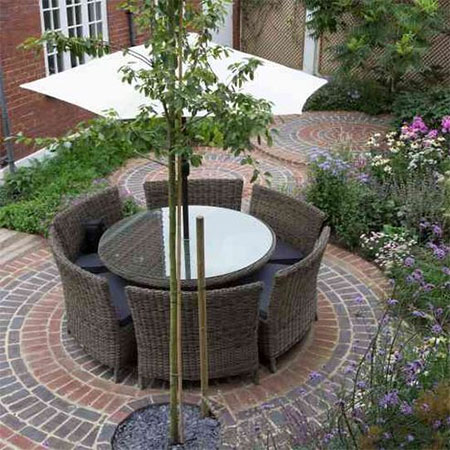
One project that I came across what that of using bricks and concrete to create stunning features for a garden. Bricks are not expensive and you can buy a small quantity if you are prepared to transport them yourself. Even cement, sand and stone are affordable if you buy at your local Builders or hardware store. With these two materials, there is a lot of scope for projects that can be done in the garden, and in this article, we look at using bricks to create circular designs, whether or a fire pit feature or just for the heck of it.
Use bricks in different colours for an interesting contrast design that catches your eye.
belderbos.co.uk
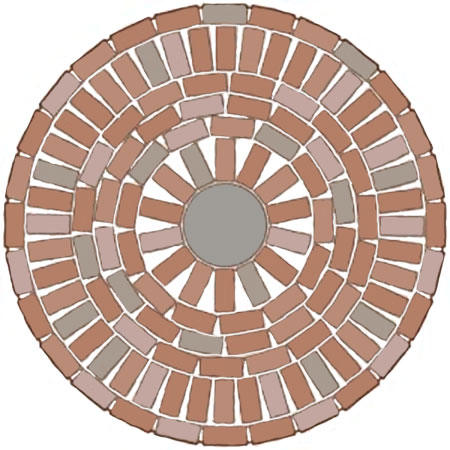
USING BRICKS TO CREATE CIRCULAR DESIGNS FOR GARDEN FEATURE
If you fancy the idea of adding a brick design to your garden, we have included a basic design plan below. What makes this brick ring a feature is the use of bricks in different colours. If you are using face brick to set out the design below, choose a selection of face brick designs such as Nebraska Travertine, Cameo Rose, Montana Travertine and Barley. All these bricks are available at brick suppliers and larger hardware stores and range in price from around R3,20 per brick.
YOU WILL NEED:
150 Bricks, quantity as per your selected design
Couple of straightedges, steel, aluminium or PAR pine
Wooden stakes and string
Cement, 40kg
8 Bags sharp sand
TOOLS:
Trowel
Spade and garden rake
Spirit level
Rubber mallet
Tape measure
Stiff sweeping brush
Hope pipe
Knee guards
Gloves
HERE'S HOW:
1. Remove any grass where the brick circle is to be placed. Go over with a rake to remove any stones and level the area.
2. Place the straight edges parallel to each other as temporary guides. The distance apart should be the size of your intended brick circle.
3. Mark the centre of the circle and hammer in a stake, tie a 1 metre length of string to the stake (adjust this for the size of your circle), now tie the other end of the string line to a second stake and use this to mark the outline of the circle. Outline this by sprinkling a handful of cement along the marked circle
4. Pour [6] bags of sand evenly over the soil in the circle and smooth with a straightedge. The layer of sand should be about 4 to 5cm thickness. Spray with a light mist of water before tamping down.
5. Working from the centre outwards, set down the bricks as per the pattern above. Tap the bricks into the sand bed with a rubber mallet. Make sure to butt the bricks together as tightly as possible.
6. After laying all the bricks, spread [2] bags of sand evenly over the surface and use a broom to sweep the sand into the joints between all the bricks. Lightly mist the area and leave to dry. Repeat the brushing and misting again in the morning until the joints between the bricks are full. Mist lightly over the next few days, especially if using the cement and sand option.
GOOD TO KNOW: For a more permanent feature, combine 4 parts sand with 1 part cement to cover the bricks after you have completed the layout.
7. To finish off, pack sand (or sand and cement) around the perimeter of the circle and mist regularly.