
How to Build a Strong, Sturdy Deck
Building a freestanding deck is a reasonably simple project that can be done in a weekend, plus you can make it any size you like and place it where you want it.
07/07/2020
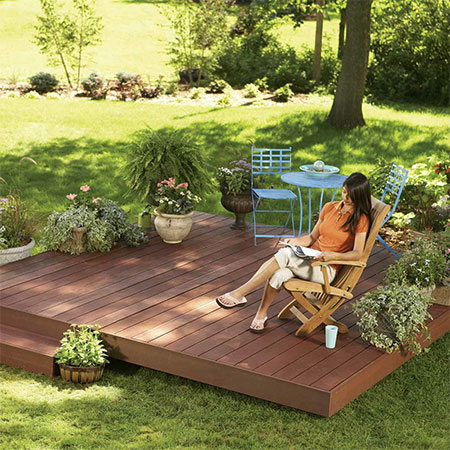
Adding a freestanding deck platform is a reasonably simple and affordable way to bring a deck to your garden. The beauty of this type of deck is that you can build it as big as you like and place it where you want it. You can even make more than one deck platform if you want to create an outdoor entertainment area.
Best Materials for Building a Deck
The cost to build the deck will vary depending on the type of material that you use:
• Pine
Pine is the most affordable timber to use for building a deck, but it is important to keep in mind that pine is classified as a softwood and that it will require regular maintenance. All the components need to be treated with exterior sealer annually to ensure that the wood does not rot, warp, twist or bow.
• Meranti
Using meranti for building a deck might be more expensive, but it is a wood species that can be used outdoors once treated with a suitable exterior sealer or deck dressing. Meranti will also require regular maintenance but it far more forgiving of the elements than pine.
• Saligna
Saligna is an excellent timber for building a deck and you can apply a suitable exterior treatment to extend the life of your deck, or leave it untreated and allow it to age naturally. Saligna can work out slightly cheaper than Meranti, but still more expensive than pine, and you can source from local timber merchants.
• Composite
Considered one of the best materials for a deck that will last a lifetime, composite materials are a combination of organic and manufactured components that don't require any treatment, won't rot and retain their shape. Using composite decking planks for building a deck might not be as cheap as pine, but when you consider the zero-maintenance and longevity of the product, it might just be worth spending a bit extra for something that will last.
• Other Materials
There are plenty of other options for building a deck, depending on how much you want to spend. Ask for advice at your local timber merchant or do some online research to look at other options for your freestanding deck.
YOU WILL NEED:
Your choice of timber or composite material decking
Material for platform support frame
Angle brackets and screws
Concrete support blocks if not laying concrete slab
TOOLS:
Garden spade
Wheelbarrow
Drill / Driver or Combi Drill plus assorted bits
Circular or Mitre saw
Clamps
Spirit level and line level
Hammer
Carpenter's square
Safety gear
Tape measure and pencil
HERE'S HOW:
You can download the step-by-step PDF plan for this project (US$6.99) here and it provides all the detailed information you need to assembling and completing a freestanding deck as shown here.

A freestanding deck is quick and easy to build once you have all the tools and materials you need to get the job done. You get to choose the size and location for the deck, so make sure to select the perfect spot before you get started. It pays to choose a spot that has sun in the morning or afternoon and a bit of shade during the hottest times of the day.
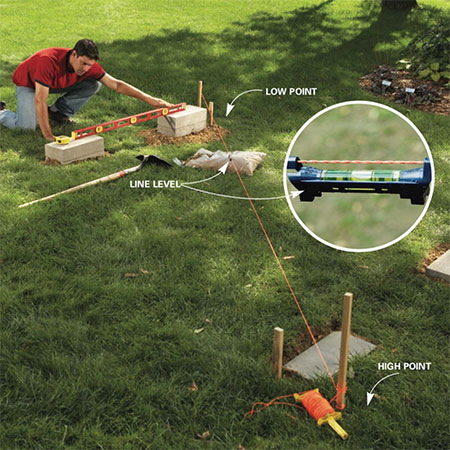
- Setting out the area
Wherever you place your deck, you will require the area to be flat and level. To cut out the time you would spend on digging out level foundations you can place the deck platform on concrete blocks. However, for a more permanent structure, it would be wise to dig out the foundations to lay a concrete slab.
Use line and a level to determine the high and low areas where the deck will be installed. This will also let you determine how many concrete blocks you need to establish a level platform for the deck.
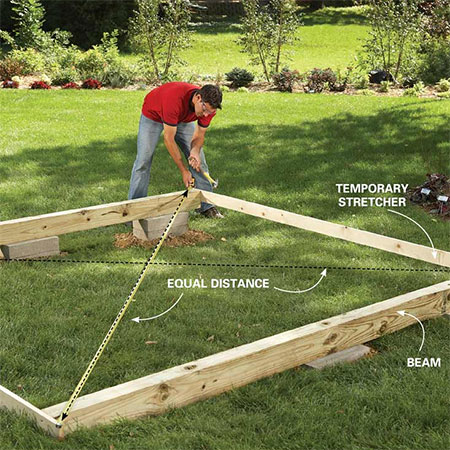
- Outline the platform
After using the line to level and place the concrete blocks on top of gravel pads, making sure that the beams that will form the foundation are square. You can use a couple of temporary stretchers will you complete this step.
Place [2] parallel beams and screw in place [2] temporary stretchers, as shown in the diagram below. Measure diagonally - corner-to-corner - to make sure the beams are square to each other. Use a spade to mark the location for adding the gravel pads. Move the beams out of the way and cut out the sod for the gravel.
- Attach joist brackets
After ensuring the shape is square, you can start attaching brackets where the joists will be mounted. Measure and mark the joist locations on the beams, spacing them at equal distance along each beam. We used 11 joists for this deck platform. The more joists you add, the more secure the decking will be and the less chance of warping or sagging.
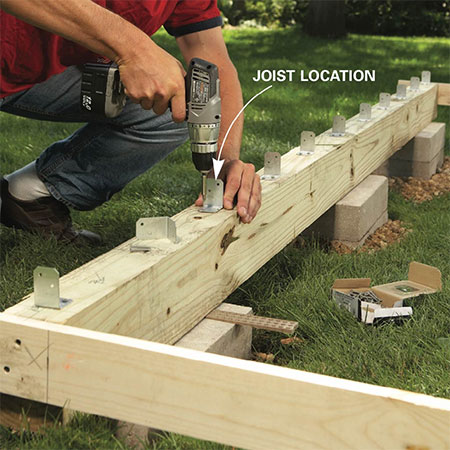
Using steel angle braces reduces the risk of splitting the wood. Secure an angle brace at the mark for each joist location.
First, set the middle joists and then add the end joists. You can use clamps to hold them in place if you don't have someone on hand to help you.
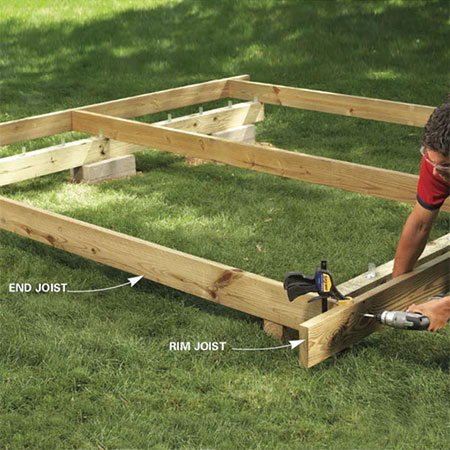
All the joists are secured in place using the angle brackets and deck screws.
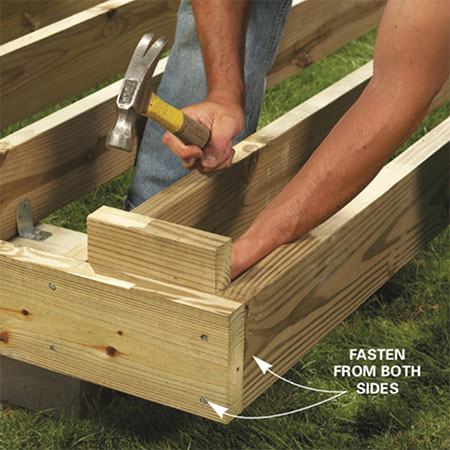
- Reinforcing the frame
At all the corners of the frame add a corner block to reinforce the frame. Cut a corner block to fit tightly with the frame and joist and use nails to secure firmly in place. Add corner blocks to the centre and side beams. You can cut these to the exact size or have a long length of board and trim as you move from point to point.
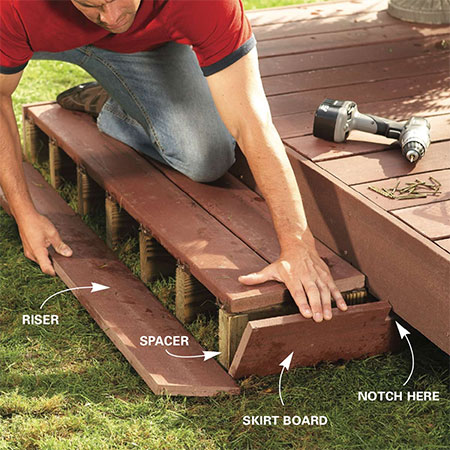
- Installing the steps
It is easy and less time-consuming to add the components for steps simply by hanging stringers from the deck joists with steel angle braces. The height for the deck should be around 20cm from the ground. If you prefer, you can add concrete pavers or build your own concrete steps.
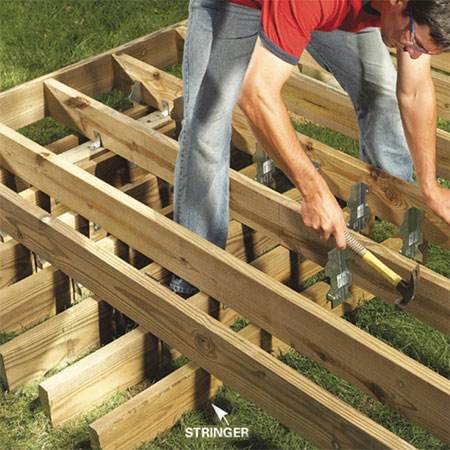
To cantilever the steps, extend the stringers underneath [4] deck joists, then join the floor joists and stair stringers with reinforcing angle braces.
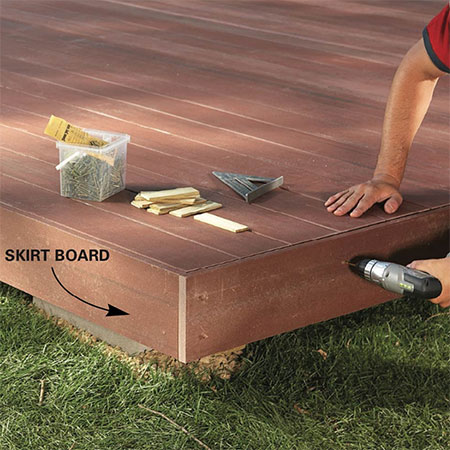
- Install decking planks
In this final step, you will add the decking planks and finish off any steps. It gives a nice finish if you use hidden fasteners to attach the planks to the frame, but you could also use a Kreg Decking Jig - see details at the top of this page.
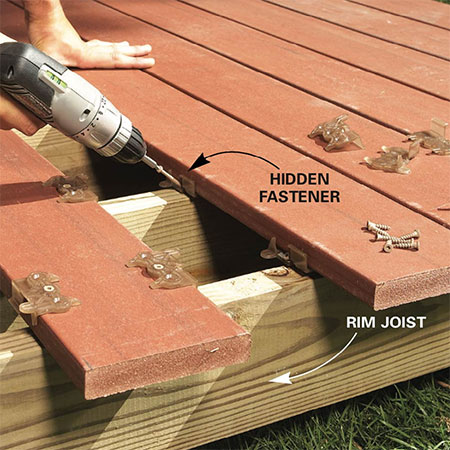
Use a planer or saw to cut any uneven planks to match for a professional finish.
You can download the step-by-step PDF plan for this project (US$6.99) here and it provides all the detailed information you need to assembling and completing a freestanding deck as shown here.
family handyman