
Quick Project: Build a Simple, Stunning, Water Feature for your Garden
Build a simple water feature that provides a stunning focal point or feature in the garden and also brings about a sense of coolness when the weather is hot and dry.
12/07/2022
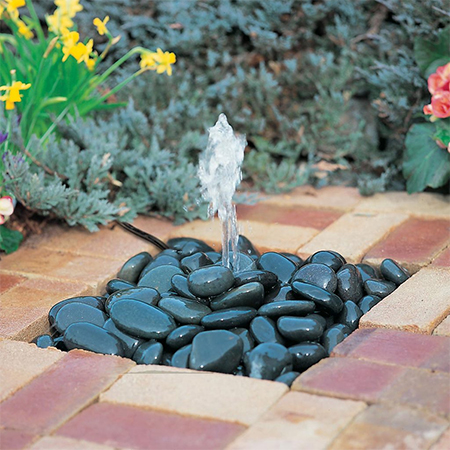
The only things you need to build this simple water feature are a few supplies that you can purchase at any Builders store and about an hour of your time. This stunning little water feature would be perfect for a bricked entertainment area or patio, or even in a small spot in the garden where you like to sit and relax. The tinkling of water will soothe your nerves while the water feature will cool you down on a hot summer's day while you take time out to relax.
YOU WILL NEED:
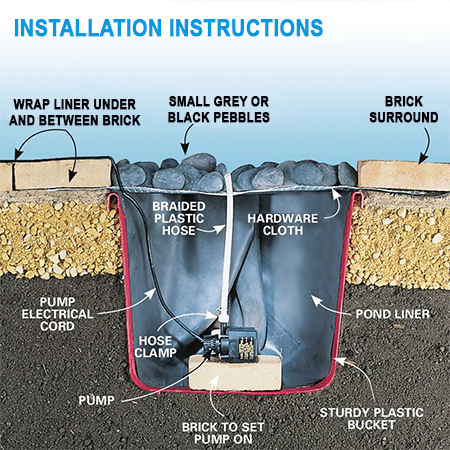
50 litre plastic bucket, drum, or bin, must be heavy-duty if you want it to last a long time and the bigger the bucket, drum, or bin the less frequently you will need to fill it up
PVC liner or sheet (see various on takealot.com) - must be large enough to surround the bucket with extra space to fit under surrounding bricks
Fountain pump, minimum 400/litres per hour
Length of flexible braided or silicone tubing to fit the pump outlet and cut to the length of the bucket height
Hose clamp
Bricks to surround the water feature
Mesh cloth cut larger than the water feature to support the pebbles and placed under the surrounding bricks
Small or medium pebbles, white, grey, or black
TOOLS:
Garden spade
Craft or utility knife
Screwdriver
Tape measure
HERE'S HOW:
Step 1
Start this project by deciding where you want the water feature to be placed. It should be close to an outdoor plug point so that the pump can be installed. Alternatively, have a qualified electrical run an outdoor power cable for you.
Step 2
Use your spade to dig a hole wide enough and deep enough for the drum, bin or bucket. The bucket should be sunk 5 centimetres below the level of the surrounding ground. Once dug, sink the bucket into the hole and pack the soil back in around to secure it firmly in place.
Step 3
Place the PVC liner inside the bucket and press in position. The liner extends around the perimeter at least 15 centimetres to be held in place by the brick surround. You can also use concrete paving or stone slabs if you prefer. The idea is that the surrounding liner will catch any water runoff and direct this back into the bucket. Fixing the edge of the liner between two bricks will assist in this process.
Step 4
With the pump placed in the centre of the bucket you can connect the tubing and hold this in place with a hose clamp. Use the manufacturer’s recommended installation instructions for wiring the pump to an electrical outlet.
Step 5
The mesh should be place over the top of the bucket. Use a craft or utility knife to make an 'X' in the centre of the mesh for the tubing. Set the mesh underneath the surrounding bricks so that it is firmly wedged in place and will be able to support the weight of the pebbles that will now be positioned on top of the mesh.
Step 6
Now it is time to test the water feature by switching on the pump. You don't want the water to spray too high as this will result in water wastage.
As soon as the water starts to lower, top this up to prevent damaging the pump motor.