
Make a rustic console table or shelf unit
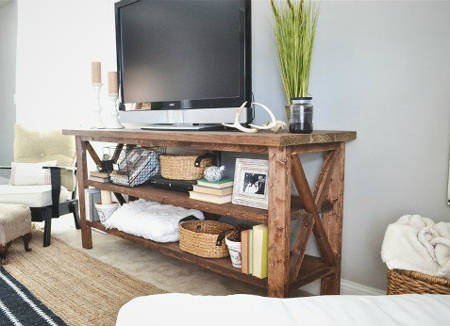
Grab some PAR pine at your local Builders Warehouse to make this easy rustic console table or shelf unit for your home. The unit retails at around R4500, but you can easily make your own for about R500.

thechroniclesofhome.com
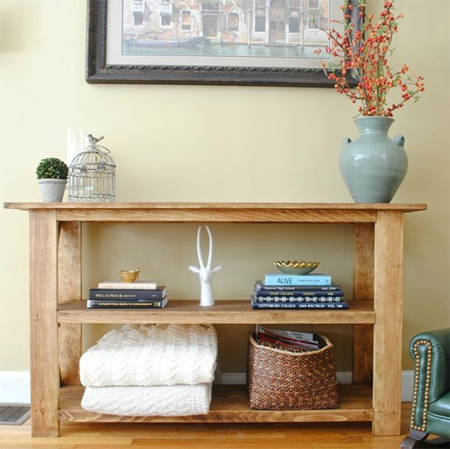
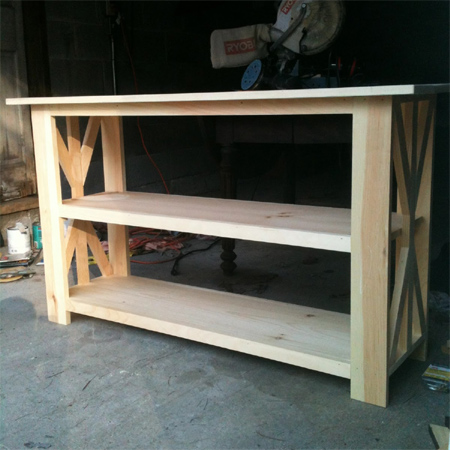
The finished unit measures 1194mm length x 800mm high. If you need a higher unit, increase the height of the legs.
Before we start
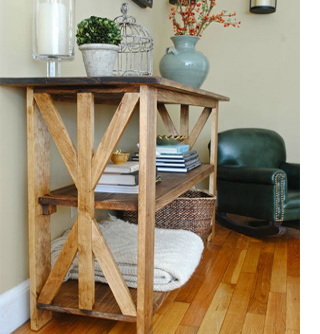
Things don't always go exactly to plan. The X-sides on the table should extend more to the centre. Make sure you follow the instructions below to avoid mistakes, and if you do make a mistake - match the other side so any boo-boos aren't noticeable!
YOU WILL NEED:
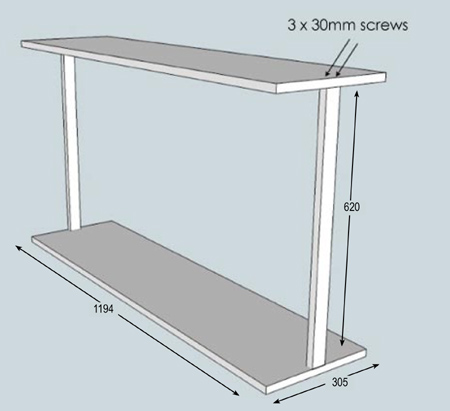
2 of 305 x 1194mm laminated pine - top/bottom
1 of 305 x 1156mm laminated pine* - shelf
2 of 20 x 66mm PAR pine cut to 620mm - centre uprights
4 of 20 x 66mm x 800mm PAR pine cut to fit - diagonals
3 of 20 x 150mm PAR pine cut to 1320mm - top slats
4 of 20 x 150mm PAR pine cut to 780mm - legs
6 of 20 x 50mm x 894mm PAR pine - face fronts*
2 of 20 x 50mm x 50mm PAR pine - supports*
*These are the last pieces you'll put on the table. Measure and sand so the shelf and face boards sit perfectly flush on the finished table.
3 x 30mm wood screws
30mm and 50mm panel pins
No More Nails adhesive
Varnish OR Antique wax
TOOLS:
Drill/Driver + assorted bits
Countersink bit
Jigsaw or handsaw
Orbital Sander + 120- and 240-grit sanding pads
Hammer
Paintbrush
Tape measure and pencil
Cloth
HERE'S HOW:
Preparation
Sand and stain all the pieces before you assemble. This makes finishing far easier. Apply Woodoc Gel Stain in Traditional Teak or Antique Oak for this look and finish off with varnish or antique wax.
1. Find the centre and mark on the top and bottom panels. Drill 2mm pilot holes at 10mm on either side of this mark - 10mm in from the outer edge. On each upright mark the centre location. Countersink the holes. Working one at a time, align one end of the upright uprights in position and drill pilot holes through the boards and into the uprights. This will prevent the uprights from splitting when you drive in the screws. Apply No More Nails adhesive before driving the screws in place.
GOOD TO KNOW
No More Nails adhesive dries much faster than conventional wood glue and is less runny and messy.
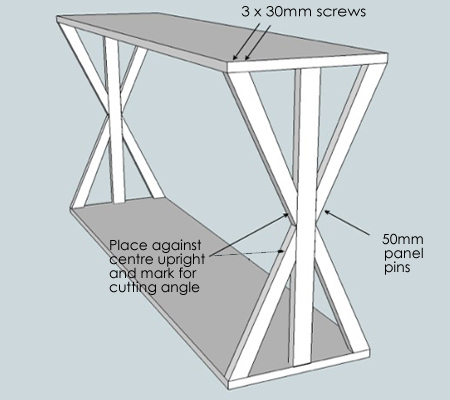
2. The four top diagonals are cut at a 25° angle. Line the angled end up against the corner edge of the top and mark where the bottom edge crosses the centre section. Use this mark for cutting the bottom of the four top diagonals. Repeat this process for the four bottom diagonals.
Note: The angle should be approximately 65°. Since most mitre saws only cut up to 50° you will need to use a handsaw or jigsaw to cut these sections.
3. Attach the diagonals by drilling 2mm pilot holes as in step 1. Note that the pilot holes need to be drilled in the same direction as the diagonals. Countersink and then drive screws in place. Because pine is soft, the screwhead should sink lower than the surface of the top or bottom.
4. Secure the bottom end of each diagonal to the centre upright using No More Nails adhesive and 30mm panel pins hammered in place.
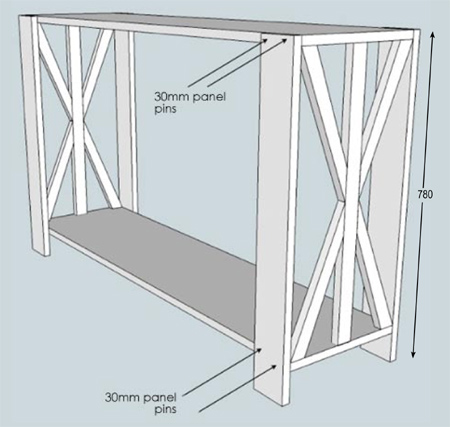
5. To attach the front and back legs to the unit, hammer panel pins into the top and bottom edges as shown. Make sure to also apply a small bead of No More Nails adhesive along the edges before attaching.
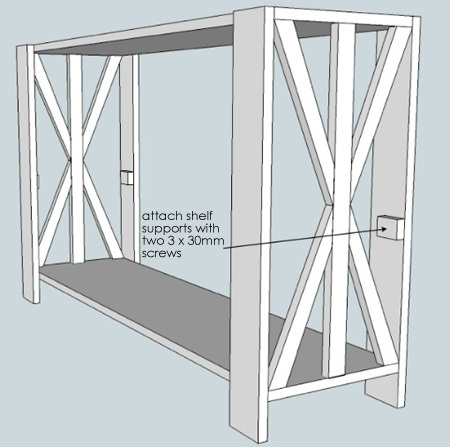
6. Use a tape measure and pencil to mark where you want the shelf to be. This mark will line up with the bottom of the shelf. Under this mark, attach the shelf supports with adhesive and panel pins.
Note: Line the shelf supports up with the inside edge of each leg so that it isn't as visible.
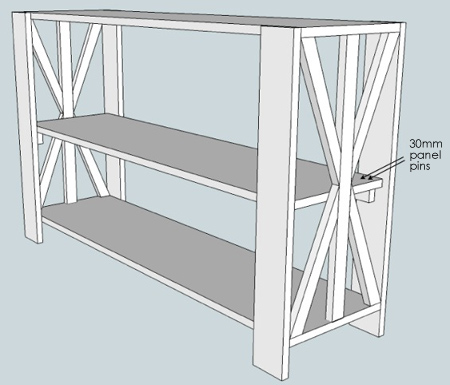
7. Slide the shelf inside the frame and attach to the supports with panel pins. You don't need to fasten the shelf in place, but it does add extra support to the entire unit.
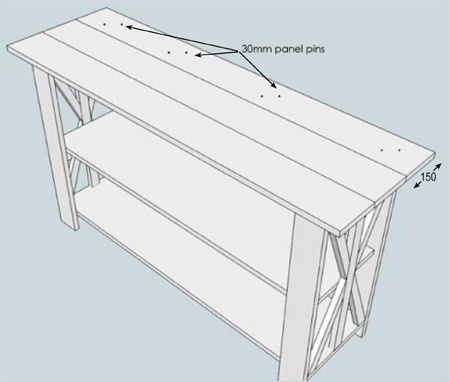
8. On the top of the unit, centre a board and use panel pins to attach to the frame top. Now you can attach the remaining panels on either side in the same way. Do use No More Nails as well. If ever you need to move the table, at least the top will be secure!
9. Attach the face fronts to the front and back shelves using panel pins.

GOOD TO KNOW
Wipe away any excess adhesive with a slightly damp cloth, as this will leave blotchy spots when you apply the stain.
My thanks to Jennifer at The Chronicles of Home for allowing me to share this project with you.
lizmarieblog.com