
Store large offcuts of timber and board
While you can have all your timber and board cut to size at Builders Warehouse, you will need a space to store any offcuts. Here's a mobile storage trolley that allows you to pack large offcuts of timber and board easily, and then move it out of the way when it's not needed.
familyhandyman.com
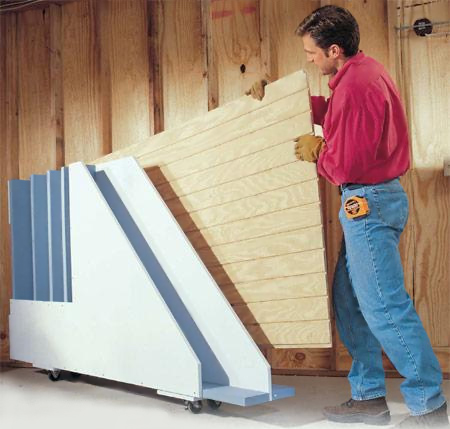
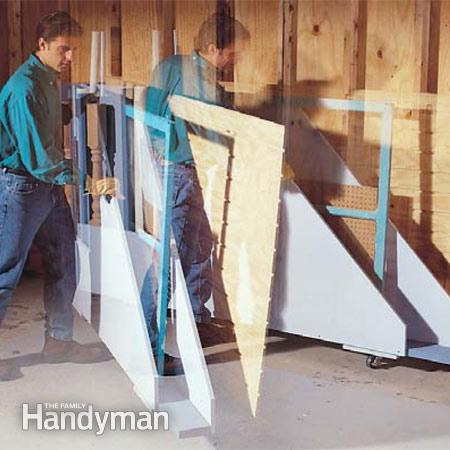
Don't throw away or leave behind offcuts when having timber and board cut to size. You are bound to come across plenty of ways to use these offcuts for small projects in and around the house. This handy mobile storage trolley allows you to swing the storage rack out from the wall. Dividers strengthen the rack while enabling you to separate large sheets from smaller ones.
Each slot has room for about six sheets of 19mm-thick board. Although you can modify our design and make the slots larger, keep in mind that anything that sits around for a year or two is a donation candidate.
YOU WILL NEED:
2 sheets 19mm shutterply or pine plywood
5 PAR pine 50 x 150mm lengths of 2,4 metres
1 PAR pine 50 x 100mm cut into 2 sections
4 casters - one locking caster
45mm wood screws
75mm wood screws
6 expansion bolts 60mm
2 strap hinges
TOOLS:
Drill/Driver and assorted bits
Circular saw or jigsaw - if cutting your own board for this project
Tape measure and pencil
HERE'S HOW:
Cut - or have cut - all the sections for assembly.
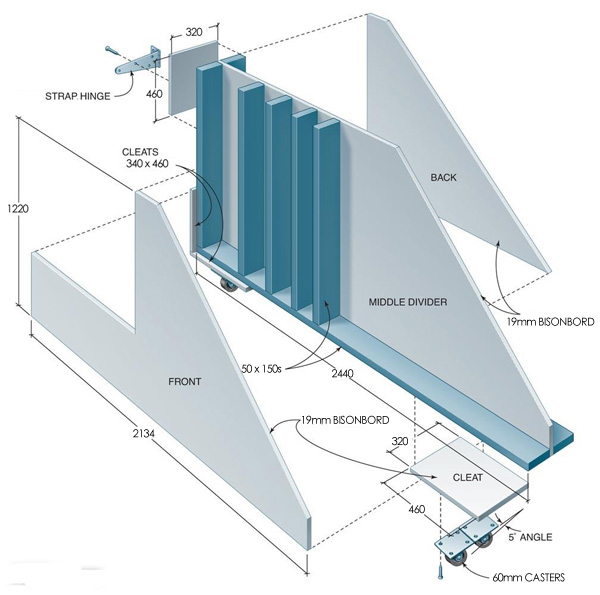

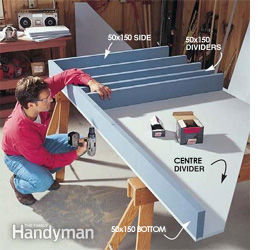
Install the 50x150s and dividers
Cut the 50x150 to length and position them on the centre plywood divider. Attach them to the plywood with 45mm screws driven from underneath. Then screw the 50x150 dividers to the bottom 50x150s with 75mm screws.
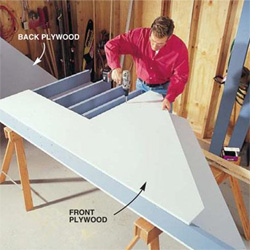
Install the front piece
Lay the front plywood piece over the 50x150s and anchor it with 45mm screws driven every 300mm.
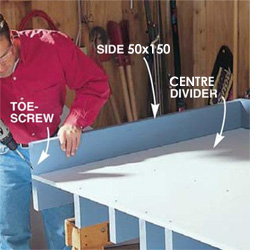
Assemble the back
Flip the project over and assemble the back section. Position back 50x150s for the bottom and side and fasten them with two 75mm screws where they meet. Then drive screws at an angle (toe-screw) through the ends of the 50x150s into the assembly below. Attach the plywood back piece to the 50x150s with the 45mm screws.
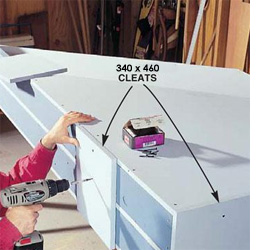
Fasten four cleats
Fasten four plywood cleats to the bottom and sides with 45mm screws to hold the rack together. Use 12 screws per cleat.
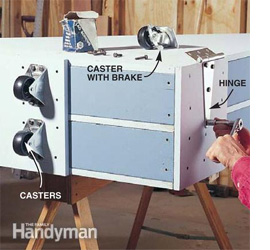
Attach the casters
Attach the four casters and the strap leaf of the hinges with 6mm x 16mm lag screws. Place the caster with a brake on the outer front edge of the rack to hold the rack stationary when sliding items in and out. When loaded, this rack is heavy. So make sure to buy casters rated for at least 100kgs each. One of the casters should have a brake for extra stability.
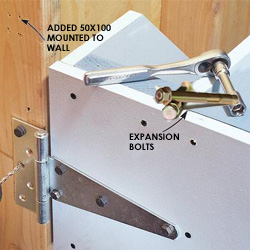
Fasten the rack to the wall
Predrill pilot holes and fasten the rack to the wall with 60mm expansion bolts.
Note: A modification to the original design calls for mounting 50x100s to the wall with expansion bolts of nylon wall plugs and screws - and mounting the rack to 50x100s with 75mm screws.