
Add interest with moulding strips
A few inexpensive lengths of pine moulding strips are all you need to make a high impact focal or feature wall in an entrance or room in a home.
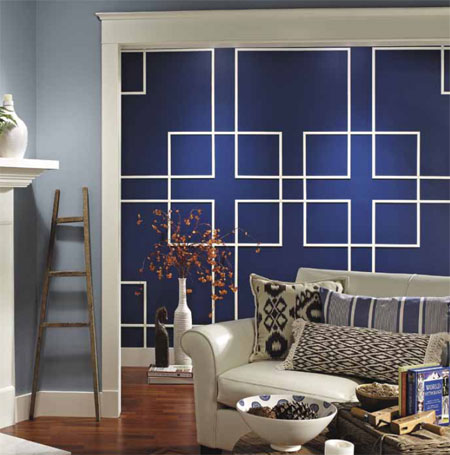
Start by taking a good look at the pattern
itself. You’ll see that it’s actually just three
'stacks' of boxes that are overlapped by
two large squares. When adjusting the pattern
to fit your wall, you’ll want to make one stack
of boxes for approximately every one metre of
wall length.
Although you may need to adjust the sizes of
the boxes and squares, notice that the spacing
between them, and also the border around the
outer edges, is always 15cm. This makes re-sizing
the pattern easier and keeps it looking good at
any scale.
It will take a bit of math to figure out the dimensions
of the boxes in your pattern, but it’s
not difficult. Sketching
your pattern out on paper is also a good idea.
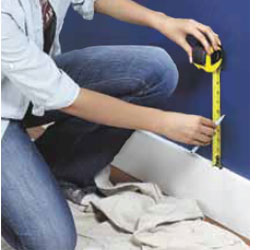
1. When you’re ready to lay out the pattern,
measure in 15cm from each end of your wall, up 15cm from the skirting, and down 15cm from
the ceiling or cornice. This
establishes an outer perimeter, which provides
the foundation for the rest of your layout.
• To find your box height, measure between the
top and bottom lines (this came to two metres in our
case). Then subtract 15cm to account for the space
between the two stacked boxes.
Divide by two to determine the height of each
box.
• Determine your box width by measuring
between the two border lines on either side of
your wall. Subtract 30cm to account for the two 15cm
spaces and then divide by three (the
number of boxes across) to get your box width.
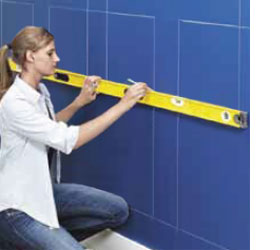
2. To mark your pattern on the wall, use a ruler or tape measure and pencil or chalk to make light tick marks 15cm from the top, sides, and bottom of your wall. Use a spirit level to draw light horizontal and vertical lines that define the outer borders of your boxes.
Lay out the large boxes by transferring the dimensions you have calculated to your wall. Draw light horizontal and vertical pencil or chalk lines to establish the sides of the large boxes, using a spirit level to make sure all of the pencil lines are level and plumb.
3. Position the centre squares next. Measure up, down, and out from their centre points to transfer their dimensions and position them properly over the large boxes.
4. Lay out the corner squares last, marking their locations in the pattern’s outer corners. Be sure to connect these four small squares to the walls, ceiling, and skirting to complete the pattern.
5. You can pre-cut most of the moulding pieces to length with a jigsaw and mitre saw, but wait to cut the short intersecting pieces that complete the centere squares and also those that link the small corner squares to the outer borders. If your marks or cuts have gotten a bit off, cutting these pieces to fit will ensure there won’t be any gaps at the joints when they’re applied. Also be sure to make all the necessary mitre cuts before cutting the pieces to length.
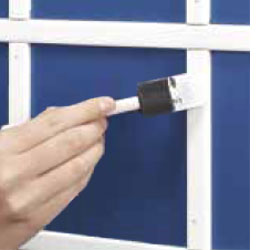
6. It’s easier to paint the moulding before applying it, and then touch up when you’re done. If you butt the pieces tightly when you apply them, you won’t need to caulk every joint.
7. First, attach the six large boxes, using No More Nails adhesive. Create the centere squares by attaching the corner pieces, adhering the moulding in the same manner as before. Make sure the straight ends of each piece butt tightly against the sides of the boxes and the mitred corners also fit tightly. Then attach the connecting pieces to finish each centre square. Repeat the process for the next centre square.
8. Create the corner squares by adhering the pieces that go inside the large boxes and then cut the small outer pieces, and apply them to the wall.
9. When the adhesive is dry, use your finger to apply acrylic sealer to any gaps and touch up those spots with paint.