Easy wall hanging pegs
Need to hang something in a hurry? These wall hanging pegs are quick and easy to make and look stunning on the wall.

YOU WILL NEED:
50 x 50mm length of pine
Mitre saw or mitre box and saw
Drill-Driver and assorted screw and drill bits
120- and 240-grit sandpaper
Woodoc 5 or 10 interior sealer
Woodoc Gel Stain or stain concentrate
Woodoc steelwool
Rubber gloves
Keyhole brackets
fischer SX or UX wall plugs and screws
You will find everything you need at your local Builders Warehouse.
HERE'S HOW:
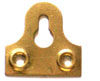
The secret to the simplicity of this project is the use of a keyhole bracket at the back of the peg. These handy brackets allow you to easily hang onto a wall-mounted plug and screw fixing.

1. Cut the hangers to length
Decide on a length for your wall hangers (ours are 200mm long) and cut at a 45-degree angle using the mitre box and saw. Clamp one end of the pine to prevent it from slipping around as you cut.

2. Mark and drill keyhole
Use a pencil to mark the keyhole onto the angled edge of the peg. Drill two holes with an 8mm wood bit, within the marked area. These holes only need to be about 5mm in depth.
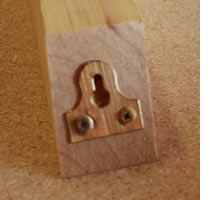
3. Screw on the keyhole hanger
Attach the keyhole hanger to the angled edge so that it fits nicely over the drilled out holes.
4. Insert wall plug and screw
If you are only drilling into plaster and clay or cement bricks you can quite easily use your drill-driver (PSR18 or PSR 14,4LI) for this. Use a quality masonry bit, such as Alpen Bits, to drill a hole that is 10mm longer than the length of the wall plug. Insert the screw, but leave 3-4mm of the head above the plug to allow the keyhole hanger to be inserted over the top.