
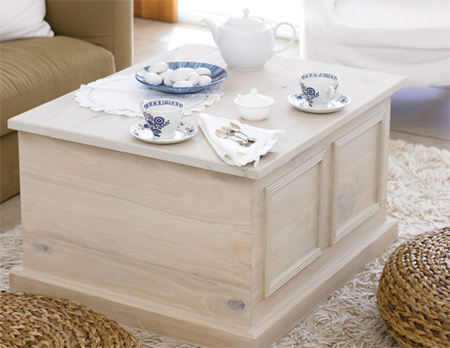
Make a storage coffee table
This coffee table is designed for more than one purpose. It's also sturdy enough to use as a TV stand and has plenty of storage space inside for CDs, DVDs, books or magazines and it's affordable to make out of laminated pine that you will find at Builders Warehouse.
YOU WILL NEED:
Piano hinge, 700mm length
16mm wood screws
30mm wood screws
Wood glue
Wood filler
Panel pins
2 self-adhesive silicone bumpers
Dowels, biscuits OR steel braces (see step 1)
TOOLS:
Drill/Driver and assorted bits
Orbital sander plus 120- and 240-grit sanding pads
Jigsaw, mitre saw or mitre box and backsaw
Hammer
Tape measure and pencil
OPTIONAL: Dowel centres of biscuit joiner (see step 1)
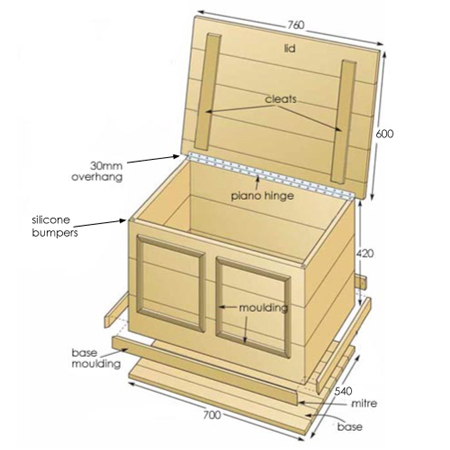
CUTTING LIST
QTY |
W |
L |
MATERIAL | ITEM | ||
1 |
600 |
760 |
laminated pine shelf | lid | ||
2 |
700 |
420 |
laminated pine shelf | front/back | ||
2 |
540 |
420 |
laminated pine shelf | sides | ||
1 |
540 |
700 |
laminated pine shelf | base* | ||
1 |
44 |
1800 |
PAR pine | base moulding | ||
1 |
44 |
1800 |
PAR pine | cleats for lid | ||
2 |
1800 |
pine moulding strips | decorative | |||
HERE'S HOW:
1. Make the box
To make start off with a basic box frame of laminated pine front, back and sides. You can join the sides together using dowel joints, biscuit joints, or butt joints with added steel braces on the inside of the box.
The bottom of this box uses pine tongue and groove panels that are slotted together and then fastened onto the base with small screws. You can use laminated pine shelving as an alternative.
GOOD TO KNOW
Sand all the cut edges with 120-grit sandpaper to remove any splinters or raw edges.
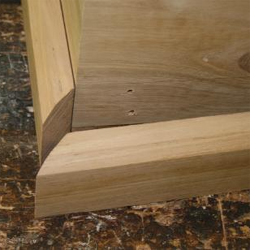
Add moulding to the base
What adds to the plain design of the box is the trim and moulding detailing. Use a mitre saw, jigsaw or mitre box and backsaw to cut the side and front base boards. Measure the width and length of the sides, front and back and transfer this onto PAR pine 44mm wide strips. The strips are fastened onto the box by drilling pilot holes inside and mounting with glue and wood screws.
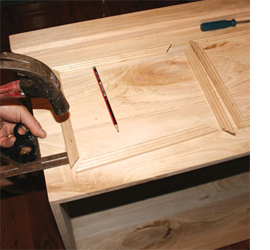
Adding the trim
Measure the moulding strips for the two panels and cut using a mitre box and backsaw. Position the strips on the front of the box, 50mm in from all edges, with a gap between, and attach with adhesive and panel pins.
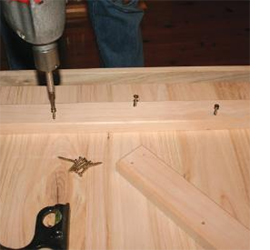
Attach the cleats
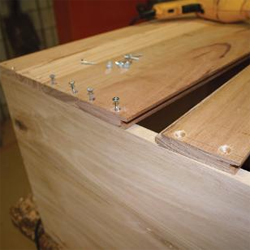
Measure in 52mm from both sides of the top and mark. Cut cleats 500mm in length. Sand with 120-grit sandpaper. Mount the cleats at this point and attach to the underside of the top with 30mm screws.
Attach the top
Use a jigsaw and steel-cutting blade if you need to cut the hinge to length. Position the piano hinge on the inside back edge of the lid, with the knuckle (barrel) overhanging the back by 1mm. Mark the position of the screw holes, drill 2mm pilot holes and fasten with 16mm screws.
Measure in 30mm from the back edge and mark to mount the piano hinge to the underside of the top with 16mm screws. To balance the front of the lid, stick two silicone bumbers onto the front corners as shown in the diagram above.
Finishing
Sand the entire project with 240-grit sandpaper for a smooth finish and wipe clean to remove all traces of dust. To finish your new storage coffee table as shown in this project, apply a whitewashing technique using Plascon Polvin. You can also distress the finished project, apply a liming wax, stain in your choice of finish, or paint your coffee table using Plascon Double Velvet for a sheen finish, Plascon Velvaglo for a gloss finish, or Rust-Oleum 2X spray paints.