Build a storage bed
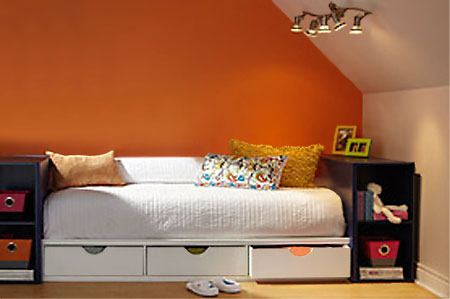
A storage bed that incorporates storage drawers, or a pullout bed, is one way to save on space in a small bedroom or guest bedroom. Storage drawers can be used to pack away toys and accessories in a child's bedroom, or used to store bed linen and other items in a guest bedroom.
HERE'S HOW:
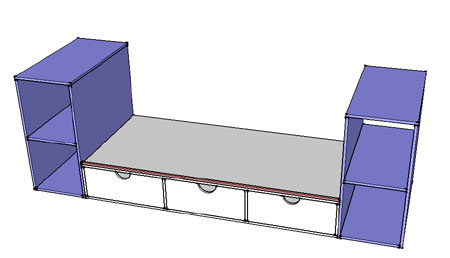
Assemble side shelf units
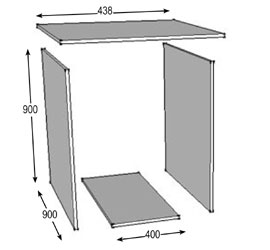
1. Drill pilot holes and countersink along the bottom edge of both sides and use 30mm wood screws to attach the sides to the base.
2. Drill pilot holes and countersink along both top edges and use 30mm wood screws to attach the top to the sides.
3. Fill the holes with wood filler and leave to dry before sanding smooth with 240-grit sandpaper.
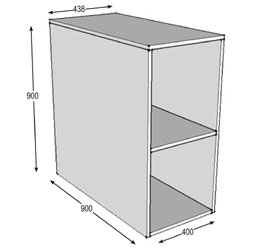
4. Insert and attach shelves by measuring up on the outer and inner sides. Drill pilot holes and countersink before driving screws through the sides into the shelves.
5. Before attaching the bed parts, sand all edges smooth with 240-grit sandpaper and paint the cubes in your choice of colour. You can use acrylic PVA or water-based enamel to paint directly onto the board. Apply two coats and let dry before sanding with 240-grit to smooth and adding a final coat.
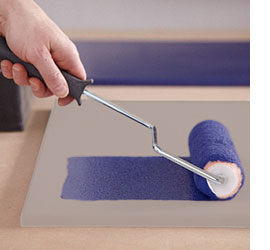
DIY Tip:
Use an ultra-short nap or foam roller to apply paint onto the surface of the board. Don't apply too much paint, rather apply a small amount of paint and then spread this out over the entire surface, leaving to dry before applying another coat.
Assemble bed frame
Before assembling the bed, sand all edges smooth with 240-grit sandpaper and paint with acrylic PVA or water-based gloss.
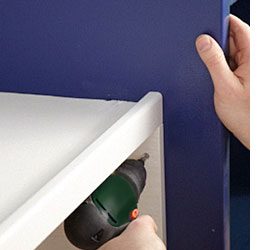
6. Position the bed base between the two side cabinets as a guide for mounting the side frames onto the side boxes. Drill pilot holes and countersink before driving 30mm wood screws through the side frames into the cabinet side on both ends.
7. Turn the assembly on its back in order to attach the bed base to the side frames. Drill pilot holes and countersink before driving screws through the back of the base into the side frames.
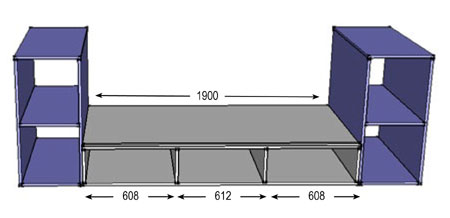
8. Use a tape measure and pencil to mark on top and bottom of bed base. Mark at 608mm from each end of the bed. Transfer these marks to the top of the bed. On the bed base, at this mark position and mount the drawer dividers by driving screws through the bottom of the bed base.
9. Place the bed top on the side frame; drill pilot holes, countersink for the drawer dividers and at both ends to attach the bed top onto the side frame.
10. Mount a batten or quarter-round on the front edge of the bed frame to hold a mattress secure. Use wood glue and panel pins to secure the batten to the bed top.
Assemble the drawers

11. Mark the centre line on each drawer front and use a template or half-circle compass to draw the shape. Use a jigsaw and clean-cut blade to cut out the shape. Sand smooth with 240-grit sandpaper.
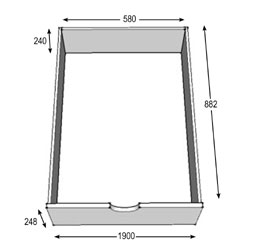
12. Construct the frame for the drawer by placing the two short pieces (drawer ends) between the long side sections.
13. Use wood glue and 3mm x 30mm wood screws to assemble the drawer frames.
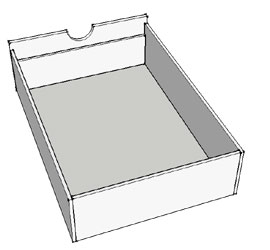
14. Attach the drawer front by drilling pilot holes and countersinking through the drawer frame end into the back of the drawer front and driving in 20mm wood screws.
15. Finally, cut and staple a 3mm masonite backing board to the side shelves and bed section.