
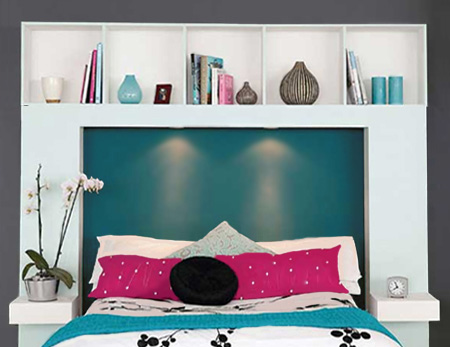
Make a storage headboard
In this do-it-yourself storage headboard, storage, style and lighting come together in a project you can build in a couple of hours. Grab all your supplies from Builders Warehouse, have all the 16mm SupaWood cut to size and you are ready to assemble.
freshhomeideas.com
You will be surprised at how easy it is to make this storage headboard. This project is designed for a queen size bed, but you can easily modify the measurements to fit this storage headboard around any bed size.
YOU WILL NEED:
3,5 x 35mm half-shank screws
16mm screws
Wood filler
Screw caps
20 L-shaped brackets
Fischer SX8 wall plugs and 4,5 x 70 - 75mm screws
Low-voltage downlights (kit form)
240-grit sandpaper or sanding pads*
Paint and equipment
TOOLS:
Drill/Driver plus assorted bits
Countersink bit
Jigsaw
Orbital sander*
Framing square
CUTTING LIST
QTY |
W |
L |
MATERIAL |
ITEM | ||
| A/B | 2 |
200 |
2160 |
16mm SupaWood |
Shelf top/bottom | |
| C | 2 |
200 |
450 |
16mm SupaWood |
Shelf sides | |
| D | 2 |
200 |
418 |
16mm SupaWood |
Shelf dividers | |
| E | 2 |
300 |
1580 |
16mm SupaWood |
Column fronts | |
| F | 4 |
187 |
1580 |
16mm SupaWood |
Column sides | |
| G | 1 |
150 |
1560 |
16mm SupaWood |
Valance front | |
| H | 1 |
184 |
1560 |
16mm SupaWood |
Valance base | |
| I | 2 |
250 |
300 |
16mm SupaWood |
Box shelf top | |
| J | 4 |
100 |
250 |
16mm SupaWood |
Box shelf sides | |
| K | 4 |
100 |
268 |
16mm SupaWood |
Box shelf front/back | |
1 |
445 |
2188 |
3mm masonite |
Backing | ||
1 |
44 |
1800 |
PAR pine |
Battens cut to length |
HERE'S HOW:
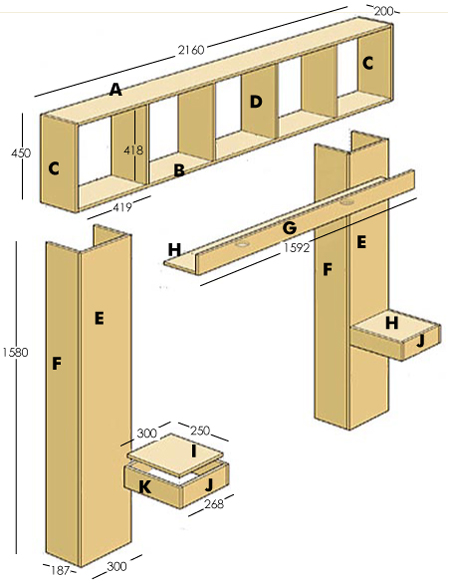
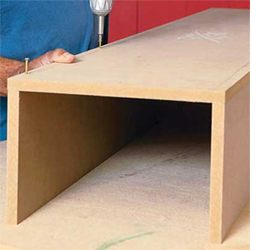
Having all the SupaWood cut to size means less time to assemble and finish this storage headboard. To attach the column front [E] to the sides [F], first place the front on top of the sides and drill 2mm pilot holes at 4 spaced intervals along both side edges. Use a countersink bit before driving screws through the front and into the sides.
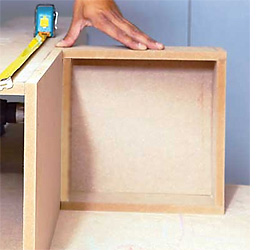
Make the shelf boxes by attaching the sides [K] to the front/back panels [J]. Add the top [H], drilling pilot holes and counter-sinking before driving in screws. You can place these shelf boxes at the same height of your bed. Before you move on to the top shelf unit, apply some wood filler to all the holes (unless you are going to pop on screw caps), so that this has time to dry. You can sand all the filled areas smooth before painting.
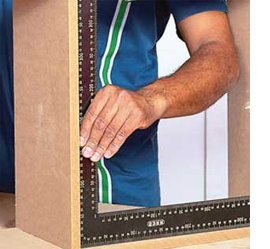
Screw the side panels [C] to the top and bottom sections [A + B], again with countersunk pilot holes. Secure the vertical dividers [D] to the top and bottom [A + B] by measuring the position and using a framing square before drilling through the top and bottom via pre-drilled, countersunk holes. Use panel pins or a staple gun to secure the back panel. Attach the top shelf unit to the top of the columns with 2 L-brackets on the insides of the two columns. Use two brackets per side and two on the front for a secure mounting.
The front of the shelf unit lines up with the front of the columns. It is important to secure the entire assembly (columns and top shelf) onto the wall using battens, wall plugs and screws. Position the unit in place and use a pencil to mark the positions of the columns on the wall.
Remove the headboard and use a drill to secure two battens per column to the wall with wall plugs and screws - 16mm in from your marks - one 100mm down from the top of each column and another 100mm up from the bottom of each column.
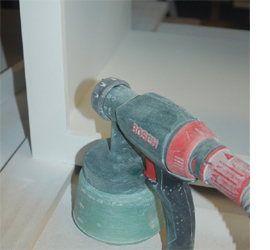
Sand all the cut edges with 240-grit sandpaper until they are smooth and then you can paint the finished units. Double Velvet leaves a nice, wipeable finish that is easy to keep clean. The best way is to use a Bosch PFS spray system, but you can also use a foam paint roller for the flat surfaces and a paintbrush to get into corners and joins. If using a Bosch PFS, add 20% water to the paint mix to thin for the base coat.
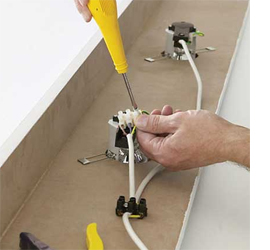
Assemble the valance by screwing the front panel [G] onto the edge of the base [H]. Use a drill and hole saw to drill appropriately sized holes for the low-voltage downlights. Install them based on the manufacturer's instructions, or have an electrician do it for you. Use L-brackets to attach the valance to the sides of the columns and the underside of the top shelf. Place the headboard back into position so that you can drive screw through pre-drilled and countersunk holes in the sides and into wall-mounted battens.