
Build a basic garden shed
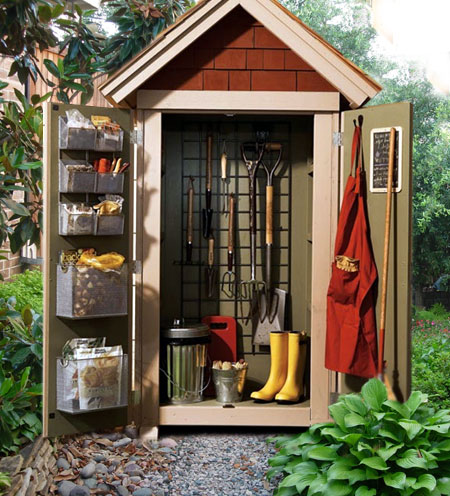
Every home needs a place for garden tools and this small garden shed provides for plenty of storage without taking up too much space. The compact design will fit almost anywhere and you can make the entire shed out of timber and board that you will find at your local Builders Warehouse.
familyhandyman.com
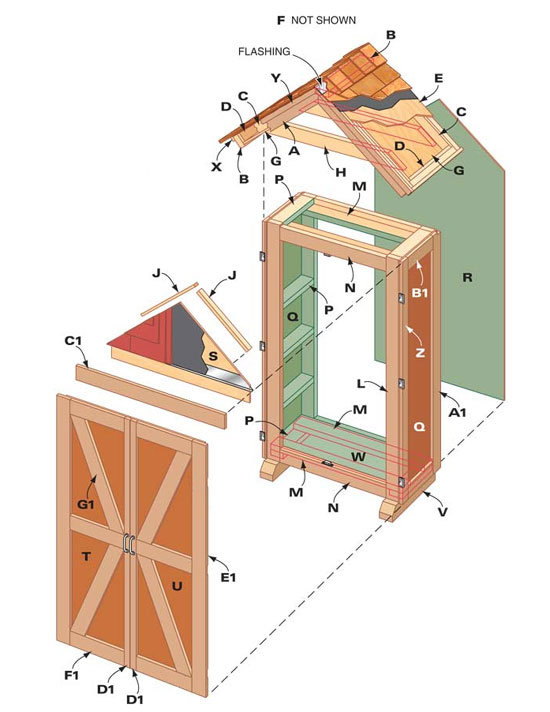
Don't be put off by the cutting list for this project. The shed is made from three components: the roof, the walls and the doors, with edges covered by trim boards. You have the choice of using marine plywood, commercial plywood and fibre cement boards for various outer panelling sections. Marine plywood and commercial plywood can be sanded, stained and sealed, while fibre cement board can be painted. As you start to construct the garden shed the project won't appear as daunting as looking at the cutting list.
YOU WILL NEED:
Hammer
Mitre saw, circular saw or jigsaw
Optional: Brad nail gun
Tape measure
Caulk gun and exterior sealer
Drill/Driver and assorted bits
Framing square
Straightedge
Speed square
Wood chisel
Cutting List:
| A | 4 |
40mm |
90mm |
810mm |
rafters | ||
| B | 3 |
40mm |
90mm |
500mm |
fascia and ridge | ||
| C | 4 |
19mm |
64mm |
470mm |
pine | panel supports | |
| D | 2 |
19mm |
64mm |
470mm |
pine | panel supports | |
| E | 1 |
12mm |
584mm |
810mm |
right roof sheathing | ||
| F | 1 |
12mm |
584mm |
820mm |
left roof sheathing | ||
| G | 2 |
12mm |
500mm |
710mm |
roof panel | ||
| H | 2 |
40mm |
90mm |
975mm |
collar ties | ||
| J | 2 |
19mm |
40mm |
460mm |
pine | front supports | |
| K | 2 |
19mm |
40mm |
584mm |
pine | rear supports | |
| L | 4 |
40mm |
90mm |
1626mm |
studs | ||
| M | 4 |
40mm |
90mm |
914mm |
top/bottom plates | ||
| N | 4 |
40mm |
90mm |
740mm |
rim joists | ||
| P | 10 |
40mm |
90mm |
340mm |
shelves | ||
| Q | 2 |
3mm |
430mm |
1626mm |
side panels | ||
| R | 1 |
3mm |
930mm |
2015mm |
back panel | ||
| S | 1 |
19mm |
910mm |
495mm |
front panel | ||
| T | 1 |
440mm |
1530mm |
left door | |||
| U | 1 |
465mm |
1530mm |
right door | |||
| V | 2 |
100mm |
100mm |
495mm |
footings | ||
| W | 1 |
340mm |
340mm |
910mm |
plywood base | ||
| X | 2 |
19mm |
40mm |
584mm |
roof trim | ||
| Y | 2 |
19mm |
40mm |
840mm |
roof trim | ||
| Z | 2 |
19mm |
64mm |
1626mm |
side battens | ||
| A1 | 2 |
19mm |
90mm |
1625mm |
rear side | ||
| B1 | 4 |
19mm |
90mm |
280mm |
rear side battens | ||
| C1 | 1 |
19mm |
90mm |
974mm |
front trim | ||
| D1 | 2 |
19mm |
40mm |
1527mm |
door edge | ||
| E1 | 2 |
19mm |
90mm |
1527mm |
door edge | ||
| F1 | 6 |
19mm |
90mm |
360mm |
horizontal door trim | ||
| G1 | 4 |
19mm |
90mm |
720mm |
diagonal door trim |
HERE'S HOW:
Assemble the walls
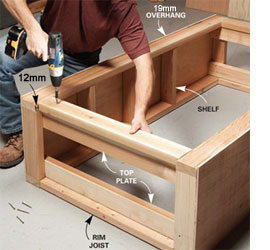
Frame and sheathe the walls, then join them with plates and joists. Use the best pieces of timber in the front where they'll show. Nail together the side walls, then square them with the plywood or fibre cement side panels. Overhang the panels 19mm at the front - this will hide the gap at the corner when you hang the doors.
Join the two sides with the top and bottom plates and rim joists. The sides, top and bottom are all mirror images of each other except for the top front rim joist, which is set down 12mm from the top so it stops the doors (see above). Use screws to fasten the framework together. Screw the 100 x 100mm footings to the bottom plates, then nail on the plywood base.
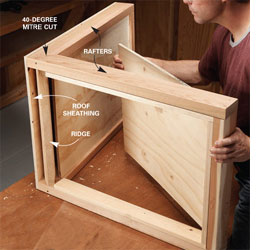
Assemble the roof
Build the roof on your workbench. Start with an L-shaped 50 x 100mm, then add the inside panel supports, inside panel, sheathing and trim. To top off the roof you can use vinyl or cement tiles, fibre cement board cut to size, or fibreglass sheeting.
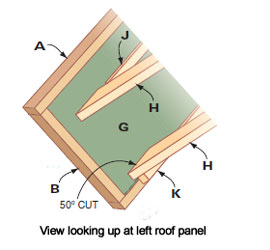
Cut and screw together the two pairs of rafters, then nail on the fascia and ridge boards. Nail on the roof sheathing and the inside panel, butting the corners together. Screw on the collar ties at the points shown in the diagram above, then screw on the front and rear nailers. Nail the roof trim on, then top off the roof.
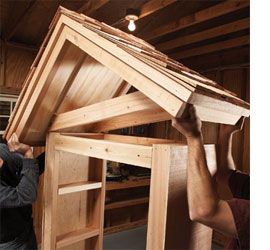
Set the roof
Set the completed roof on the shed base. Screw on the front and back panels to join the roof and the base. Tip the shed upright, then set the roof on, aligning the front collar tie with the front rim joist and
centering it side to side.
Nail the cedar trim to the sides, aligning the 22 x 76mm boards on the sides with the overhanging edge of plywood along the front edge. Glue and screw on the back and front siding panels to join the roof and base together. Use the back panel to square the structure and make it rigid.
Fill the front
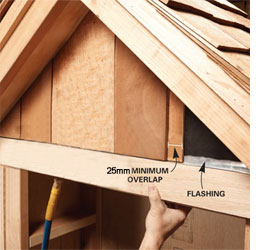
The original project calls for cedar shingles, which are not available in this country. As an alternative you can cut a solid fibre cement panel to cover the front opening, or cut 6mm plywood tiles to fit. Place metal flashing over the trim so water won't seep behind it. Nail on the front trim piece, aligning it with the horizontal side battens. Attach flashing and felt to the front panel, then cover it with cement fibre board or plywood panels.
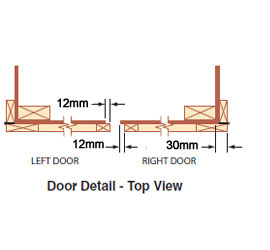
Finally, construct the doors. Cut the hinge mortises and hang the doors. Leave a 3mm gap between the doors and trim along the top.
Stain and seal the shed with Woodoc 30 (inland) or Woodoc 50 (coastal) exterior sealer. Apply according to the manufacturer's instructions. Three coats are required for maximum protection.
Set the shed against the house on a layer of gravel (4 to 5cm thick) of gravel. Add or take away gravel under the footings until the shed is tight against the siding and the gap above the doors is even. Place the shed again a wall or fence to keep it from tipping.