
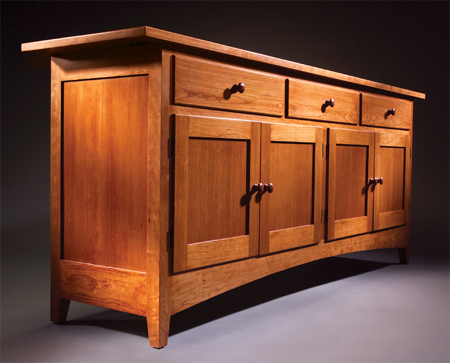
DIY how to make a Shaker sideboard or server
I love Shaker style because it ties in nicely with my love of everything Shabby Chic. Have just bought the plans for this Shaker sideboard or server and intend to make it as soon as I get a chance, but in the meantime here are the plans if you want to make your own Shaker sideboard or server.
Will be organising some Finnish Birch plywood for this project, but not sure yet if I will varnish or paint white with a distressed finish.
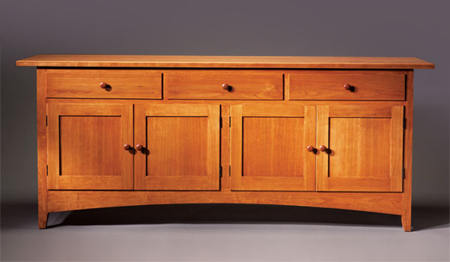
Behind the elegant front and sides of this Shaker sideboard or server is a very easy to build plywood box joined with biscuits*. It’s strong and durable. The front and sides are assemblies that are added onto the box. The result is a beautiful, traditional-looking piece that doesn't require complicated joinery.
NOTE: Substitute biscuit joints with dowels or Kreg Pockethole Jig

YOU WILL NEED:
INNER PLYWOOD CASE
Part |
Item | Qty |
Material |
Dimensions | |
A1 |
Bottom | 1 |
18mm plywood |
400 x 1708 | |
A2 |
Lower partition | 1 |
18mm plywood |
400 x 420 | |
A3 |
Middle divider | 1 |
18mm plywood |
400 x 1708 | |
A4 |
Drawer partition | 2 |
18mm plywood |
400 x 133 | |
A5 |
Subtop | 1 |
18mm plywood |
400 x 1708 | |
A6 |
Side | 2 |
18mm plywood |
400 x 710 | |
A7 |
Back panel | 1 |
6mm plywood |
336 x 1734 | |
A8 |
Shelf | 2 |
18mm plywood |
400 x 840 | |
A9 |
Shelf edging | 2 |
6mm pine |
19 x 840 | |
| OUTER CASE |
|||||
Part |
Item | Qty |
Material |
Dimensions | |
B1 |
Leg | 4 | 44 x 44 pine |
790 | |
B2 |
Centre panel | 2 | 6mm pine |
360 x 546 | |
B3 |
Top panel rail | 2 | 18mm plywood |
76 x 340 | |
B4 |
Bottom panel rail | 2 | 18mm plywood |
114 x 336 | |
B5 |
Top rail filler | 2 | 6mm plywood |
76 x 336 | |
B6 |
Bottom rail filler | 2 | 6mm pine |
114 x 336 | |
B7 |
Top face-frame rail | 1 | 18mm plywood |
35 x 1708 | |
B8 |
Middle face-frame rail | 1 | 18mm plywood |
35 x 1708 | |
B9 |
Bottom face-frame rail | 1 | 18mm plywood |
120 x 1708 | |
B10 |
Drawer divider stile | 2 | 18mm plywood |
35 x 117mm | |
B11 |
Centre stile | 1 | 18mm plywood |
40 x 403mm | |
B12 |
Top (laminated) | 2 | 12mm plywood |
476 x 1975mm | |
| DOORS & DRAWERS | |||||
C1 |
Drawer front | 3 | 18mm plywood | 127 x 556mm | |
C2 |
Drawer side | 6 | 12mm plywood | 114 x 384mm | |
C3 |
Drawer back | 3 | 12mm plywood | 114 x 540mm | |
C4 |
Drawer bottom | 3 | 6mm plywood | 387 x 527mm | |
C5 |
Kicker guide | 6 | 16mm plywood | 25 x 400mm | |
C6 |
Bottom guide | 6 | 9mm plywood | 20 x 375mm | |
C7 |
Centre guide | 3 | 9mm plywood | 20 x 406mm | |
C8 |
Upper rail | 4 | 18mm plywood | 57 x 324mm | |
C9 |
Lower rail | 4 | 18mm plywood | 70 x 324mm | |
C10 |
Stile | 8 | 18mm plywood | 57 x 412mm | |
C11 |
Panel | 4 | 6mm plywood | 323 x 313mm | |
C12 |
Pull - pine dowel | 7 | 30mm dia pine | ||
C13 |
Catch cleat | 2 | 16mm pine | 25 x 100mm | |
6 brass
butt hinge
7 knobs
2 magnetic door catches
Wood glue
Wood filler
TOOLS
Jigsaw,
circular saw or tablesaw
Planer
Router
Biscuit joiner + assorted biscuits*
Random orbit sander + various grits sanding pads
HERE'S HOW:
Build the plywood case
1. Cut the plywood case parts (A1 through A7, Fig A).
2. Assemble the bottom, lower partition, middle divider, drawer partitions and subtop with glue, screws and biscuits.

1. Begin building the sideboard by constructing a simple plywood case using glue, screws and biscuits. When you attach the sides, use a spacer to ensure a precise setback from the case’s front. The legs will fit into the notch that this setback creates.
3. Attach the sides (A6) to the plywood case (A1 through
A5). Use a 25mm spacer board at the front corners to create
a notch for the legs (B1) to fit into. A precise 25mm setback ensures that the face frame, which later
attaches to the plywood case, lines up evenly with the front
face of the legs.
Add the leg panels
4. Make the legs (B1). Cut the tapered foot (Fig. A) with a jigsaw or tablesaw and use a sander to smooth it. Cut a stopped groove for the 6mm centre panel (B2) using a slot cutter on your router table.
5. Cut the stopped rabbet in the back of the rear legs for the back panel (A7) (Fig. A).
6. Make the top and bottom panel rails (B3, B4) and rout grooves in these parts for the centre panel.
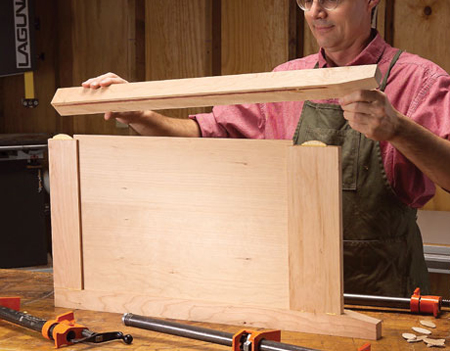
2. Glue the leg panels. The centre piece fits into a groove in the top and bottom rails and legs, and the rails attach to the legs with biscuits.
7. Assemble the leg panels (Image 2 above). Use biscuits and glue to join the rails to the legs. When the glue is dry, clamp the leg panels to the plywood case.
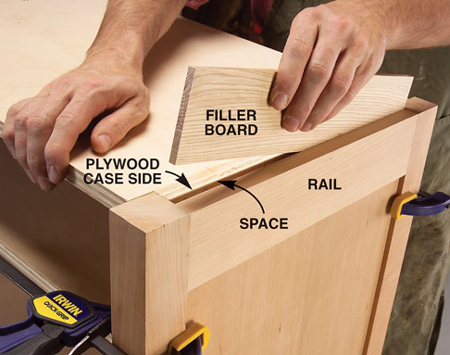
3. Clamp the leg panel to the plywood case. Test-fit the thickness of filler boards in the spaces between the rails and the plywood case side. When the fillers are planed to the correct thickness, remove the leg panel and glue the fillers to its top and bottom rails.
8. Cut filler boards (B5, B6) and test their fit (image 3 above). You’ll need to adjust the thickness of these fillers if the plywood you used for the plywood case sides (A6) is not exactly 18mm thick.

4. Attach the leg panels to the sides of the plywood case. Secure the leg panels with screws for now; you’ll need to remove these parts later.
9. Unclamp the leg panels and glue the filler boards to the inside surface of the rails. When the glue is dry, attach the leg panels to the plywood case with screws only (image 4 above).
Note: Do not use glue at this time. Notice that the screws run through the plywood sides in the drawer opening and below the case’s bottom. These screws are hidden when the sideboard is complete.
Make the face frame
10. Cut out the face-frame parts (B7 through B11). Test-fit
the face-frame rails between the front legs on the cabinet to
make sure they are the correct length.
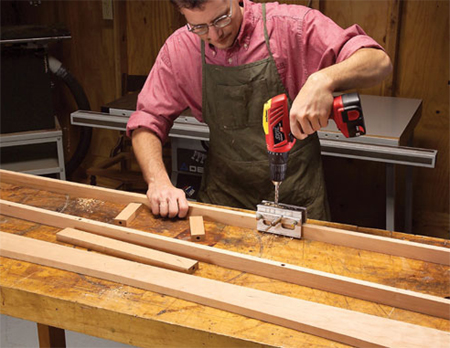
5. Drill dowel holes in the face-frame parts. Only a single dowel is needed at each joint, but you must make sure the joints do not twist during final gluing and clamping.
11. Assemble the face frame with dowels (image 5 above).
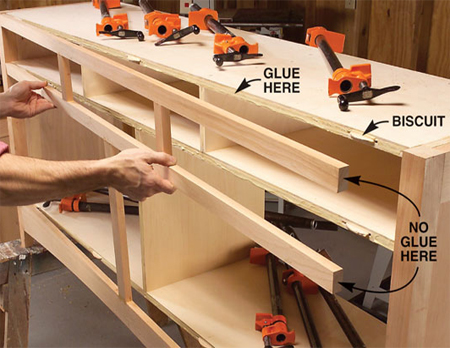
6. Glue and clamp the assembled face frame to the front of the plywood case. Biscuits on the case’s front help with alignment. Don’t put glue on the ends of the rails at this time; you’ll make biscuit joints and glue them in the next step.
12. Attach the face frame to the plywood case (image 6 above). Use biscuits to align the face frame to the plywood case.
Note: At this time, do not put glue on the end of the rails where they meet the legs.
13. After the face frame is attached to the case and the glue has dried, unscrew and remove the leg panels.
14. Cut biscuit slots in the ends of the rails. The middle and top rails are too narrow for a full biscuit. Position your biscuit joiner on the ends of these rails so the slot breaks out at the top of the rail, but not on the bottom. This will produce a slot for a half-length biscuit. The bottom rail is too narrow for two full biscuits. Position the biscuit slots in the ends of this rail close together so they don’t break out at either the top or bottom. Cut the biscuits for these slots to about three-quarters of their length. Cut corresponding biscuit slots in the front legs.
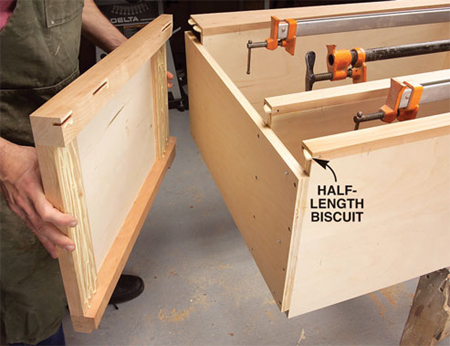
7. Permanently attach the leg panels to the plywood case using both screws and glue. The face-frame rails are joined to the front legs with biscuits. Use half-length biscuits in the middle and top rails and two three-quarter length biscuits in the bottom rail.
15. Apply glue to the filler boards’ inside surfaces, the ends of the face-frame rails and the biscuit slots on the legs. Reattach the leg panels to the plywood case (image 7 above).
Complete the case
16. Glue up the top (B12) and attach it to the plywood case with screws. The holes in the plywood subtop (A5) should be drilled oversize to allow seasonal movement of the top because it’s solid wood.
17. Attach the back panel (A7).
18. Cut the shelves (A8) and glue on their edging (A9).
19. Drill for shelf pins.
Add the drawers
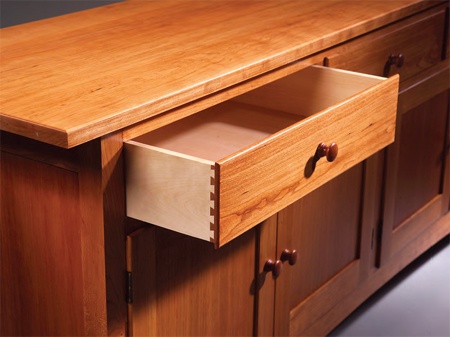
20. Make drawer boxes with lipped fronts (Fig. A). I used a half-blind dovetail jig with a 12mm-dia. 14-degree dovetail bit. My jig produces dovetails on 22mm centres, so I ended up with good-looking half pins on both the top and bottom of the drawer sides.
Note: For the less experienced DIYers, leave out the dovetailing and use wood glue to assemble the drawers. Add panel pins for additional strength once the glue has dried.
21. Groove the drawer sides, back and front for the drawer bottoms (C1 through C4). Round the front edges using a 6mm round-over bit in your router table. Then assemble the drawers.
Note: Again here, the drawer bottoms can be cut to fit inside the frame and then glued and pinned in place.
22. Attach kicker guides (C5) to the inside of the drawer openings. Adjust the thickness of these guides so there is 3mm clearance between them and the top of the drawer sides.
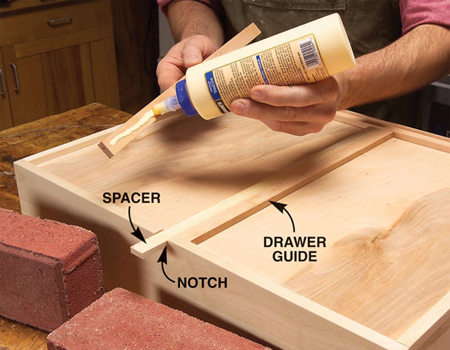
8. Glue guides to the bottom of the drawers. A spacer set in a notch in the drawer back and centred at the front of the drawer keeps the two guides correctly positioned. Use a couple of bricks to hold the guides in place while the glue dries.
23. Cut a notch in the bottom edge of the drawer back for the centre guide (C7). Attach the bottom guides (C6) to the drawer boxes (image 8 above). Use a spacer between the guides to assist with positioning, but slide the spacer out before the glue sets to prevent it from sticking to any glue that squeezes out.
24. Attach the centre guide to the inside of the drawer opening with screws at the front and back. Test the fit of the drawer box. There should be about 3mm clearance along the sides of the drawers.
Build the doors
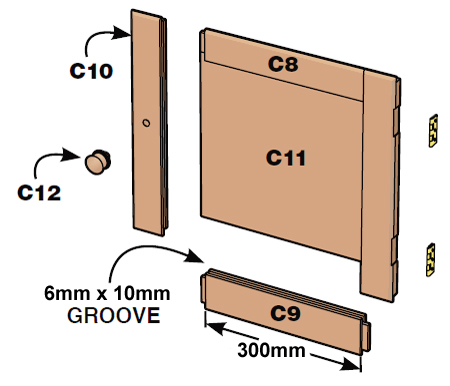
25. Cut out the parts for the doors (C8 through C11). Use a slot-and-tenon cutter to machine the joints.
Note: I will be making my doors the easy way; a solid back panel with thinner frames on top to create the Shaker panel design.
Assemble the doors
26. Round the outer front edge of the doors to match the drawer fronts’ roundovers.
27. Rabbet the top and bottom back edges of the doors (Fig. A).
28. Rout and chisel mortises for the butt hinges in the doors and front legs and hang the doors. (Self-closing European-style hinges can be substituted for the butt hinges.)
29. Drill the doors and drawers for the wood pulls (C12) and install them.
30. Glue the door catches’ cleats (C13) to the back of the centre rail and attach the magnetic catches.

31. Remove the doors, drawers, cabinet back, and hardware and finish-sand all the parts.
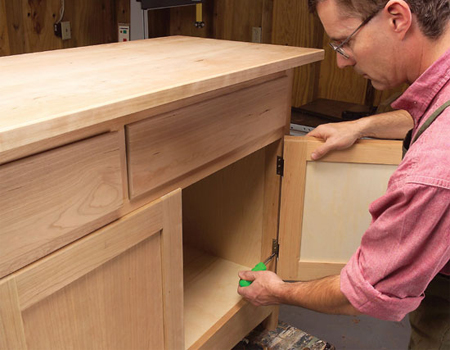
9. Install the hinges and doors. The top and bottom of the doors have a lip, but the sides do not. This allows you to use standard butt hinges. The hinges are mortised into both the door and the case.
Janice Anderssen or Home-Dzine accepts no responsibility for incorrect measurements, plans or diagrams contained in this feature. To allow for inaccuracies, double check all measurements supplied.