
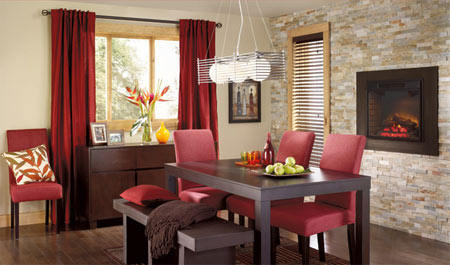
Make an occasional or dining bench
With its clean, simple lines, this occasional bench will make a stylish addition to your dining room. It is easy to build and goes well with all types of decor, whether modern or more traditional. An elegant way to add extra seating around your table!
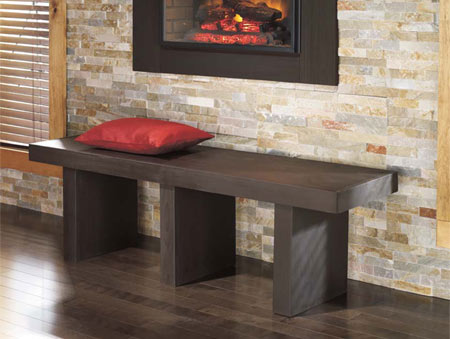
This bench measuring 400 x 1544 x 500mm high is built from solid maple boards and maple-finish plywood. It is assembled almost entirely using wood biscuits, which make invisible joints. Biscuits are small strips of compressed wood that are fitted into slots cut with a special tool known as a biscuit joiner (or plate joiner), which demands a certain level of skill. When the biscuits come into contact with water-based glue applied in the slots, they swell and stay wedged in the slots, holding the structure together.
YOU WILL NEED:
22mm pine cut to sizes as per cutting list
Biscuit joiner
Drill-Driver and assorted bits
Square
Pencil
Tape measure
2 packets #10 biscuits
Wood glue
5 x 30mm cut screws
Woodoc 10 interior sealer and stain concentrate
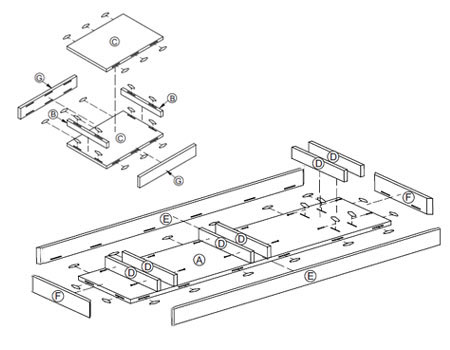
Cutting List
| A | 1 | 400 x 1500mm | Top of bench |
| B | 2 | 100 x 400mm | Top/bottom of leg |
| C | 6 | 400 x 478mm | Side of leg |
| D | 6 | 100 x 400mm | Leg battens |
| E | 2 | 100 x 1544mm | Front/back edge of bench top |
| F | 2 | 100 x 400mm | Side edge of bench top |
| G | 6 | 100 x 478mm | Side of leg |
HERE'S HOW:
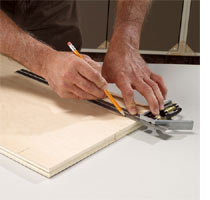
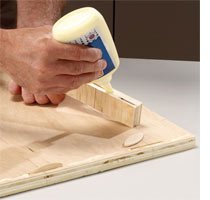
1. On each part, make the marks showing where to cut the slots for the biscuits. The marks should denote the centre of each slot.
2. Cut the slots with the biscuit joiner, aligning the central guide with the marks made on the parts.
DIY Tip
Glue must always be applied to the inside of a slot before inserting a biscuit.
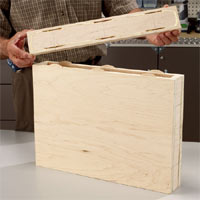
3. To make the legs, insert biscuits into the slots on one of the large leg sides C. Attach two inside leg parts B to the ends of C and fit biscuits into the slots in B. Lay another large leg side C on top of this assembly and insert the biscuits into the empty slots. Slide the small leg sides G onto the biscuits in C to close up the box that makes the leg.
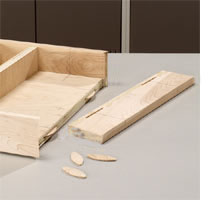
4. Clamp the parts together while the glue dries. Repeat this procedure for the other legs. Insert biscuits into all the slots in the bench top A. Fit leg battens D onto the biscuits on the flat side of A. Affix long edges E and short edges F around the perimeter of A. Clamp the parts together while the glue dries.
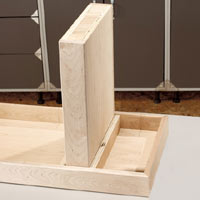
5. Insert the legs between the pairs of brackets. Screw the legs in place through the sides of the leg battens. Now you are ready to stain or paint your bench.
.jpg)
Woodoc Interior Sealer
Use Woodoc 10 Interior Sealer to finish off your project. Easy to apply and fail safe for all users. Woodoc 10 penetrates to form a durable layer of
sealed wood that is bubble and flake free. Imparts a distinctive deep lustre and patina
to all types of wood.
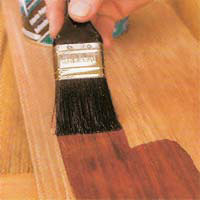
Applying Woodoc 10
Clean the surface with a cloth before application. If adding stain concentrate, slowly stir into the Woodoc 10 sealer. You do not want to create air bubbles as these will mar the finish. Apply with a paintbrush by going with the grain from end to end in one stroke. Let the first coat dry and lightly sand with Woodoc SteelWool before applying the second coat.
Note: Allow each coat to dry thoroughly before applying the next coat.
Clean brush and spray equipment with mineral turpentine.