
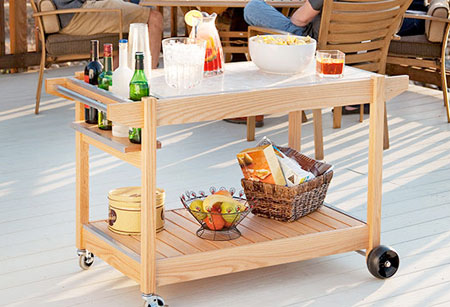
Make this DIY patio trolley
Entertaining friends is easy with this versatile do-it-yourself trolley that’s great for the deck, a patio, or a sunroom. In fact, it's so nice you could even use it indoors as well.
YOU WILL NEED:
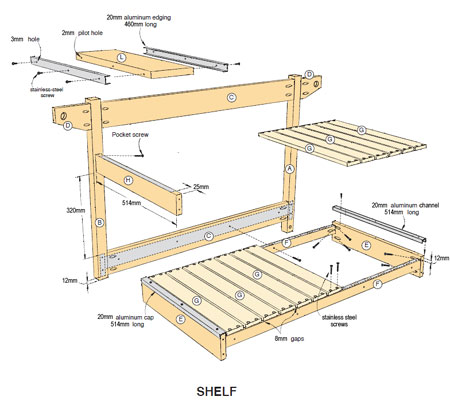
| A | 2 |
front legs | 40 |
40 |
720 |
|
| B | 2 |
back legs | 40 |
40 |
670 |
|
| C | 4 |
rails | 20 |
90 |
910 |
|
| D | 4 |
rail extension | 20 |
90 |
130 |
|
| E | 2 |
shelf base rail | 20 |
90 |
510 |
|
| F | 2 |
shelf cleats | 20 |
40 |
930 |
|
| G | 13 |
shelf slats | 12 |
64 |
510 |
|
| H | 2 |
top cross rail | 20 |
64 |
510 |
|
| I | 2 |
bottle rails | 20 |
40 |
510 |
|
| J | 5 |
dividers | 20 |
40 |
510 |
|
| K | 2 |
tile supports | 20 |
64 |
925 |
|
| L | 1 |
tray | 20 |
64 |
465 |
Natural stone tile (have cut to size after assembling the trolley)
2 x wheels*
2 x locking casters and assembly nuts
25 x 2300mm chrome tube
Wood glue
30mm wood screws
Rust-Oleum polyurethane semi-gloss spray
12mm aluminum angle
22mm aluminum angle
*Threaded steel rod (same diameter as hole for wheels)
2 packs clear self-stick bumper pads
*2 x axle cap nuts
12mm stainless-steel panhead screws
30mm stainless-steel flathead screws
40mm stainless-steel flathead screws
12mm washers
TOOLS
Kreg pocket hole jig
Mitre saw or circular saw
Jigsaw and clean-cut blade and steel blades
Drill/Driver and assorted drill and screw bits, and countersink bit
Tape measure
Square
Clamps
120-grit and 220-grit sandpaper
HERE'S HOW:
Build the sides
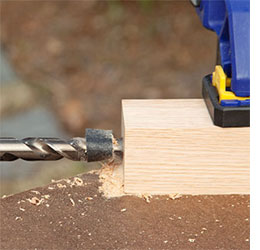
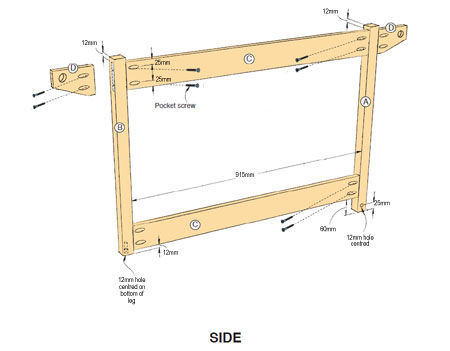
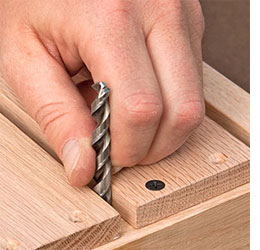
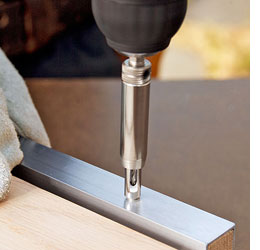
Cut the front legs (A) and back legs (B) from 40mm pine; cut the rails (C) to length from 24 x 100mm planks. Drill pocket holes as shown in the side diagram below and sand the parts with 220-grit sandpaper. Mark and drill 12mm holes 40mm deep, centred on the bottom of the rear legs for the T-nut and casters. To drill the hole, clamp the leg flat on a bench to steady the leg, and use the work surface as an aid to help you drill the hole parallel to the length of the leg by keeping the bit parallel to the bench surface.

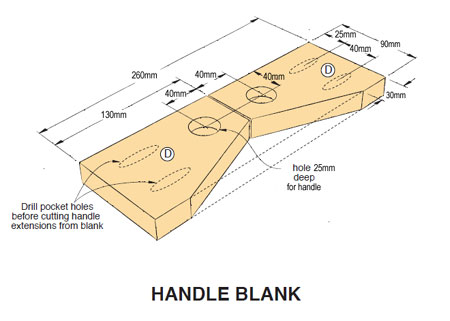
Drill 12mm diameter holes through the front legs for the axle rod - as shown on the side diagram below. For the [D] Handle Blank, cut two pieces of 25 x 100mm to 260mm length to make the handle extensions. Drill the two 25mm holes, 10mm deep on each blank to receive the aluminum handles, and drill the pocket holes located at each end of the blanks. Cut the parts to shape and length using a jigsaw; sand smooth with 220-grit sandpaper. Assemble the sides flat on your bench using glue and pocket-hole screws. The inside face of the legs and rails are flush; this creates a 20mm offset on the outside face of the sides. To make the assembly easy, use a 20mm spacer to lift the rails off the bench so the faces are flush. Note the proper orientation of the legs during the assembly to create a right and left side for the cart.
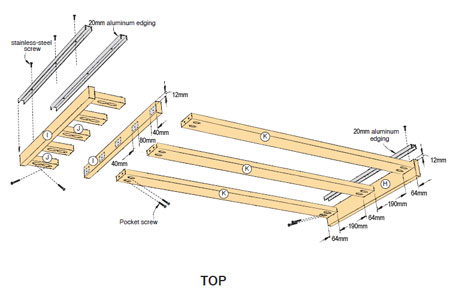
Build the bottom shelf

Measure and cut all the different rails with a jigsaw. If you are using a cut-ott or mitre saw, cut all of the different rails -- base rails (E), cross rails (H), and bottle rails (I) -- with one setup. Use a stop block on your saw and the parts will all match for length and allow the cart to come together perfectly. Set the parts aside and use as needed. Cut the cleats (F) and slats (G) to length and drill the pocket holes where shown on the cross rails and cleats - see shelf diagram below.
You need to allow a 12mm offset so the top of the slats and rails are flush. Use the 12mm thick stock for the slats as a spacer to create the cleat offset below the top edge of the base rails. Do this by assembling the shelf frame upside down on a flat work surface.
Cut the 12mm thick slats (G) to length (the slats are 6mm shorter than the width of the base to create a nice reveal).
Place the slats so there is 3mm between the end of the slat and the outside edge of the cleat. We countersunk the 4 holes in each slat, and then positioned the slats on the cleats.
To create the 8mm spaces between the slats, we used an 8mm drill bit. Position the first slat, and drill a pilot hole and countersink for the screws.
Drive one screw in each end of each slat, and install the remaining slats, spacing the parts with the drill bit and driving one screw in each end of each slat as you proceed. With all of the slats installed, go back and drive the remaining screws. (Stainless-steel are a great choice here for an cart that will stay outdoors because they are corrosion resistant.)
Make the top
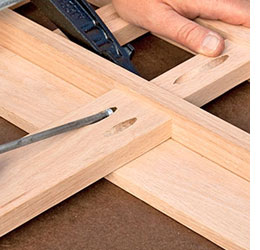
Cut parts for the dividers (J). For the tile supports (K), cut to a length 10mm longer than the combined length of two tiles. This allows you to remove the tiles when you want to clean them. Drill pocket holes on the ends of the dividers and supports as shown - see top diagram below. Lay out the parts of the assembly in their proper orientations and work each part to keep organized. Assemble the bottle rails (E) and the dividers using glue and pocket-hole screws.
The outside edge of the dividers should be flush with the ends of the rails and equally spaced 8mm apart for the remaining dividers -- a piece of scrap 12mm material will hold the dividers down from the top of the rails like we did for the bottom shelf by assembling the top upside down. Complete the top by adding the tile rails and the remaining cross rail to the bottle rail and divider assembly; drill and drive pocket holes as shown. Sand all of the assemblies using 120- and 220-grit sandpaper, taking time to soften the harsh edges of the wood as you go.
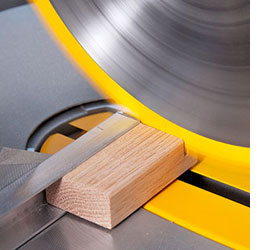
Cut the aluminum edging for the base rails (E), one cross rail (H), and the bottle rails (I) to length with a jigsaw (steel cutting jigsaw blade) or by using a standard carbide-tipped blade in a mitre saw. Use a scrap of 20mm wood placed inside the aluminum while cutting the trim to prevent the aluminum from deforming.
Drill 5mm holes in the aluminum edging for the screws and place the edging in position. Drill pilot holes into the wood using a self-centering bit, and drive the screws to secure the aluminum in position where shown on the bottom shelf - see shelf and top diagrams.
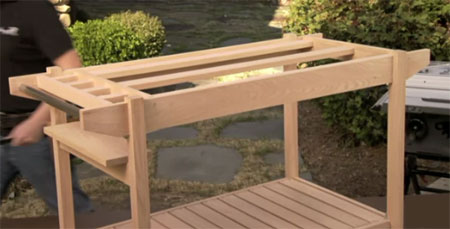
Assemble the trolley
Cut the bottle shelf (L) and the aluminum edging for the tray to length and attach the aluminum edging to the shelf as you did before. Retrieve the remaining cross rail (H) you cut earlier and drill pocket holes on each end. Sand the parts and prepare for the main assembly.
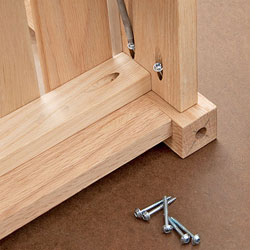
Lay one side of the cart on your bench and position the lower shelf assembly - see shelf diagram. The tops of the slats will be flush with the lower side rails. Secure the shelf using glue and pocket-hole screws through the rails into the front and back legs. Also, predrill and drive screws through the cleats into the side rails. You can use the pocket-hole screws for this as well. Simply drill pilot holes for the screws and secure the cleats to the rails. Using glue and pocket holes, add the cross rail (H) to support the bottle shelf (L) where shown to the back leg 320mm up from the bottom shelf. With the cart still on its side, add the top assembly using glue and clamps. Position the top assembly so the tops of the rails are flush with the top of the side rails (you will drive the screws later).
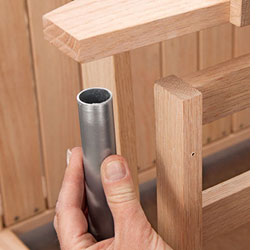
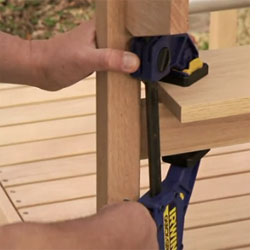
Cut the tubing to length for the handles. Use 22-grit sandpaper to sand the aluminum to create a brushed finish; place the handles in the holes of the handle extensions (D). This is a good time to remove the other aluminum pieces and scuff the finish of these parts as well. Place the second side in position and guide the aluminum handles into the second side; secure using glue and clamps, guiding the handle into the hole of the handle extensions. Clamp until the glue dries.
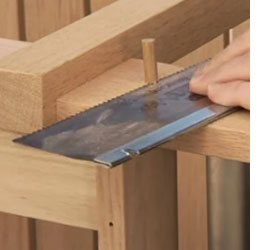
Stand the cart on its legs and drill 6mm-deep countersunk holes where shown to permanently attach the two side assemblies to the top; drive screws through the sides into the rails. Cut 25mm long plugs from a dowel sized to match the countersunk holes. Glue a plug into each hole. Trim the plugs flush with a handsaw and sand smooth.
Lay the cart on its side and secure the lower shelf using pocket-hole screws as you did when you first installed the shelf to the first side. Glue the bottle shelf into position on the rail (I), centering the bottle shelf on the rail’s length and width. Clamp and allow to dry.
Prepare the cart for finishing by giving the entire project a light sanding then wipe clean with a tack rag. Apply Rust-Oleum polyurethane spray varnish to protect the cart from moisture. Apply three coats for protection.
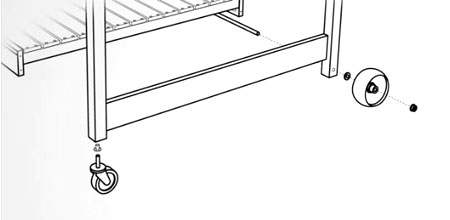
Reinstall the aluminum edging with screws. Flip the cart upside down to install the casters. Drive a T-nut into the bottom of the back legs (B). Thread the stem caster into the T-nut and tighten.
For the front legs, add an axle cap nut to one end of a 12mm steel rod and add the wheel and a washer; slip the other end through the back legs. When the axle comes through the second leg, add a washer and a wheel and mark the axle 12mm from where the axle protrudes from the wheel. Remove the rod and cut using a jigsaw and steel blade. Reinstall the axle and add the washer, wheel, and remaining cap nut. A 20mm socket works great for driving the axle cap nut in place.