
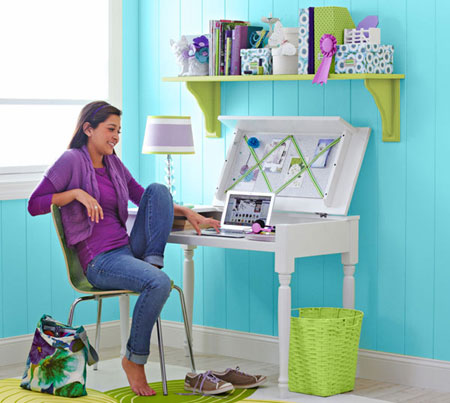
Make a lift-top computer desk
This sleek computer desk looks great in a home office, but it’s also perfect for a teen’s room. So why not spend the weekend with your son or daughter building a pair of them?
YOU WILL NEED:
A |
1 |
20mm pine |
140mm |
940mm |
back apron | |
B |
2 |
20mm pine |
140mm |
380mm |
side aprons | |
C |
1 |
20mm pine |
140mm |
200mm |
front apron | |
D |
4 |
60mm pine |
60mm |
740mm |
legs | |
E |
1 |
20mm pine |
90mm |
1070mm |
hinge board | |
F |
1 |
20mm pine |
420mm |
270mm |
fixed top | |
G |
1 |
20mm pine |
420mm |
800mm |
lid | |
H |
1 |
20mm pine |
350mm |
1000mm |
bottom | |
I |
1 |
20mm pine |
40mm |
940mm |
trim | |
J |
1 |
20mm pine |
90mm |
90mm |
stop-block | |
K |
1 |
20mm pine |
140mm |
730mm |
lid apron | |
L |
2 |
20mm pine |
40mm |
370mm |
cleats | |
M |
1 |
20mm pine |
20mm |
305mm |
lid support |
Self-mortise hinges
Wood screws
Pine table legs
Wood glue
Masking tape
Double-sided tape
Acrylic PVA for base coat
Rust-Oleum 2X semi-satin white
TOOLS
Mitre saw or mitre box and backsaw
Jigsaw with clean-cut blades
Drill/Driver with assorted bits and countersink bit
Kreg pocket-hole jig kit,
Random orbit sander with 120- and 220-grit sanding pads
Carpenter’s square
Clamps
Paintbrush and rags
Putty knife or paint scraper
HERE'S HOW:
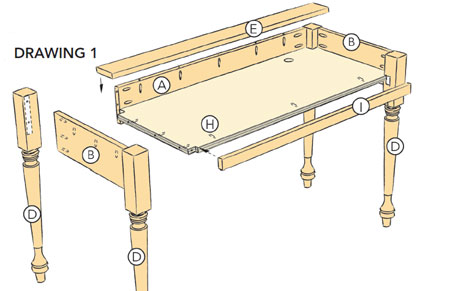
1. Cut the back apron A, side aprons B, and front apron C to length. Drill pocket holes on the ends of the aprons and along the top edge of the left side and back aprons.
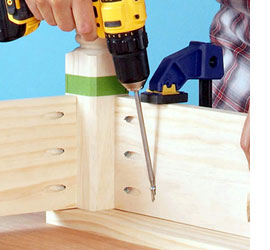
2. Sand the legs D and aprons with 120- and then 220-grit sandpaper. Place masking tape on the legs to mark the 6mm inset from the face of the leg to the aprons. This avoids marking directly on the wood. When the assembly is complete, remove the masking tape.
GOOD TO KNOW
Remember to sand turned legs with the grain, not around the shape. Use a loose piece of sandpaper for fast results.

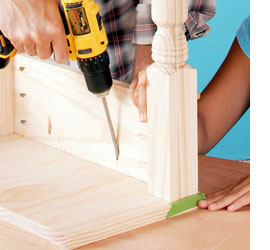
3. Apply glue to the ends of the aprons, position them against the legs, and secure with pocket-hole screws. Begin with the back apron and back legs, and then add the side aprons and the front legs.
4. Cut the hinge board E to length and sand to 220 grit. Place the hinge board and a couple of 20mm-thick scraps on your work surface, and place the table upside down on the parts with the legs inset from the edges of the hinge board by 6mm. Secure the table to the hinge board with glue and pocket screws.
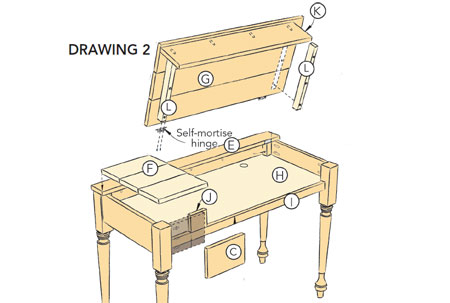
5. The top of the desk is made from three boards glued together edge to edge. The boards for the fixed top F are 270mm long, and the boards for the lid G are 800mm long. Glue boards edge to edge with the ends flush.
GOOD TO KNOW
To help align the surface of the boards when making a wide panel, clamp scraps to the top and bottom faces of the panel. Apply masking tape to the edges of the scraps to prevent the glue that squeezes out from between the boards as you clamp them together from bonding the scraps to your panel.
6. After the glue has set for 30 minutes, remove the clamps and peel excess glue using a putty knife. Set the panel aside to cure overnight, then sand the panels with 120- and 220-grit sandpaper. Enlarge the pilot holes from the pocket holes drilled in the left side apron where it attaches to the top.
GOOD TO KNOW
Wood expands and contracts across the width of a board with changes in humidity and temperature. If the lid expands and it’s glued to the side apron, the wood will split. What to do? Drill a 5mm oversize pilot hole inside the pocket hole in the apron. This lets the head of the screw pivot and allows the top to move without causing cracks.
7.Glue the fixed top to the hinge board - be sure to align the left end of the parts flush. Use scraps clamped across the joints to help keep the boards flush.
8. Sand the fixed top/hinge board joint smooth and secure the left apron to the fixed top.
9. To hide the screws inside the desk, fill the pocket holes using glue and wood plugs.

GOOD TO KNOW
Pocket screws are a great way to build a project, but how do you hide the holes? Use dowels cut at an angle to fit into the holes and sand them flush with a sander. Because they are made of wood, the plugs will accept paint or stain in preparation for a good finish.
10. Add the front apron to the left leg - inset the apron 6mm from the leg face. Secure with glue and pocket screws.
11. Cut the pine for the bottom H to size. Lay out and cut the notches on the corners of the bottom with a jigsaw - the notches fit around the legs. Drill a 40mm hole for cords and cables near the back edge of the bottom.
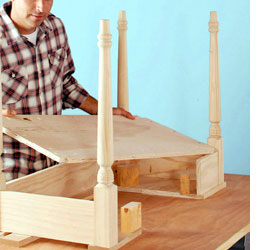
12. Drill pocket holes around the perimeter of the bottom, sand the pine, and insert into the table. Use four 90mm-tall spacers placed on the bench to position the bottom in the table base. The spacers ensure that the bottom is installed level inside the desk.
13. Cut the trim I to fit between the front legs. Apply glue to the front edge of the bottom H and slip the trim into place. Align the top edges of the parts; secure with pocket screws through the holes in the bottom into the trim.
14. Cut the stop block J to length, sand it, and glue it to the inside face of the front apron, 130mm from the leg. The block supports the left end of the lid.
15. Cut the lid apron K to length, drill pocket holes for securing to the lid G, and sand the part. Secure to the bottom face of the lid, flush on each end, so the face of the apron is set back 12mm from the front edge of the lid. Install plugs in the pocket holes using glue; sand smooth when the glue has cured.
16. Cut two lid cleats L to length, sand, and screw them to the bottom face of the lid. Inset the cleats 40mm in from the left end, and 80mm from the right end of the lid. This connection has wood movement potential similar to the side apron and fixed lid, so secure the cleats with screws only.
17. Place the lid on the desk with a 3mm gap between the lid and the fixed top F. Install the hinges connecting the lid to the hinge board, locating the hinges 60mm from each end of the lid.
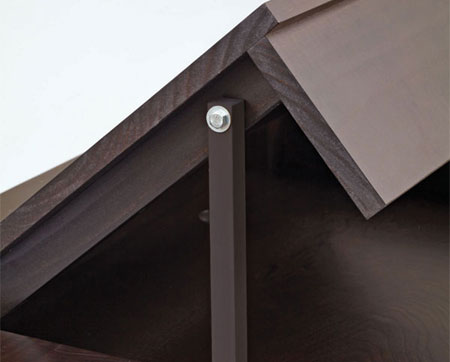
18. To prevent the lid from closing too fast, make a lid support M, which can be easily swung out of the way for closing. Cut a 20mm square dowel to length for the lid support. Position the part against the left lid cleat and drill a 6mm hole; smooth the edges with sandpaper. Install using the hardware shown.
Mounting hinges
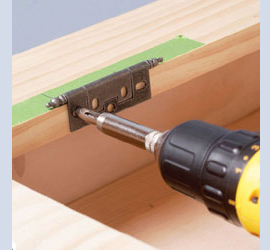
A. Mark out the location of the hinge on the lid and the frame. Place masking tape on the wood to lay out the hinges. This prevents unnecessary marks that will have to be removed later.
B. Align the hinge with the layout mark on the frame, holding it in place with double-sided tape.
C. Remove the hinge from the frame and relocate it to the lid. Align the hinge with the layout mark on the lid and secure with double-sided tape. Drill pilot holes in the edge of the lid.
D. Remove the hinge, peel the tape from the hinge, and drive the screws. Use a slower speed setting on your drill/driver when installing the screws to avoid stripped heads and broken screws .
Finishing
- Remove the hinges and lightly sand the entire piece in preparation for the finish. Wipe with a clean cloth and decide what finish to apply.
- For a painted desk, apply primer, let dry, sand the primer, wipe with a clean cloth, and apply two coats of satin or sheen.
- Alternatively, use Rust-Oleum 2X Painter's Touch spray paint in your choice of colour. Take the project outdoors or into a well-ventilated space and cover the floor with a dropcloth or newspaper.
- For a more natural finish, apply Woodoc 5 or 10 following the manufacturer’s instructions. Lightly sand the piece, wipe with a clean cloth, apply clear sealer or combine with the stain colour of your choice.