
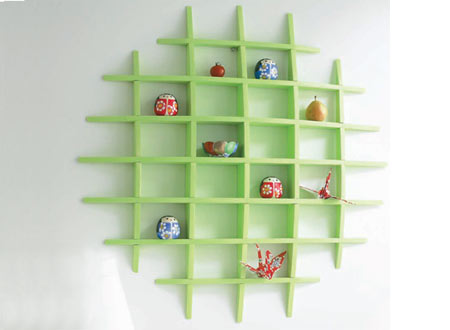
Make a knick-knack shelf
This designer-style shelving features 12 interlocking fins which can be modified for larger ornaments by reducing the number of shelves.
YOU WILL NEED:
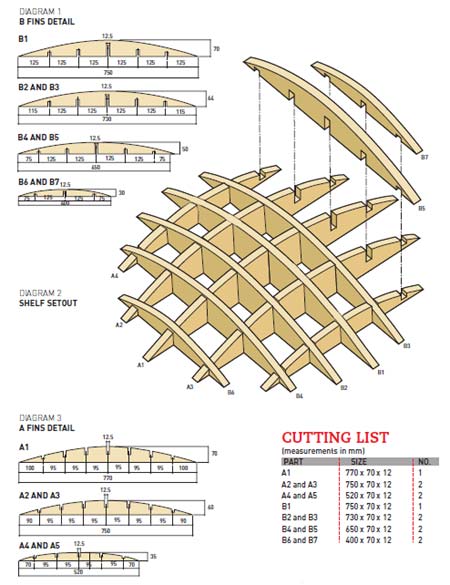
See cutting list below* *You can use pine or Supawood for this project
Tape measure
Pencil
Clamps
Bench vice
Steel rule
Jigsaw and fine-cut blade
12mm wood chisel
Sanding block
120-grit and 240-grit sandpaper
Ponal wood glue
Rust-Oleum Painters Touch - in choice of colour
fischer UX universal plug and screws
HERE'S HOW:
1. On A1 and B1, mark a centre-line for the base of the centre notch and a centre-line across the width. Working
from the centre, measure 125mm to mark the centre of each notch for B1 and 95mm for A1, then mark the notches.
2. Position A1 in a vice, securing a small clamp at each end. Position a one-metre steel ruler against the clamps, bending it to the opposite
edge, marking a curve. Repeat for B1, reversing the curve. Cut the curves with a jigsaw.
3. Mark A fins with cross-halving notches from the top edge and the B fins with notches from the bottom. Use a jigsaw to cut along the lines,
removing waste with a 12mm chisel.
4. Join A2 and A3 at one corner with a small nail. Position the centre of A1 at the centre-line of A2 and A3 to transfer the joints, repeating
for A4 and A5. Cut the notch with a jigsaw and tidying with a chisel.
Notches are half the timber depth.
5. Pair up fins B2 to B7 and mark up the notches using B1 as a template. Use a jigsaw and 12mm chisel to cut the notches. Mark the B curves, flexing a steel ruler, cutting with a jigsaw. Intersect the fins, marking A fins above the B fin joint.
6. Remove the A fins, clamp and use a steel ruler to join the marks into a single curve that passes through the joints, cutting with a jigsaw.
7. Position A and B fins together, sanding to remove any protrusions to create smooth, curved intersections. Smooth the entire
front of the unit using a sanding block and 120-grit sandpaper.
8. Disassemble unit to sand the fins with 240-grit sandpaper, wipe clean and spray with Rust-Oleum Painters Touch. Apply Ponal wood glue inside
the joints and reassemble without attaching B6 and B7.
9. Drill pilot holes and countersink a 5mm hole into the outer joints of A1, A2 and A3. Mount the shelf on the wall, into wall studs, using
fischer universal wall plugs and screws, positioning B6 and B7 to cover the screws.
handyman magazine