
Increase storage space in a garage
This project shows how to make narrow roll-out shelves and while you may not find the exact same mechanism to install there are alternatives.
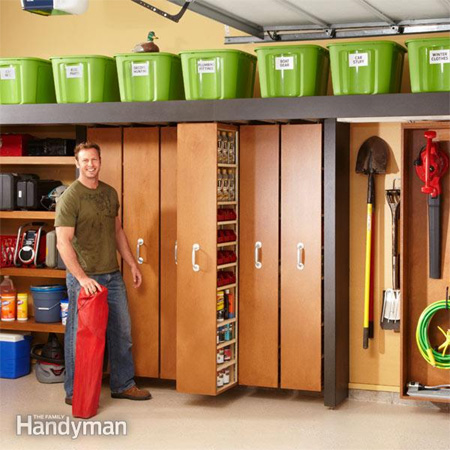
When the garage is the only place in a house that has space for storage - or to use as a workshop - finding enough space to move around and work can be a problem. I found this project on Family Handyman that shows how to make narrow roll-out shelves and while you may not find the exact same mechanism to install there are alternatives.
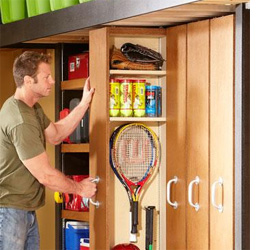
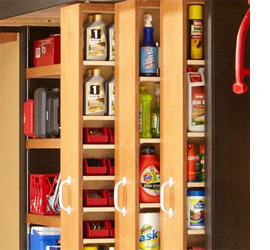
The secret to this roll-out shelving system are the double-sided roll-out shelves that allow access from both sides and only taking up a narrow space. The roll-out shelves replace standard shelving and offer an easy way to access all your paint, screws and tools. When the shelves are pulled out, everything is in full view and easily accessible. Plus, the garage looks neat and tidy when the shelves are pushed back in.
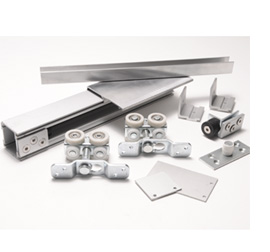
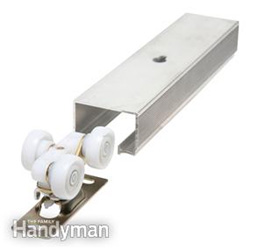
As an alternative to imported systems, www.hillaldam.net are a South African manufacturer that offer a selection of sliding track fittings. You will need to get in touch with them to find a local supplier in your area. Their Straightaway 200A shown above is a top hung sliding hardware for interior aluminium or timber doors up to 200kg, and they have smaller versions if you are not going to be storing heavy items, such as paint cans, etc.
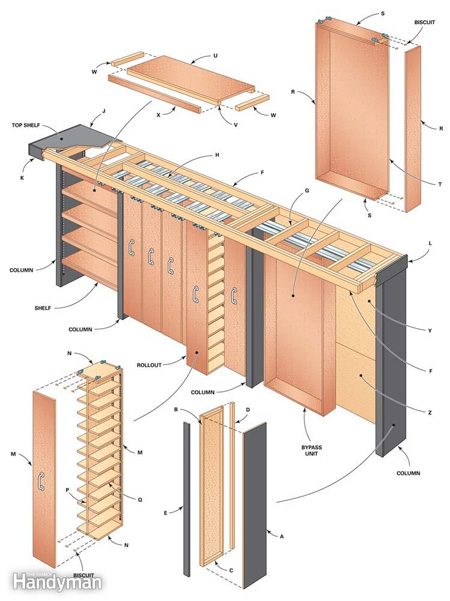
Don’t worry if you’ve also got some large items to store. The 4,8 metre.-long top shelf is 80cm deep to hold big storage containers, and there’s a 90cm.-wide section of 40cm-deep shelves for medium-size items. The storage unit is 4,8 metres long, 213cm tall and 40cm deep.
Expect to spend three or four days building this project. It’s not complicated or difficult, but there are a lot of parts to cut out and assemble. For the most part, we used standard carpentry tools, but we used a table saw to cut the BisonBord. You can have all the BisonBord sections cut at your local Builders Warehouse - reducing the time spent on cutting. You will also need a biscuit joiner and pockethole jig to assemble the rollouts and bypass unit. The latter tools are optional, though. You can substitute screws and glue for the biscuit joints. You can also nail through the face of the cabinets to secure the divider rather than use pocket screws.
YOU WILL NEED:
QTY |
W |
L |
MATERIAL | ITEM | |||
A |
8 |
387 |
2030 |
18mm BisonBord** | Column sides | ||
B |
8 |
40 |
2030 |
18mm BisonBord | Column spacers | ||
C |
8 |
40 x 40 |
310 |
PAR pine | Column spacers | ||
D |
4 |
40 x 40 |
2030 |
PAR pine | Column spacers | ||
E |
4 |
80 |
2030 |
18mm BisonBord | Column face trim | ||
F |
3 |
50 x 100 |
4880 |
PAR pine | Top shelf | ||
G |
15 |
50 x 100 |
700 |
PAR pine | Top shelf | ||
H |
2 |
50 x 100 |
1924 |
PAR pine | Top shelf | ||
J |
2 |
813 |
2438 |
18mm BisonBord | Top shelf - top | ||
K |
2 |
146 |
2438 |
18mm BisonBord | Top shelf - face trim | ||
L |
2 |
146 |
820 |
18mm BisonBord | Top shelf - end trim | ||
M |
12 |
300 |
1892 |
18mm BisonBord | Rollouts - sides | ||
N |
18 |
300 |
368 |
18mm BisonBord | Rollouts - tops/bottoms | ||
P |
6 |
368 |
1835 |
18mm BisonBord | Rollouts - divider | ||
Q |
132 |
140 |
356 |
18mm BisonBord | Rollouts - shelves* | ||
R |
2 |
203 |
1892 |
18mm BisonBord | Bypass unit - sides | ||
S |
3 |
203 |
775 |
18mm BisonBord | Bypass unit - tops/bottoms | ||
T |
1 |
775 |
1835 |
18mm BisonBord | Bypass unit - back shelves | ||
U |
5 |
368 |
1010 |
18mm BisonBord | Shelves - tops | ||
V |
10 |
40 x 40 |
1010 |
PAR pine | Shelves - top/back frame s | ||
W |
10 |
40 x 40 |
292 |
PAR pine | Shelves - side frames | ||
X |
5 |
57 |
1010 |
18mm BisonBord | Shelves - face trim | ||
Y |
1 |
1626 |
1220 |
18mm BisonBord | |||
Z |
1 |
1626 |
711 |
18mm BisonBord |
*Adjust to your requirements - this includes 22 shelves for each rollout.
**Note: The original plan called for 19mm thick board. Allow for any adjustments by adding shims/washers to fill gaps.
52 hangers - 4 of track 2438mm - 2 of track 1830mm
548 shelf pins
30mm, 75mm and 16mm wood screws
4 T-nuts
4 leg levellers (adjustable feet)
Wood glue
Panel pins
24 Nylon wall plugs and screws for mounting to wall
Handles
TOOLS:
Hammer
Drill/Driver and assorted bits
Countersink bit
Optional (if cutting own board): circular saw, mitre saw or table saw
Electronic detector
Biscuit joiner and biscuits
Spirit level
Framing square
Jigsaw
Stepladder
Orbital sander and assorted grit sanding pads
Pocket hole jig
Safety glasses
HERE'S HOW:
Have all your sections cut to size at Builders Warehouse for easy assembly of all parts. The total cost for this entire unit works out at around R3000, but you can reduce the size to cut down on the total cost.
Open the enlarged drawings and print these out .
Note: Abbreviations - o.c = on centre
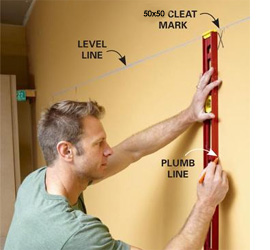
Mark the wall
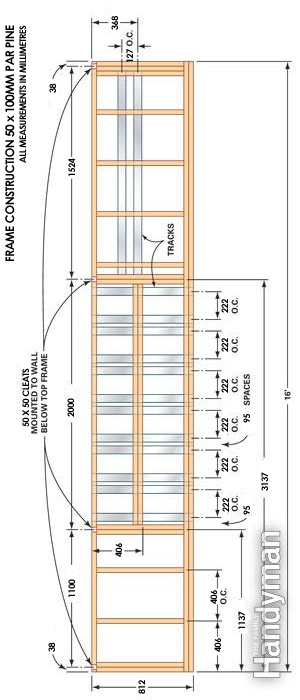
Mark the location of the top shelf and columns on the wall before you start building. This allows you to check for obstructions and double-check the height of the columns. Make a level line to indicate the bottom edge of the top shelf, and then mark the location of all four columns. Draw plumb lines to mark the edge of the 50x50 cleats.
Next, use a level to see if the garage floor slopes. We used a laser level to establish level reference points on each end and measured up from these points to mark the endpoint of the horizontal layout line. Then we snapped a chalk line between these points to indicate the bottom edge of the shelf and the top of the columns.
You could also use a line level across the wall to mark the level line. If your garage floor slopes more than 2cm from one end of the unit to the other, you’ll have to build some of the columns a little taller. Check this out by measuring down from the level line at each end.
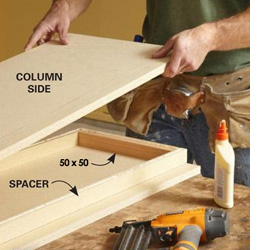
Assemble the columns
Wood glue creates a strong bond on BisonBord and makes a strong assembly. Use panel pins to hold the parts together until the glue sets.
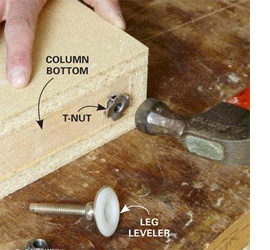
Install leg levellers
Garage floors tend to be damp and unlevel. Adjustable leg levellers on the bottom of each column keep the columns dry and adjust to sloping floors.
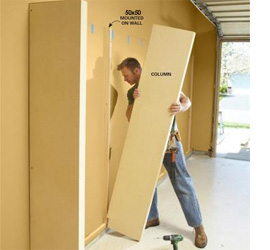
Install the columns
Slip the columns over cleats mounted to the wall. We had to notch the bottoms of the columns to fit around the skirting. It's easy to adjust the height and plumb the face of the column before screwing it to the cleat.
Adjust the leg levellers until the tops of the columns are even with the horizontal line. Then set a level against the front edge to make sure the column is plumb. You can slide narrow shims between the wall and the back edge of the column if necessary to plumb the column. When the column is plumb and the top is even with the level line, drive screws through the side and into the cleats.

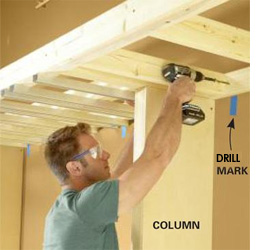
Attach the tracks to the shelf frame
To avoid working overhead later, screw the tracks to the shelf before you install it. Screw 50 x 100s together to make the top shelf. It’s easier to attach the aluminum tracks to the shelf before you lift it onto the columns. Use the dimensions in Figure B to lay out the track locations.
Cut the tracks to 812mm with a hacksaw. Then drill holes for the mounting screws. Attach the tracks with pan head or washer head screws. Mark the locations on the wall.
Lift the shelf onto the columns and screw it to the wall with nylon wall plugs and screws. Screw 19mm BisonBord to the top of the shelf frame. Check with a framing square to make sure the columns are at a right angle to the wall before you toe-screw the front of the columns to the shelf frame.
Set the frame on the columns
Align the ends of the shelf with the outside edges of the columns and screw it to the wall using nylon (Fischer) wall plugs.
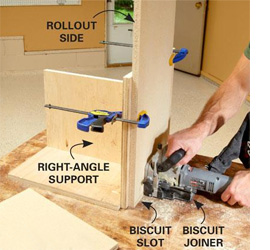
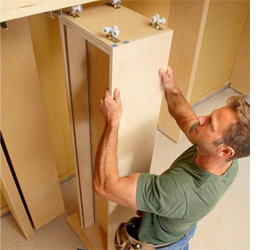
Cut biscuit slots in the rollout parts
Cut three biscuit slots on the face of the sides and matching slots on the ends of the top and bottom. The right angle support allows us to use the workbench top to support the biscuit joiner.
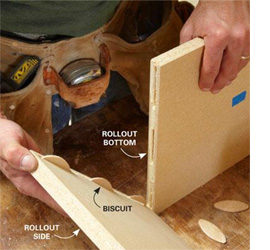
Assemble the rollouts
Join the sides to the top and bottom of the rollouts with biscuits and wood glue. Glue and clamp the sides to the top and bottom. Glue a second layer of BisonBord to the top for extra strength and to allow for the 40mm. roller mounting screws.
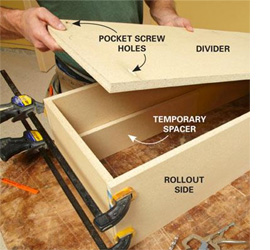
Install the rollout divider
Use spacers to support the divider while you screw or nail it to the sides of the shelf. Vary the size of the spacers to create different-width shelves. Photo shows how to support the centre divider with spacers while you attach it with pocket screws. If you don’t have a pocket screw jig, just drive finish nails through the front and back of the rollout to secure the divider.
You can adjust the position of the divider to accommodate your items. We moved one off-centre to allow for 178mm-deep shelves and built another unit with full-depth shelves. Use the same method to build the large bypass unit.
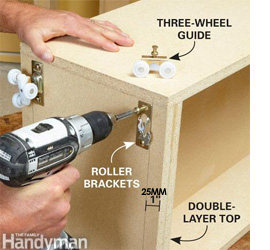
Mount the rollers
Adjustable rollers allow you to fine-tune the rollout shelves after they're installed. Each pair of rollers is rated for 200kgs.Draw lines 25mm from the edge as guides for the brackets. Drill pilot holes and attach the brackets with screws. Position the shelf standards about 20mm from the front and back of the cabinet.
Install the rollouts on the tracks
Slide the rollers into the tracks to hang the rollout shelf. It's easy if you pile up some scraps to support the heavy rollout while you align the rollers. We used different techniques to hang the rollout shelves and the bypass unit. For the rollouts, it’s simpler to connect the rollers to the top of the shelf first and then slide the wheels into the tracks (shown above). For the bypass unit, install the rollers in the track before you mount it, and then hang the bypass by sliding the rollers into the mounting brackets.
To prevent the rollers on the rollout shelves from bumping into the face trim, screw 40mm-square blocks of BisonBord to the outside end of each of the rollout shelf tracks. After all the rollouts are hung, adjust the rollers until the spaces between rollouts are even and the faces are flush when they’re pushed in.
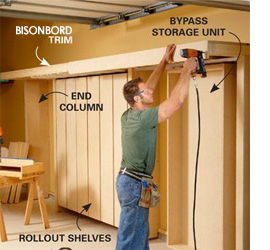
Add the finishing touches
Finish up by nailing strips of Bisonbord over the front edge of the top shelf and the face of the columns. You can stain or paint the Bisonbord or just brush a coat or two of polyurethane over it. Two 2440mm pieces will just cover the front edge. Then overlap the side pieces at each end. We also screwed sheets of BisonBord to the wall behind the bypass unit to provide an attachment surface for hooks and other hanging hardware.
We stained the columns and trim black, and the face of the rollouts and the bypass unit with brown stain. When the stain was dry, we brushed two coats of polyurethane sealer over the whole works to provide a little sheen and extra protection. If you plan to stain and finish the storage unit, consider doing it before you assemble the parts. It’ll save you a lot of time and effort.