
Wood Finishing Tips
A fine finish is the crowning touch that brings out the beauty of wood, but finishing wood is tricky business. Even master woodworkers get a little nervous when the time comes to finish their projects. That's why they don't rush the job.
Bitter experience has taught them that extra attention to the key steps in the process saves time and trouble. This article will describe those key steps, warn you about some common pitfalls and offer tips for a smooth, successful finish.
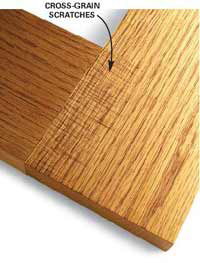
Sand with the grain when hand-sanding or using a belt sander. Scratches are hard to see when they run parallel to the grain. But even the lightest scratches across the grain are obvious, especially after staining.

Hand-Sand the Curves
Sand curved surfaces and other areas an electric sander can't reach by hand. Treat all areas equally, using the same progression of sandpaper grits for both hand and power sanding.
Progress From Coarse to Finer
Progress from coarse to finer and finer sandpaper. Whether you're sanding by hand or using a power tool, start with 80-grit to sand away blemishes, then use 120-grit and finally 180-grit. Using these exact grits isn't vital (100-150-180 works too), but it's important to progress in steps, removing deeper scratches and leaving finer scratches each time.
Don't Sand Through the Stain
When sanding between coats, it's easy to rub right through the clear coat, removing the stain below. So sand super lightly after the first coat, just enough to cut down any dust whiskers on the surface. If there are bigger problems "such as runs" deal with them after the second coat when you can sand a bit harder. To repair rubbed-through spots, just apply new stain. Immediately wipe away any stain that gets on the surrounding polyurethane.
Sand Without Leaving Scratches
A random orbital sander leaves scratches that are practically invisible, so you can sand across joints where grain changes direction. But move slowly and apply light pressure. Otherwise, you'll get swirly scratches.
Watch for Blotchy Wood
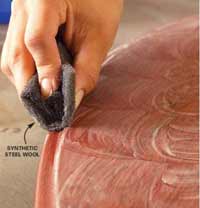
Some woods absorb stain unevenly, which causes dark blotches to appear. Birch, maple, pine and cherry can all play this ugly trick on you. It's hard to eliminate this effect, but you can limit it by applying a coat of sealer before staining. This also prevents the end grain from absorbing more stain than the face grain. When sanding between coats, smooth curves with a steel wool substitute such as 3M's Scotchbrite pads. Steel wool leaves fibres behind, which can cause stains in the finish.
Better Brushes Are the Key
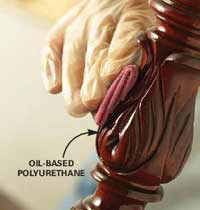
Usually, a brush is the best tool for applying polyurethane. For water-based poly, a synthetic brush (such as nylon or polyester) is best. For oil-based poly, use a natural-bristle brush. Quality brushes hold more finish, lay it on smoothly and are less likely to leave lost bristles in your clear coat. If you clean your brush immediately after use, it'll serve you well far into the future.
Get Rid Of Dust
Dust settling on wet polyurethane will give your finish the look and feel of razor stubble. So clean the area you're working in and let the dust settle. Then dust the workpiece with a soft, lint-free cloth. Don't use tack cloth, it can leave a residue that interferes with adhesion.
Leave Mistakes Alone (Usually)
When you notice a run, missed spot or other problem in the polyurethane you applied minutes earlier, you'll be tempted to brush it out. Don't. The finish may look wet, but chances are it's already sticky, and brushing will only make a mess. There are a couple of exceptions to this rule: You can pop tiny air bubbles with a pin, and you can pluck out a hair, a lost bristle or unfortunate fly using sharp tweezers and a steady hand.
Sand Between Coats
Lightly sand between coats with 400-grit wet/dry sandpaper, which won't fall apart when it gets wet. A little water provides lubrication and keeps the finish from clogging the paper. Sanding after each coat (except the last) rubs out imperfections and roughens the surface for better adhesion of the next coat. In most cases, this is a quick job, more like wiping the surface than sanding it. When the sanding is done, wipe away the residue with a damp rag.
Turn out the lights and shine light at a low angle across the wood to reveal imperfections. Flag the problem areas with masking tape and sand them out. Wipe Instead Of Brush. Wipe oil-based polyurethane onto hard-to-brush surfaces using a soft, lint-free cloth. Wiping leaves a thinner coat than brushing, so you'll have to apply more coats. Water-based poly becomes sticky too fast for wiping.
Test Stains, Thoroughly!
You can't rely on those stain samples on display in stores. Actual colour varies a lot, depending on the type of wood and how you prepared it for finishing. So save scraps from your project, run them through the same sanding process and use them to test finishes. If you didn't build the item you're finishing, run tests on an inconspicuous area, the underside of a table, for example. Test stain on scraps to get the colour you want.
Leaving excess stain on the wood for longer or shorter periods won't affect the colour much. If it's a custom colour you're after, you can mix stains of the same brand.
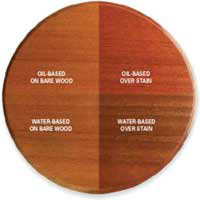
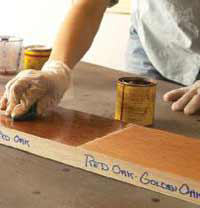
Test Clear Finishes, Too
Water-based polyurethane affects the colour only slightly. Oil-based poly has an amber tone that can dramatically change the colour of stained or unstained wood. The same stain was used on the samples shown.
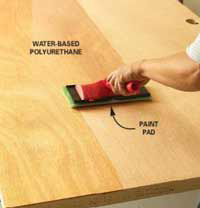
Use a Pad on Large Areas
Apply water-based polyurethane to large surfaces fast by using a paint pad. Water-based poly dries quickly and may not allow enough
'wet' time for brushing out big areas.