
How to refinish a door
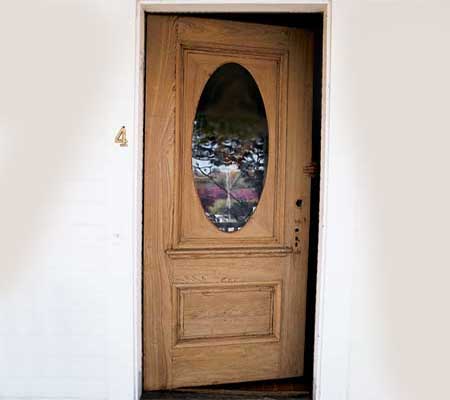
The years and the elements hadn't been kind to the exterior of this door. Flakes of varnish still clung to the wood in spots, while the rest of the surface was rough and dried out from the effects of water and sun. Wood entry doors everywhere suffer from the same assaults, and many end up in the trash, replaced by low-maintenance, mass-produced products.
If you have an older home that still has solid hardwood doors, you may prefer to bring the doors back to life rather than replace.
HERE'S HOW:
1. Remove door hardware
Before starting on the project, remove the door, set on a solid worktop or, in this case, padded sawhorses and remove all the hardware.
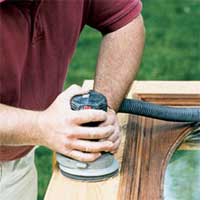
2. Sand the surface
With the door resting on padded sawhorses, use a random-orbit sander with 80-grit paper to quickly remove what remains of the old varnish and sun-baked flakes of wood. Sand the wood again with 120-grit paper, then 180-grit.
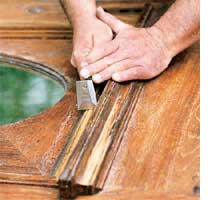
3. Scrape the mouldings
Small, razor-sharp scrapers reach into corners, across narrow profiles, and on the end grain of raised panels where no rotary sander can safely go. Pull the scraper with the grain; use two hands and apply only gentle downward pressure to reduce the chance of an accidental slip gouging the wood. You will find a selection of these tools at your local
Builders Warehouse or Builders Express.
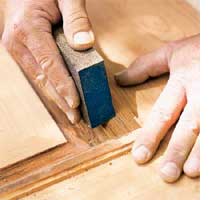
4. Hand-sand profiles and clear away dust
Fold a half sheet of 120-grit sandpaper in thirds, press it into a section of the profile with your fingertips, then rub back and forth in long strokes over the length of the moulding. Use a sanding sponge, on inside corners where fingers can't reach. Follow with a quick brushing and a thorough vacuuming to clear away dust that might spoil the finish.
5. Seal door edges before rehanging
While it's still on the sawhorses, seal the bottom and top edges with 3 coats of
Woodoc 30 or 50 exterior sealer. These areas are normally missed when doing maintenance touch up, but are the areas where moisture can gain easy access to a wood door and cause swelling and bloating. Once the sealer is dry, put the door back on its hinges before applying the sealer to the front and back of the door. Otherwise, there's no practical way to rehang the door without damaging the finish.
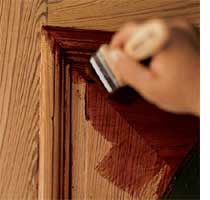
6. Choose a finish and apply first coat
If you want to use a colour stain, select the stain and mix this with the
Woodoc 30 or 50 exterior sealer. Do not shake the tin, rather stir gently to prevent any bubbles that will spoil the finish. Put down a dropcloth to prevent floors and surrounding areas from spots and runs. Start on the panels, then move to the surrounding mouldings. Coat the horizontal rails next, and finally the vertical stiles.

If the wood is extremely dry you will notice that the sealer is immediately absorbed. Apply more sealer to the door until the surface stays wet for at least 5 minutes, and which indicates that sufficient sealer has been applied for the first coat. Let this dry overnight and then rub down with Woodoc Steel wool. Apply the second and third coats, allowing sufficient drying time between coats. Apply in exactly the same method as indicated above.
7. Attach hardware
When the door is completely dry, reattach the door hardware. To keep the door looking nourished and provide adequate protection, you need to perform regular maintenance. As soon as the finish starts to look dry, wipe down with mineral turpentine and
Woodoc Steelwool to remove the sun- and weather-damaged top layers, and follow this up with a new application of exterior sealer.