
How to lay a DIY concrete patio
As an investment, concrete patios typically cost less than patios made of brick or natural stone because they are less labour-intensive to install.
The lower price tag combined with the wide array of patterns and colours available make concrete an economical choice for a concrete patio. Plus, with the right knowledge and tools, a concrete patio can be tackled as a do-it-yourself project.
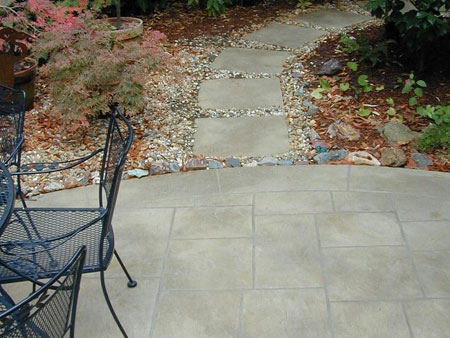
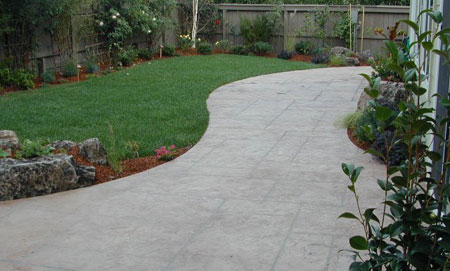
Building your own natural stone patio can be a difficult and costly task, but with concrete the job is easy and affordable. Laying a stone patio involves laying each individual piece, but with concrete, it is simply poured and then stamped in sections. Not only is installation simpler and more affordable, but stamped concrete patios and walkways are more durable than actual stone, there is no need to worry about loose or cracked pieces. Concrete as a building material can be very economical if you can tackle the labour yourself and is still a very solid choice if you are paying for part or all of the physical work as well.
How do I begin planning?
Decide what you are going to do on your patio surface and how many people you would like to acommodate. You may want room for a braai, garden furniture and maybe even a fire pit. Too small of a surface gives a crowded feel or may result in a chair leg slipping off the edge into soft ground. If your garden is very small you may want to limit the patio to devote more area to green space. You are balancing aesthetics with utility. You may find you are best served with two smaller hard surfaces. You may want a large area that can acommodate many guests.
Carefully look at the drainage in the garden. If you need to change grading or add french drains, these should be considered first. Sometimes you have no choice but to let your garden drain onto your new patio, but ideally the patio should drain away from the house. Even in a garden that lacks ideal grading and drainage the slab can still be elevated a bit and have a slight angle to clear water quickly. Am I really able to do this myself?
The work is very physical and you will want some help. At each stage you may find you want to hire others for that part or do some yourself. Here is the process:
The minimum concrete slab thickness you will want is 10cm over a minimum of 20cm base. If you decided on a 3 metre x 4 metre patio, that means you must remove quite a bit of soil. Consider if you can use the soil somewhere in your garden otherwise you will need to remove it or have it taken away.
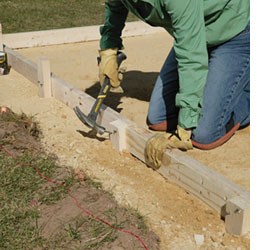
After digging out your patio shape - plus an additional 10cm for forming - set perimeter forms by securing scaffolding planks and stakes. At this stage you need to check to see that you have uniform distance from your house and that the form is perfectly straight at all angles. Check that your forms are square by measuring and comparing the two diagonals that would form an X across your square or rectangle. Adjust forms until these are very close.
DIY Tip: Coat the form boards with a coat of commercial release agent or vegetable oil to prevent the concrete from sticking to the form boards.
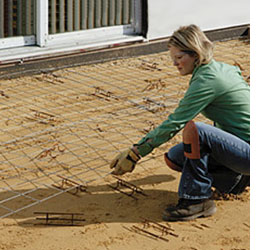
Reinforce the concrete with wire mesh (150mm squares of 10-guage metal). Put the mesh on wire supports, sold separately, so it sits roughly in the middle of the slab’s thickness. Leave a few centimetres of space between the mesh and the edges of the forms to prevent rust. Overlay sections by 10cm and tie them together with wire. Wire the mesh to the supports. The most common type of reinforcing is rolled wire mesh or a rebar grid. Rebar is tied at overlaps and intersections using tie wire and pliers.
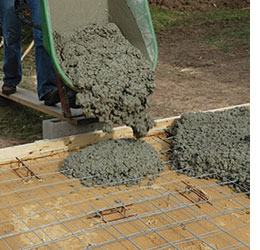
If you’re using a wheelbarrow, build a temporary ramp over the forms so that the wheelbarrow won’t knock them out of place. Start in a corner and dump the loads of concrete against each other.
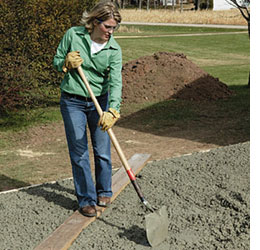
Have a helper with a shovel spread the concrete into corners and against the forms and expansion joints. Lay a wide board across the forms so you can reach the interior of the pour. If the concrete cases the wire mesh to sing, pull it up with a rake so that it’s in the middle of the slab. Work a shovel or rake up and down to remove air pockets, especially alongside the forms.
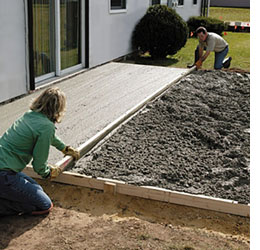
With a helper pull a screed (a long, straight plank) across the forms to level the concrete. Tilt the screed forward and slide it from side to side as you push it forward. Shovel off excess concrete in front of the screed or fill in low spots. Make a second pass with the screed tilted the opposite direction. Work a bull float back and forth with the blade flat against the surface to smooth and compact the concrete.
DIY Tip: For small surfaces use a darby instead of a bull float. Work the concrete until water forms on the surface.
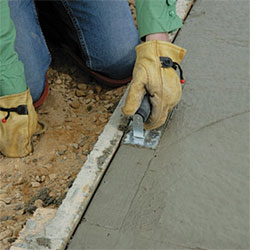
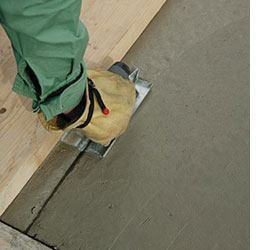
When you’ve finished floating, separate the concrete from the forms by running the tip of a pointing trowel between the two. Then slide the cutting edge of an edger along the forms to round over the patio edge, making it less likely to chip. Lift the leading edge of the tool to avoid marring the concrete.
Cut shallow grooves, called control joints, in the wet cement pad. These weaken the spots a little so that if the ground shifts, the resulting crack should form along the control joint. You need a joint every 2 metres, so make marks every 2 metres along the forms. Place a jointer at each mark. Guide the jointer against a board that spans the patio.
DIY Tip: Control joints can also be cut after the concrete has cured using a circular saw with a cement or masonry blade.
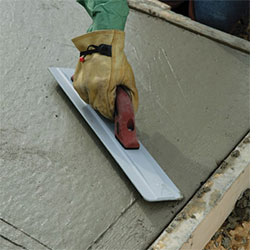
After cutting the control joints, and when any water sheen has left the surface, run a wood or magnesium hand float over the surface to proved a final smoothing. Raise the leading edge of the float slightly as you work to avoid making likes on the surface of the concrete.
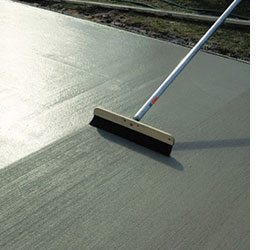
For improved traction, pull a stiff-bristle broom across the surface. Draw the broom in either straight or wavy lines. If you don’t like the pattern or if it is too coarse, trowel, wit, and broom again. The longer the concrete dries, the finer the broomed surface. Make another pass along the perimeter with the edger.
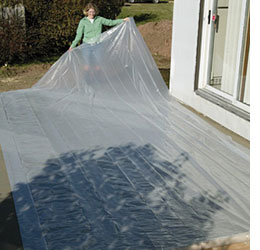
Lay plastic sheeting over the finished surface to assist the curing process. The moisture trapped inside eliminates the need for watering during the curing stage. Let he concrete cure at least 48 hours before removing the forms.
While building a natural stone patio can be a difficult and costly task, with concrete the job is easy and affordable, as it is simply poured and smoothed. Not only is installation simpler and more affordable, but concrete patios and walkways are more durable than actual stone - there is no need to worry about loose or cracked pieces.