
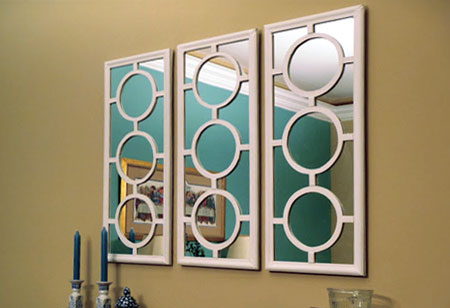
Make a decorative mirror
I am sure that you have seen these decorative mirrors on the Internet. They look gorgeous with the circular onlays. Buying one of these decorative mirrors can easily set you back over R100, but here's how to make your own decorative mirror on the cheap...
lazylizonless.blogspot.com
The project is designed by Lazy Liz and I have asked permission to feature quite a few of her projects. I just need to modify the dimensions and look at alternative options for materials that aren't available locally.
YOU WILL NEED:
Pine or SupaWood moulding for the frame
3mm SupaWood for the onlays
Mirrors - cut to size - a nice size is 300mm x 800mm
Mitre box and backsaw
Steel corner braces and small screws
Rust-Oleum 2X or acrylic paint
Jigsaw and fretsaw - thin - blade
Drill/Driver
HERE'S HOW:
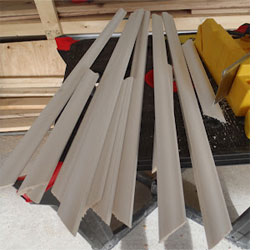
Measure up and cut all the frame pieces to length using a mitre box and backsaw. The frame should be at least 10mm smaller than the size of your mirror.
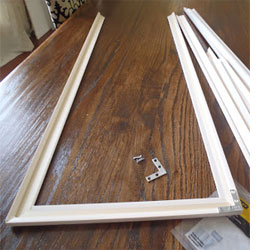
Use a small bead of No More Nails at each corner before joining together with a corner brace and small screws. Now you can spray with Rust-Oleum 2X or use acrylic paint to finish off the frames.
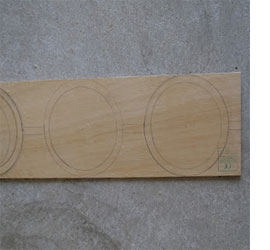
To create the circular overlay that sits on top of the glass, mark and draw out the shapes on a piece of 3mm PG Bison SupaWood. Make sure you measure twice and cut once so that the finished design in perfect - or as close as possible.
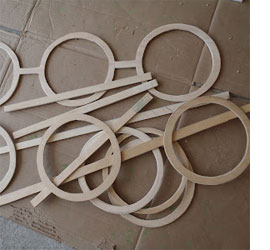
The easiest way to cut out the decorative frame is using a jigsaw and fretsaw blade - a thin, small blade that fits into the jigsaw. Any small boo-boos can be sanded away once you've finished. Paint the decorative frames as you did for the main frames.
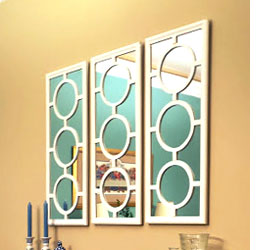
Now all that's left to do is to attach the mirror to the frame and add the decorative panels. You can use corner braces and small screws to attach the mirror to the back of the frame. The decorative panel is glued onto the front of the mirror with epoxy glue. Use a very small amount of wood filler to fill in any gaps and then lightly sand smooth before touching up. Add a picture hanger to each frame and mount onto the wall.