
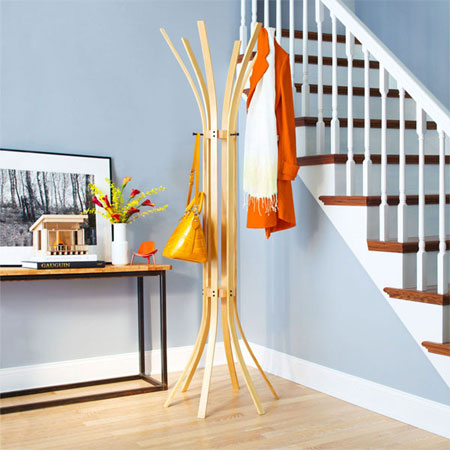
Make a bent-wood coat rack
In this project we show you a simple wood-bending technique to make a unique, tree-shaped coat rack. The key to this project is making a simple bending form that shapes the legs. Simply glue two thin wood strips together, then place them in the form while the glue is wet. As the glue dries, it bonds the parts together permanently in the new bent form.
YOU WILL NEED:
Masking tape
80-, 120-, 240-, and 400-grit sandpaper
Black marker
12 of 3mm x 2400mm plywood or pine
1 of 300 x 2500mm 16mm melamine board
2 of 50 x 100mm x 2400mm PAR pine
1 ox 50 x 150mm x 1800mm PAR pine
3 of 12 x 250mm lag screws
Plasti-Dip, black, #42518
Rust-Oleum satin canyon black spray paint
Wood glue
40mm length panhead sheet-metal screws
70mm wood screws
Rust-Oleum semigloss spray polyurethane
TOOLS
Mitre saw or jigsaw
Framing square
Handsaw
Drill/Driver and assorted bits
2 quick clamps
Tape measure and pencil
HERE'S HOW:
Make the branches
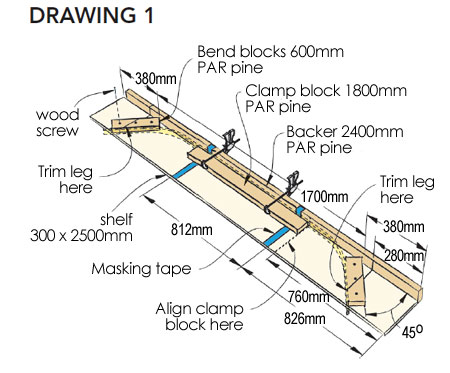
1. The shape of the tree is made using a bending form. Cut the PAR pine parts to length as shown in Diagram 1 above. Secure to the shelf board with 30mm screws.
2. Draw trim and alignment lines for the clamp block on the form with a marker; mark the hub locations with masking tape. These marks will help everything stay aligned as you proceed.
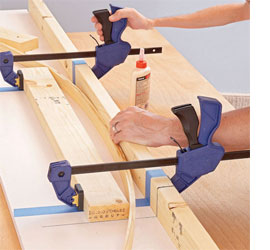
3. Glue two 3mm strips together, with edges/ends aligned to create a leg. While glue is wet, place leg into the form - the clamp block, with the help of two clamps, will force the wood into the proper shape. Squeeze the clamps until the centre portion of the leg is against the backer; let dry overnight.
4. Mark the location of the hubs on the leg with a pencil. Unclamp the leg from the form and sand to remove the excess glue. Repeat for other legs (you’ll need six legs total).
5. Clamp a leg back into the form with the clamping block between the leg and the backer. Note: When the legs come out of the form, they lose some shape. This is called spring back, and it’s normal. Realign the hub marks on the legs with tape on the form.
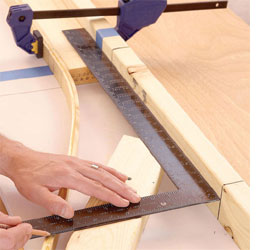
6. Use a framing square to mark the trim line cuts on the leg. Remove the leg from the form; cut with a handsaw. Repeat for the other legs.
Build a tree
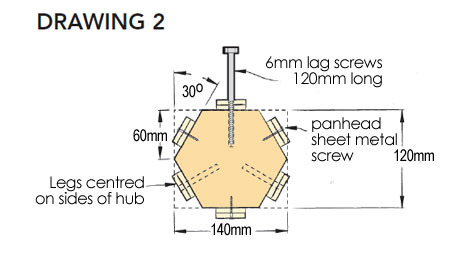
1. Lay out the hexagon shape of the hubs on a 50 x 150mm block. Cut the hubs using a mitre saw.
2. Place the hubs on the form and then attach the first two legs, aligning with the hub marks you drew on the legs. Drill pilot holes and secure with sheet-metal screws .
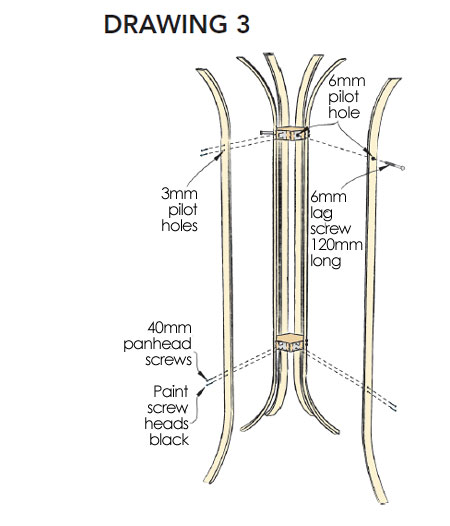
Note: Two screws are used at each lower leg/hub joint. For the upper connection, use two screws at every other joint and one screw in the remaining joints (the single screws will be replaced by lag screws).
3. Stand the tree, add the third leg (aligning the marks with the hub), and secure with screws. With the tree upright, attach the remaining legs.
4. Remove legs, sand, and reassemble with glue and screws. Wipe the tree with a slightly damp cloth and apply two coats of Rust-Oleum satin polyurethane spray.
5. Remove the single screws where the lag screws are to be installed and drill 6mm pilot holes 50mm deep. Install the lags into the holes; secure with wood glue.