How to Make and Install Fake Ceiling Beams
Wooden ceiling beams add architectural detail to any home and they are an easy and affordable project if you fancy adding fake ceiling beams to any room in the home.
01/08/2021
better homes and gardens magazine
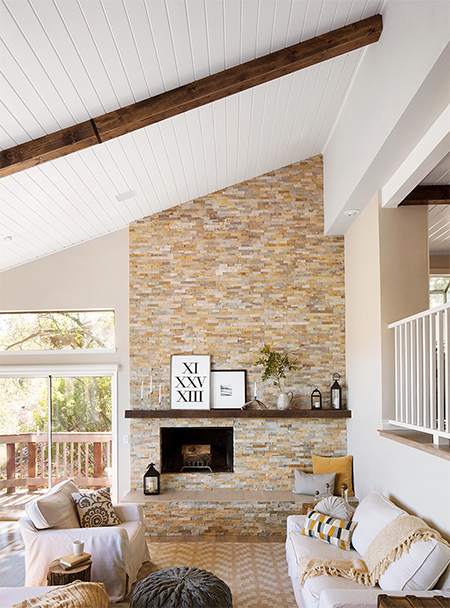
Whether your home is rustic or cottage or modern contemporary, wooden ceiling beams add something different to a plain room. Since most builders-spec homes don't include wooden beams and the cost of installing real wooden beams might be considered too expensive, there is a way to have the look of real wooden beams by making up wood boxes that are lightweight and easily mounted on a ceiling providing there are roof beams to support them.
Adapted from the original article in Better Homes and Gardens magazine, we modified the project to include local materials and supplies to make it easy for you to install fake wooden ceiling beams in your own home. Better Homes and Gardens magazine is one of my favourite home and decor mags and I get a lot of tips and tricks that are fun and interesting. You can buy back-issues at Takealot.com or get in touch with DiscountMags.com.
PAR pine untreated 12 x 94mm x 1.8 metre length costs R110 each at Builders and are the perfect lightweight material for making the faux beams. Do a bit of distressing on the face of the planks to create an aged effect.
PAR SAP Untreated (12 x 94mm x 1.8m) at R110
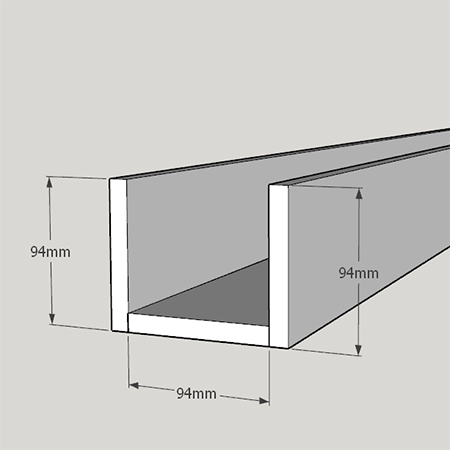
All you need to make your own fake ceiling beams are lengths of 12 x 94mm PAR pine. It costs around R110 for a 1.8 metre length and is also available in 2.4 and 3 metre lengths. If that isn't long enough to span the width of a room, you can always join lengths together to create a longer length.
YOU WILL NEED:
3 of 12 x 94 x 1.8 metre PAR planks to make the beam
1 of 12 x 94 x 1.8 metre to secure the beam
Wood glue
Pneumatic nailer or hammer and panel pins
Pattex No More Nails adhesive
HERE'S HOW:
Distressing and staining the faux ceiling beam
Before assembling the casing for the beam, gather together a few tools and supplies that you can use to give the pine wood a distressed or aged look. There are plenty of items you can use to distress the finish including a claw hammer, chains, screws, gouging tool and screwdrivers. Go to town and make those planks look really old.

hgtv
After banging the heck out of the planks apply your choice of wood stain. This can be light, medium or dark but keeping in mind that a darker finish will be more eye-catching.
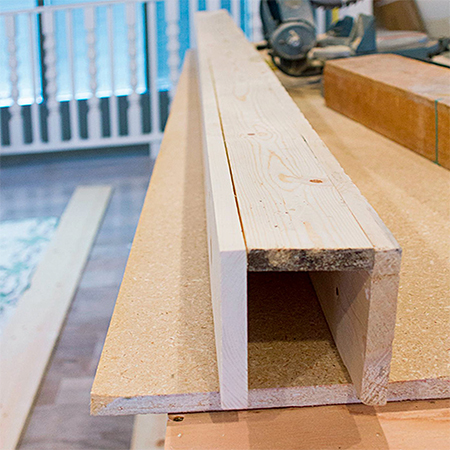
How to make a faux ceiling beam
The simplest way to make faux ceiling beams is to create the 'U' shape using 94mm wide PAR pine planks. These are glued and stapled using a pneumatic nail gun or using a hammer and panel pins. Screws would be too visible and spoil the outside appearance where nails or panel pins will not be as visible. Glue and clamp the boards overnight and then staple or pin the following morning.
How to install a faux ceiling beam
Installing the faux beam is quick and easy. First, locate a suitable ceiling beam to use as the support and onto which you can screw the beam support. This might limit where you can place the beam so be sure to check this out beforehand.

The support plank is mounted onto the ceiling using Pattex No More Nails adhesive and screws. Stagger the screws on the left and right of the plank to mount it to a rafter or beam above the ceiling. Leave for a day or so to ensure the adhesive has time to dry properly before using nails or pins to secure the beam case onto the support along the top edge.
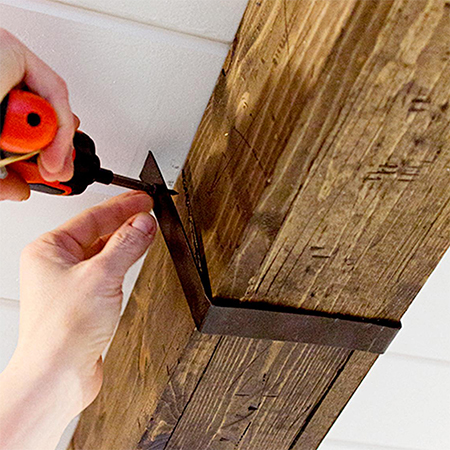
If you need to do more than one length to fit the span of the ceiling, you can disguise joins by adding galvanised brackets stained to match and screw these in position.