
DIY Desk with clean lines
Here is a desk that you can make that has storage shelves on the sides, and a storage cubby in the top for books or files - to keep the desktop clutter free and neat.
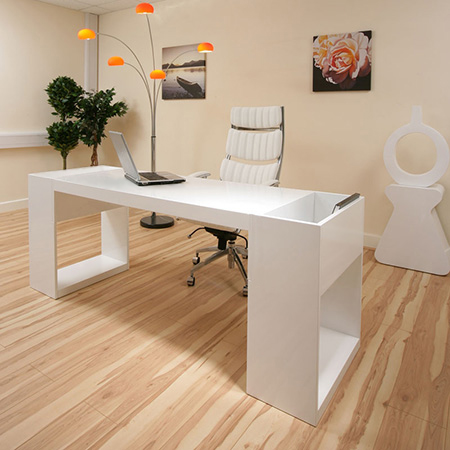
The desk is made using 16mm MDF if you plan to paint it, or you can use 16mm BisonLam or SupaLam (laminated particleboard or MDF) in pure white, or 16mm MelaWood in a wood grain finish - the choice is yours. Most of these board products are available at Builders.
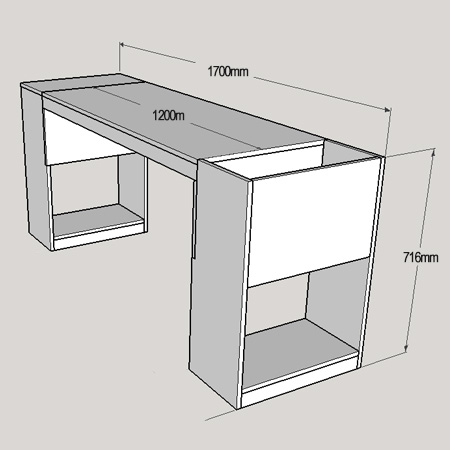
You can also modify the total length of the desk simply by reducing the length of the top and top supports.
HERE'S HOW:
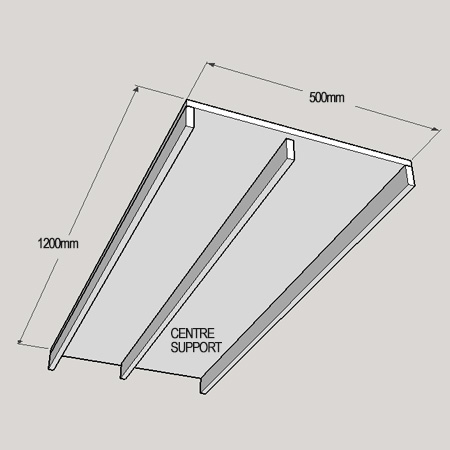
1 of 500 x 1200mm - top
2 of 50 x 1200mm - top front / back supports
1 of 50 x 1168mm - top centre support
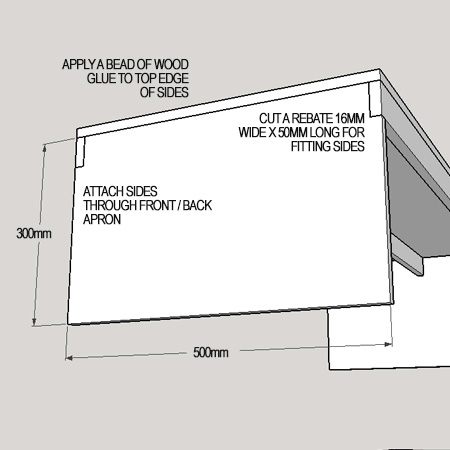
2 of 300 x 500mm - sides for top
2 of 266 x 716mm - supports 1A / 1B
2 of 250 x 700mm - supports 2A / 2B
1 of 250 x 500mm - top (topped section)
1 of 316 x 468mm - side 1B (cubby section)
2 of 266 x 468mm - bottom shelves
1 of 250 x 468mm - shelf (topped section)
1 of 234 x 468mm - shelf (cubby section)
4 of 50 x 468mm - side aprons
3.5 x 40mm screws
Wood glue
Wood filler
TOOLS:
Drill / Driver plus assorted bits
Countersink bit
Orbital sander plus 120- and 240-grit sanding pads
Tape measure and pencil
OPTIONAL: Pockethole jig, biscuit joiner or dowel centres (or steel angle brackets and 13mm screws)
HERE'S HOW:
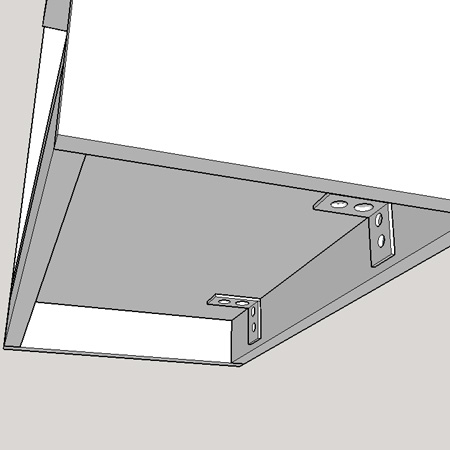
1. Attach the front, back and centre supports to the top. You can use a pockethole jig, biscuit joiner, dowel joints, or secure in place with angle brackets and 13mm screws. On all supports add a bead of wood glue along the top edge before securing in place.
2. Cut a rebate in both side sections to allow for fitting to the ends of the top. The sides fit onto the front and back top supports.
3. Assemble the cubby section by attaching the uprights to the bottom and top shelves. This bottom shelf is 50mm up from the bottom and the top shelf is 400mm up from the bottom. Measure, mark and pre-drill two 3mm countersunk pilot holes through the sides for each shelf and secure with 40mm screws.
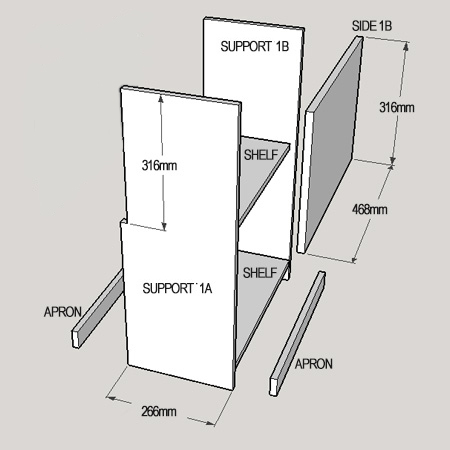
4. Use wood glue to secure the side aprons in place at the base of the cubby section. If using a pockethole jig or biscuit joiner you can cut slots to secure the aprons in place. If not, use wood glue and steel angle brackets to attach.
5. Insert the outer side section (SIDE 1B) and secure by drilling two 3mm countersunk pilot holes through the supports and into the edges of the sides and drive in 40mm screws.
GOOD TO KNOW
At this stage you have the
option to make a second cubby section for the
other side of the desk (order double the
materials), or make the topped
section below.
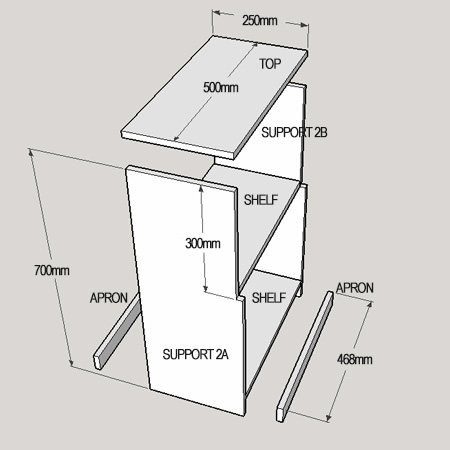
6. For the other side section repeat steps 3 and 4.
7. Attach the top using your preferred method (pocketholes, biscuits or dowels), or drill two 3mm countersunk pilot holes through the top and secure to the supports with 40mm screws.
GOOD TO KNOW
Pilot holes in sections to be
joined are essential to prevent the board from
splitting or popping open.
Finishing and Final Assembly
Fill all holes with wood filler and let this dry.
Sand all the completed sections using 120-grit sanding pads to remove any uneven edges and then 240-grit sanding pads to smooth. Wipe clean.
Paint the individual sections before assembly. To paint you can use a combination paintbrush / foam roller or a Bosch PFS spray system. Use Prominent Premium or UltraSheen to paint the sections for a washable finish. We recommend the BOSCH PFS spray system for a professional finish.
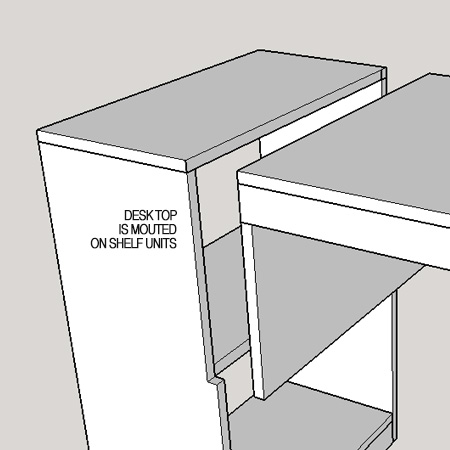
After painting, secure the sides onto the desk by fitting the sections together and drilling two 3mm countersunk pilot holes through the back of the desk sides into the side sections. The holes and screws can be covered with matching plastic screw caps.
Not responsible for errors or omissions