
A Handy Shed for your Dustbins
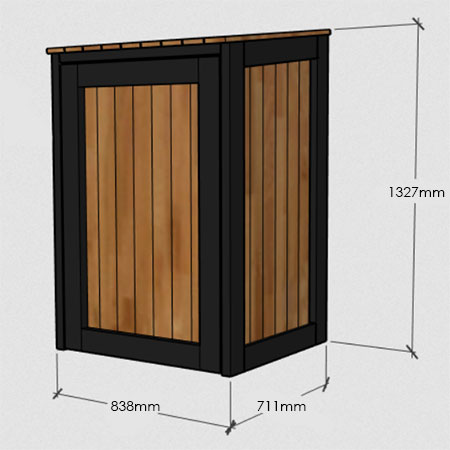
Dustbins can be an eyesore but this handy shed made using PAR pine is a great way to store one or two dustbins out of sight.
28/06/2020
Here's another great project idea from BuildSomething and designed by wood shopdiaries. This pine shed can be made to fit one dustbin or modified for two dustbins. The shed is a great way to hide your dustbins and you can use the same design if you need to cover an air conditioner outlet, all your pool equipment, or for storing children's toys. If you need to make any modifications to the design, you will find a handy conversion calculator here.
YOU WILL NEED:
2 of 38mm x 89mm x 1181mm - Side Panel Front Pieces, one end mitred 7 degrees
2 of 38mm x 89mm x 1257mm - Side Panel Back Pieces, one end mitred 7 degrees
2 of 38mm x 89mm x 533mm - Side Panel Bottom Pieces
2 of 38mm x 89mm x 540mm - Side Panel Top Pieces, ends mitred 7 degrees parallel
3 of 38mm x 89mm x 762mm - Frame Pieces
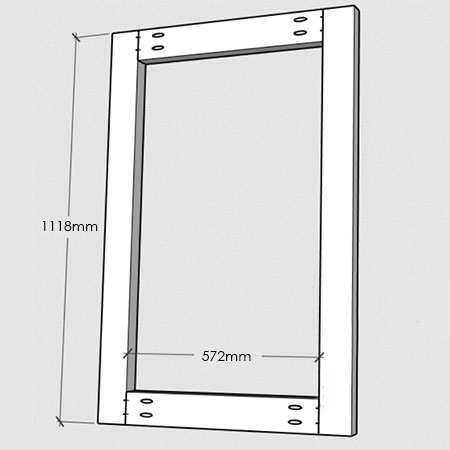
2 of 38mm x 89mm x 1118mm - Door Frame Sides
2 of 38mm x 89mm 572mm - Door Frame Top and Bottom
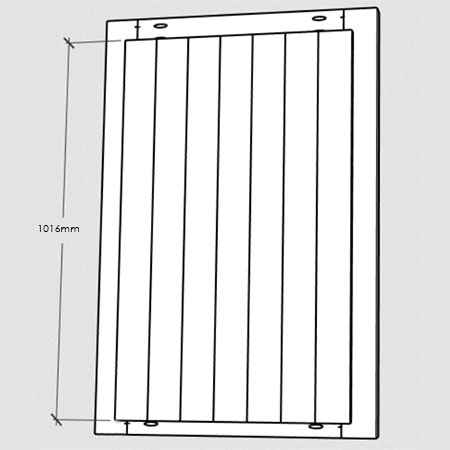
7 of 19mm x 89mm x 1016mm - Door Slats
2 of 19mm x 89mm x 1067mm - Side Slats Front
2 of 19mm x 89mm x 1080mm - Second Side Slats
2 of 19mm x 89mm x 1092mm - Third Side Slats
2 of 19mm x 89mm x 1105mm - Fourth Side Slats
2 of 19mm x 89mm x 1118mm - Fifth Side Slats
2 of 19mm x 89mm x 1130mm - Back Side Slats
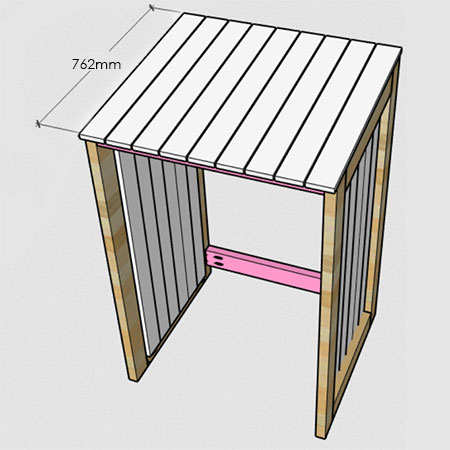
9 of 19mm x 89mm x 762mm - Roof Slats
Have all the pieces cut to size for quick and easy assembly
2 Steel hinges and screws
1 Door latch and screws
64mm & 32mm pocket-hole screws
4 x 34mm cut screws
Stain and exterior sealer
TOOLS:
Drill / Driver or Combi Drill plus assorted bits
Kreg pocket-hole jig
Clamps
Mitre saw or jigsaw
Tape measure and pencil
HERE'S HOW:
If you prefer to watch the woodshop diaries step-by-step video of the making of this dustbin shed, you will see the video at the bottom of this page.
Set-up your pocket-hole jig in advance according to the thickness of the pieces you are working with. For this project, there are 38mm and 19mm thicknesses.
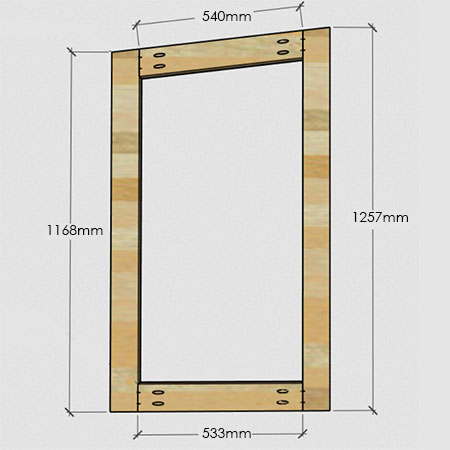
1. Assemble the Side Frames in a similar manner, mirroring the assembly process. The top ends of both the Front and Back pieces have a 7° mitre joint, as does the Top Frame piece. This degree allows for the roof to slant at a slight angle for drainage. Join all the sections with 64mm screws.
GOOD TO KNOW: Drill the pocket-holes on opposite sides (mirrored) on the inside of each frame.
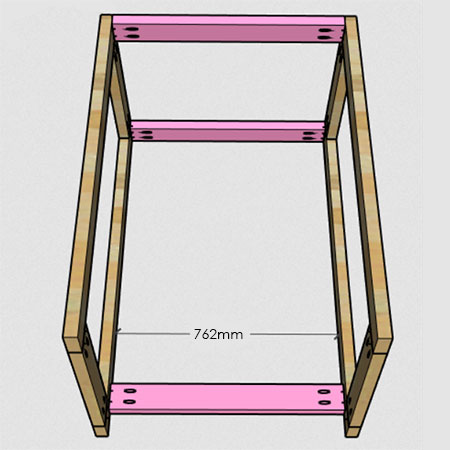
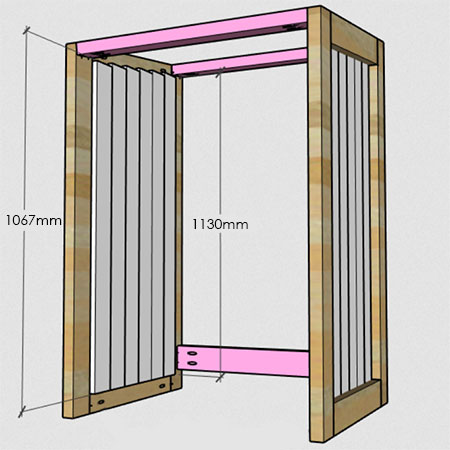
2. Drill pocket-holes and assemble using 64mm screws, as shown in the diagram below. Position on Frame Piece at the front and one at the back, with an additional Frame Piece at the back, slightly elevated from the bottom.
3. To assemble the Door Frame, drill pocket-holes as shown below and assemble with 64mm screws.
4. Finishing: If you plan on staining and sealing in a 2-tone colour selection as per this project, stain the door frame and the cover frame black before adding the slats. If you wish to apply a stain to the slats, you can also do this now before continuing with the assembly.
5. For this step, you will attach the Side Panel Slats using 32mm screws. Keep in mind that the Sides have an angle, so start at the front and work backwards. Secure the 1067mm slat at the front and then add the remaining slats.
GOOD TO KNOW: The slat bottoms have a 12mm overhang on the Bottom Frame piece.
6. Place the Door Slats as shown in the diagram below, making sure that they are centred and screw in place with 32mm screws along the top and bottom edges.
7. Now you are ready to install the Roof Slats. Allow a 25mm overhang at the front and back and secure with 32mm screws.
GOOD TO KNOW: Allow a 5mm gap between each slat.
8. Finish off the shed by installing the Door onto the Frame. Allow a 5 to 6mm gap on all sides. Install steel hinges and a door catch.
Finishing
If not already done, apply an exterior sealer according to the recommended guidelines. Make sure to apply to annually to ensure maximum protection and longevity for your dustbin shed.
Watch the video below for step-by-step instructions on how to assemble the dustbin shed.