
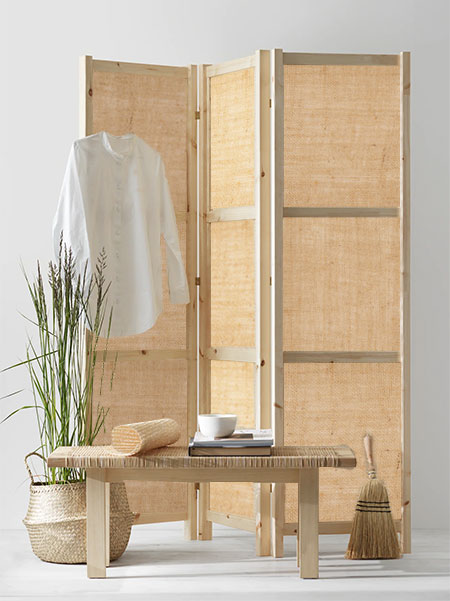
Quick Project: Make a Pine and Hessian Privacy Screen
Use PAR pine and hessian to make a folding privacy screen for a bedroom, bathroom or open plan living room.
20/05/2021
ikea
A folding privacy screen can come in very handy when you need some privacy, to hide a corner where you have your home office, or just to add privacy to an open plan room. The design of our screen is light and airy which is achieved by using hessian. You can buy hessian at most fabric stores and it is one of the cheapest fabrics you can buy.
Hessian panels give the screen a natural look that is enhanced by the raw pine. A timeless classic that serves a practical purpose, you will find instructions to make the folding panel screen below.
YOU WILL NEED:
6 of 22 x 44 x 1800mm PAR pine - uprights for screen frame
12 of 22 x 44 x 436mm PAR pine - cross-pieces for screen frame
2 metres hessian fabric
Fabric scissors or sharp scissors
32mm coarse-thread pocket-hole screws
6 brass butt hinges plus 16mm screws
Hot glue gun
Pine moulding or trim
Wood glue
TOOLS:
Drill/Driver plus assorted bits
Kreg pocket-hole jig
Heavy-duty staple gun or air-stapler
Hammer plus panel pins
Sander plus 180-grit sanding pads
Use this folding screen for privacy or add hooks so that it can double up as a bulletin board where you can clip your favourite pictures or images that inspire you.

HERE'S HOW:
Step 1
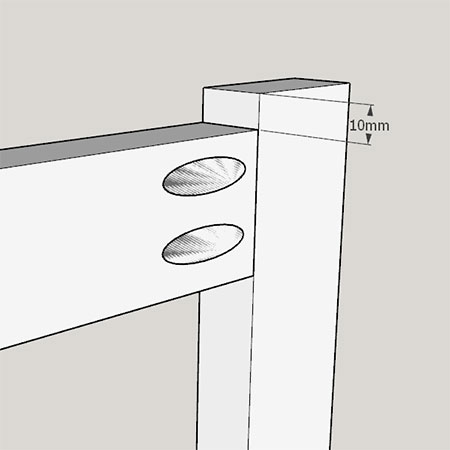
Assemble the PAR pine to make the [3] panels. Drill 2 pocket-holes at both ends of the cross-pieces as can be seen in the diagram below. Use wood glue and 32mm pocket-hole screws to join. Note the measurements below for the spacing between the cross-pieces. You can modify this if you wish.
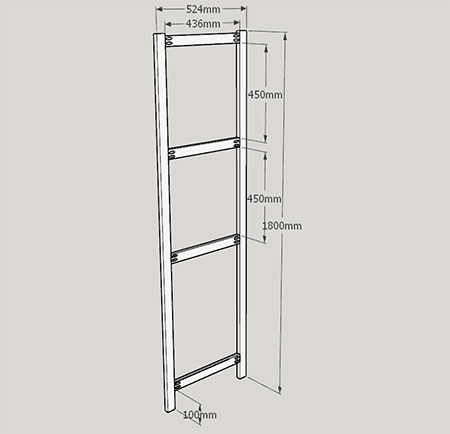
The top cross-piece is mounted 10mm from the top of the uprights.
The bottom cross-piece is mounted 100mm from the bottom of the uprights.

GOOD TO KNOW: Lay the uprights on a flat, level surface so that it is easier to add the cross-pieces.
Step 2
Sand the assembled frame using a sander and 120-grit sanding pad. Wipe clean once you are done.
Optional
If you want to stain, seal or varnish the frame, do this now before you add the hessian panels.
Step 3
Cut the hessian fabric into squares that are about 40mm larger all around. Fold over the edges twice, with each fold not more than 10mm wide and then use a heavy-duty stapler to secure to one side of the screen frames. Repeat this step for all the openings.
When securing the hessian onto the frames, make sure that it is straight. First, attach the top and then pull taut to attach the bottom and then repeat this for the sides of each hessian panel.
Step 4
Cut the pine moulding to hide the folded over hessian edges and give a nice finish to the privacy screen. Use a hammer and nails to attach the pine moulding to the screen frames.
Step 5
While the frames are still flat on your work surface, measure and mark to install the hinges that will hold the frames together. These will be attached with 16mm screws but do make sure to put them the right way so that the panel opens and folds up properly.