DIY Divas make Garden Chairs
At the DIY Divas workshop on Saturday morning, the DIY Divas made Garden Chairs and we show you how to make your own garden chairs using PAR pine.
26/05/2019
After making this garden chair a couple of years back, I received a lot of enquiries as to a more economical method to make these garden chairs. The original design used 32 x 94mm PAR pine and it did work out a tad expensive, but still far cheaper than buying ready-made garden chairs.
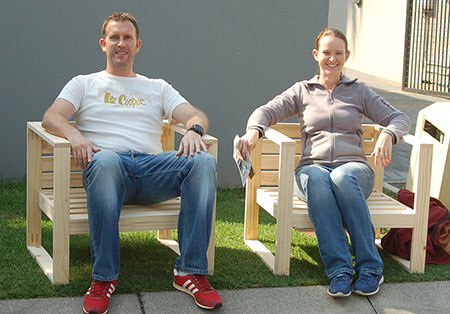
With some trial runs we worked out that you can make these garden chairs using more affordable 19/22 x 69mm PAR pine, and it brings the price down to about a third of that using the thicker PAR pine and the chairs are just as sturdy. So, for those of you wanting to make the garden chairs without spending too much, we did the workshop this Saturday and the DIY Divas made 4 garden chairs, which all came out exceptionally good.
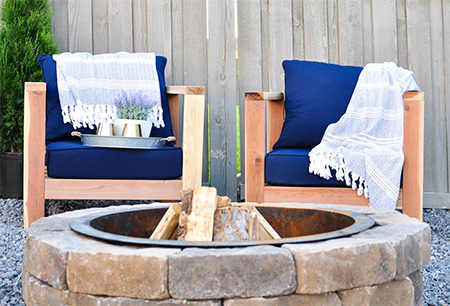
If you make these garden chairs for outdoors, remember to seal them with an exterior sealer. Also keep in mind that you must regularly apply the exterior sealer as soon as you see the finish start to go dull. These chairs are made using pine and not applying exterior sealer means that they will not withstand our extreme cliimate for very long.
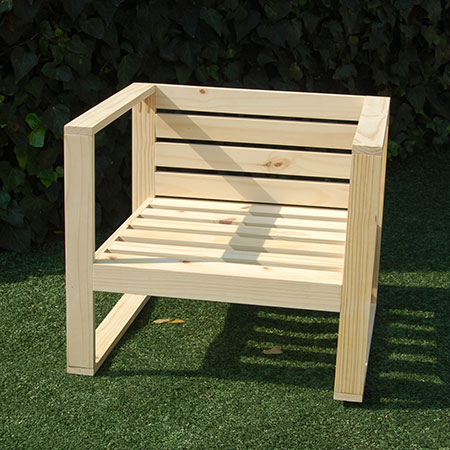
One tool that we did use to make the garden chairs was a Kreg K4 Pocket-Hole Jig. Using this tool lets us make the garden chairs without any visible screws, and you can fill the pocket-holes with plugs for a totally invisible joining method.
To make the 4 chairs we needed a total of 24 x 19/22 x 69 x 1800mm PAR pine. The cost per plank is around R49 (depending on your location). Because we changed the thickness from 32mm to 19/22mm and the width of the planks from 94mm to 69mm, a few modifications to the cutting list were necessary.
YOU WILL NEED:
A. 4 of 19 x 69 650mm - chair side arm top/bottom
B. 4 of 19 x 69 x 576mm - chair side front/back
C. 2 of 19 x 69 x 610mm - chair side, seat support
D. 6 of 19 x 69 x 590mm - chair seat slats
E. 5 x 19 x 69 x 590mm - chair seat back
2 of 19 x 44 x 600mm - seat support
Wood glue, waterproof
3.5 x 30mm screws [8]
4 x 50mm screws [16]
32mm coarse thread pocket hole screws [50]
4 of roofing washers and 16mm screws
TOOLS:
Drill / Driver plus assorted bits
Kreg Pocket hole Jig
Orbital Sander plus 120- and 240-grit sanding pads
Tape measure and pencil
HERE'S HOW:
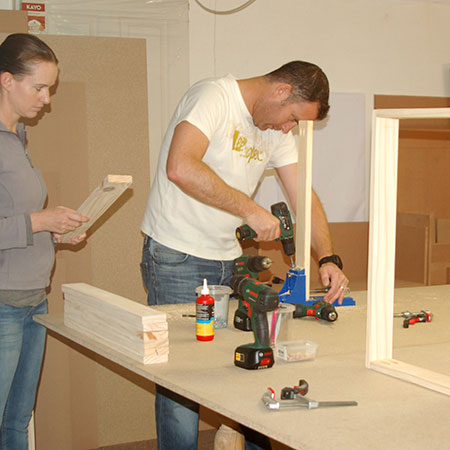
1. Sand all the individual pieces before assembly.
2. Set up your pocket-hole jig and drill bit for 19mm material and then drill [2] pocket-holes in B, C, D and E.
Now you can follow the directions in the original post with a few modifications as listed below:
3. The pocket-holes for the arm sections are drilled in the front/back and not the top/bottom pieces.
GOOD TO KNOW: If you follow the drilling of pocket-holes in step 2 above, all the correct pieces will be drilled.
4. Ignore the spacing instructions in the original post, since the planks are not the same width and there are now [6] pieces in total for the seat and [5] pieces in total for the back. It is easy enough to space these and mark to attach at evenly spaced differences.
5. We also added [4] roofing washers to the bottom of both arms to lift the chairs off the floor and reduce water damage.
Note: The chairs are designed to accommodate a seat cushion and rectangular cushion for the back, and this also increases the seat height and makes for comfortable garden chairs.