
Mobile Clothes Rail
For all your clothes, making your own mobile hanging rail is a great way to add extra storage to your bedroom, especially when renting a home.
04/11/2017
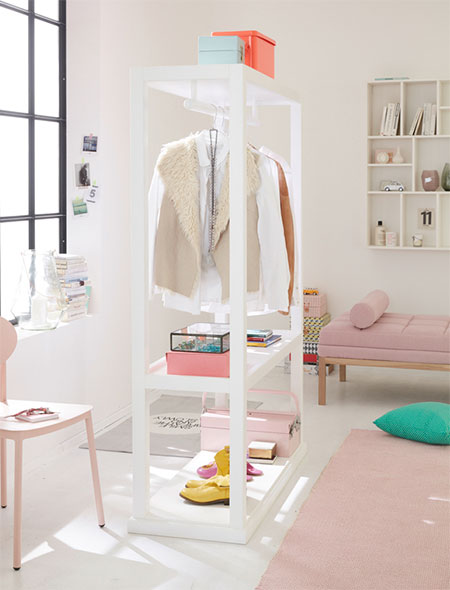
This DIY clothes rail is a great way to add extra storage to your bedroom, especially if you're renting a home. The lightweight, freestanding design means you can take it with you when you move - and always have enough storage for all your clothes.
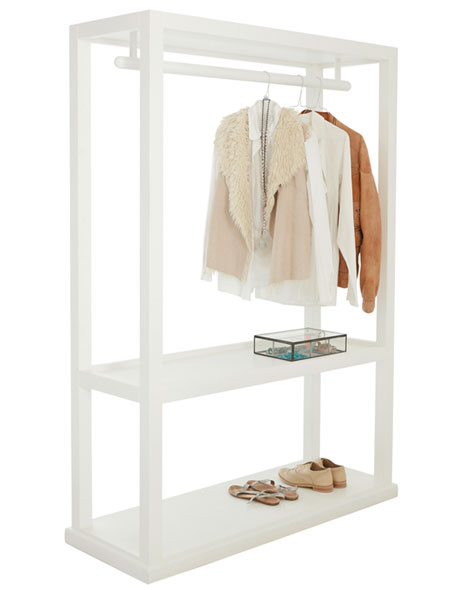
Clever design means this DIY clothes hanging rail is affordable and easy to make, and you don't need any fancy tools to make one! The pine PAR frame is wrapped with 3mm SupaWood (or Masonite/Evowood) for lightweight construction. Plus, you will find everything you need for this project at Builders Warehouse or your local timber merchant.
YOU WILL NEED:
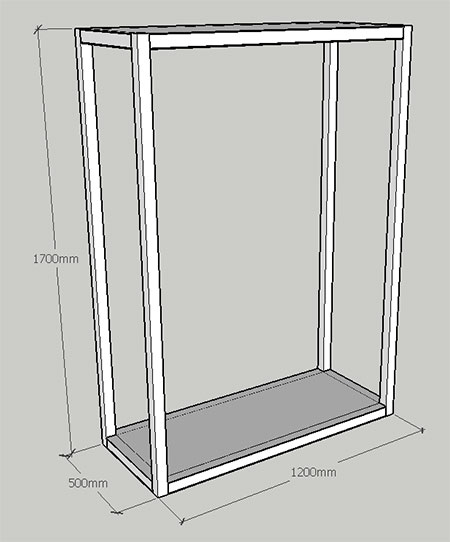
4 of 500 x 1200mm 3mm SupaWood or Masonite/Evowood - cladding
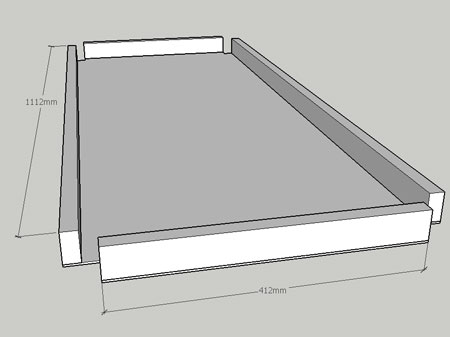
4 of 44 x 44 x 412mm pine - shelf sides
4 of 44 x 44 x 1112mm pine - shelf front/back
2 of 22 x 44 x 412mm pine - middle shelf sides
2 of 22 x 44 x 1112mm pine - middle shelf front/back
4 of 44 x 44 x 1700mm pine - uprights
2 of 22 x 44 x 1200mm pine - front/back apron
2 of 22 x 44 x 544mm pine - side aprons
Wood glue
Wood filler
120- and 240-grit sandpaper
4 x 50mm cut screws
4 x 30mm screws or 32mm coarse-thread pocket hole screws
TOOLS:
Drill/Driver plus assorted bit
Countersink bit
Jigsaw
Tape measure and pencil
HERE'S HOW:

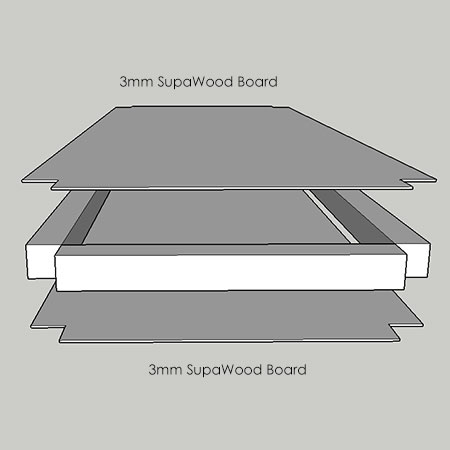
1. For the top shelf, clad 44 x 44mm pine PAR inside 3mm SupaWood to make the shelf. You can glue the sections initially and then use a pneumatic nailer or hammer and panel pins to secure. Each shelf has 44 x 44mm rebates at the corners for mounting the uprights. Cut out the rebates with a jigsaw.
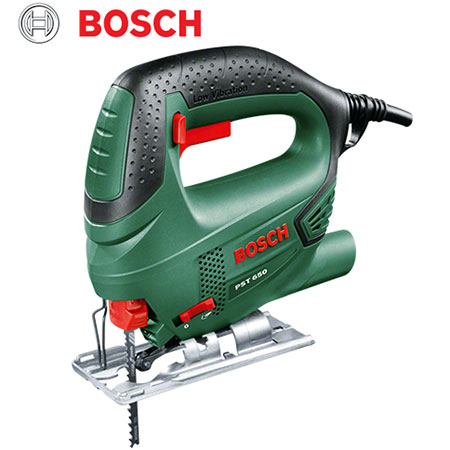
The Bosch PST 650 jigsaw offers compact size and lightweight design with reduced vibration for ease of use - ideal for the beginner DIY enthusiast.
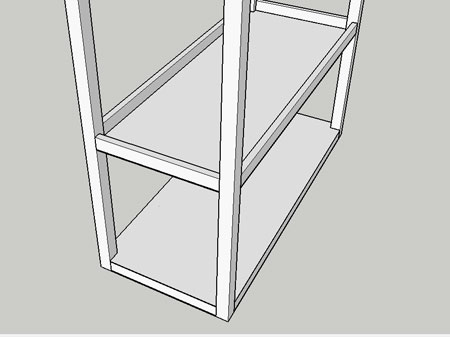
2. For the middle shelf, only clad the underside of the shelf and use 22 x 44mm pine in place of 44mm pine - see point 4. below. For the bottom shelf, only clad the top of the shelf and fit 44 x 44mm pine as done with the top shelf.
3. Place the uprights in the corner rebates and secure with wood glue and 60mm screws. Stagger the placing of the screws around the sides when joining to the top and bottom shelves. If the pine is dense/hard, do countersunk pilot holes before driving in screws.
GOOD TO KNOW
It's important to select on pine PAR for the uprights that are perfectly straight.
BELOW: Detail of middle shelf.
4. Secure the middle shelf at the desired height. You can secure the shelf to the uprights using two methods: [1] Drill pocket holes in the back of the 22 x 44mm pine before adding the cladding and then use 32mm coarse-thread screws and wood glue to attach to the uprights, [2] Drill through the uprights into the 22 x 44mm pine.
GOOD TO KNOW
If you go with option 2, drill countersunk pilot holes before driving in screws to prevent any splitting or cracking.
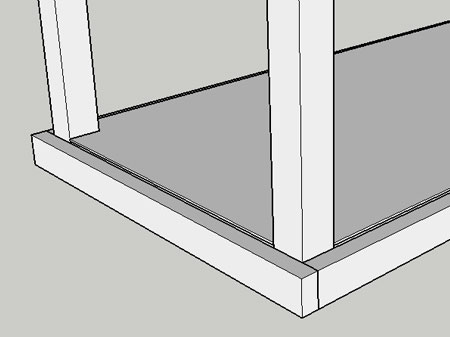
5. To complete, add 22 x 44mm aprons along the front, back and side edges of the bottom shelf. The aprons can be glued in place and a few panel pins hammered in along the length.
Finishing
Fill all holes with wood filler and sand smooth once dry. Wipe clean. Attach your choice of hanging rail. Paint with acrylic paint in your choice of colour, using either a paintbrush/foam roller combination, or a Bosch PFS spray system. You will find plenty of tips and tricks for either method in our Decorating section.