
Use These 5 Tips For Better Results When Working With Plywood
We asked Kreg Tools to give us 5 tips for better results when working with plywood for your DIY projects.
11/02/2021
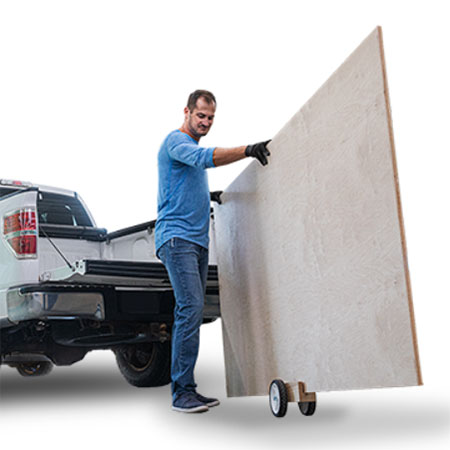
Make it easier to move around plywood sheets with a Panel Caddy
When you are building or assembling projects that call for plywood, handling and cutting those sheets can be a serious challenge. Here are some ways to get great results, and do it safely and confidently:
1. Easy-to-build panel caddy
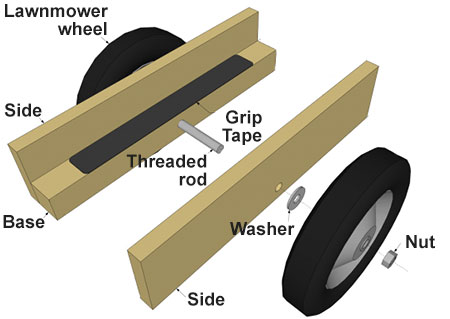
Firstly, eliminate transportation hassles, no matter how strong you are, there’s nothing easy about carrying 1200mm x 2400mm plywood sheets. There are ways to make it easier to carry around and move plywood sheets when you need to get them from storage to workshop - build yourself a simple panel caddy. All you need are scraps of PAR pine or SupaWood (MDF), a couple of inexpensive lawnmower wheels, and some threaded rod and nuts.
1. Use a saw to cut both the Base and Sides to length - any length you desire - and then set your Kreg® Pocket-Hole Jig for 19mm-thick material. Drill pocket holes in the underside of the 50mm along each edge.
2. Attach the sides using 32mm coarse-thread pocket hole screws before drilling a hole for slipping in the threaded rod. Add washers and the wheels.
GOOD TO KNOW: To prevent plywood board from sliding around, apply a length of grip tape to the carrier.
2. Get plenty of support
In this next tip, we look at how to support your plywood sheets when cutting them down to size. While a couple of tables or sawhorses might support the sheet as you cut, they won't hold it stable while you work, and they also won’t stop everything from crashing to the ground as you cut through the plywood. Not only will this damage your plywood, but it's also dangerous.
Extruded or rigid foam can be purchased at larger hardware suppliers and is a great way to support plywood while cutting. It keeps the pieces from pinching or falling, and you can even set it up on the ground if needed. Watch the benefits of using foam insulation in the video.
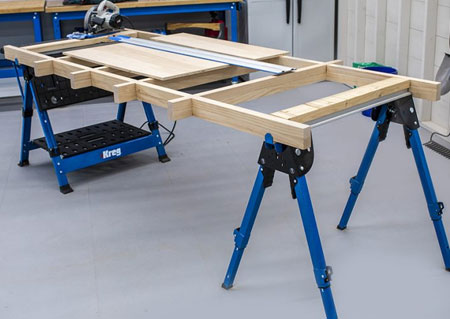
3. Make yourself a cutting grid
The third tip from Kreg tools is to make up a cutting grid that can span between the tables or sawhorses to support the sheets. If you use a cutting grid like the one shown above, it takes the risk out of cutting large sheets. For more information, you can click on this link to view a FREE PLAN for a knockdown grid that is easily assembled and packed away when not in use.
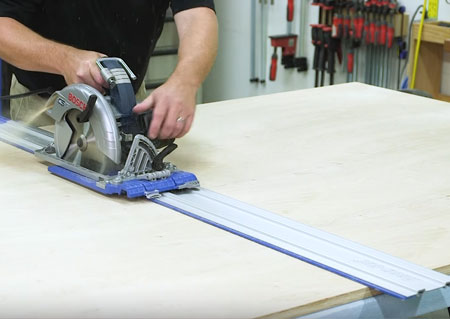
4. Create circular saw perfection
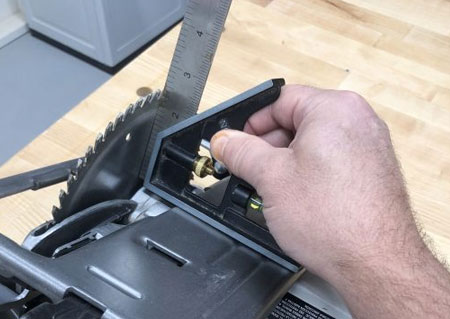
Now that you can move your sheets and support them while you work, you are just about ready to cut. But before you turn on your circular saw, make sure it is equipped to give you the best cutting results. First, ditch the standard blade that came with your saw in favour of one that is made specifically for cutting plywood. With the cutting blade firmly secured, use a guide to ensure the bevel scale on the saw is set for a true 90° cut. Check out this video for more information.
Circular saws tend to get banged around a lot, so it is not unusual for them to be just a bit off. You can check easily (with the saw unplugged, of course) by setting the saw to full cutting depth and holding a square against the saw base and blade. If necessary, adjust the bevel setting.
Using a saw guide will make it easy to control your saw, so you can be confident that you will cut straight and accurately every time.
5. Guide the way
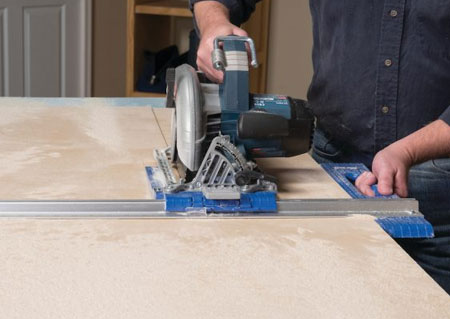
With everything set up as discussed above and your circular saw all set to go, cutting plywood should be far easier and less hassle. However, you may find that cutting a straight line with accuracy can still be a challenge. That is because holding a circular saw exactly on your line can be a challenge, especially when making cuts that are 100mm or 200mm long. The solution is to use a saw guide. A guide will make it easy to control your saw, so you can be confident that you will cut straight and accurately every time.
Using a Kreg Rip-Cut™ guides your circular saw with a long edge guide that follows the straight edge of the sheet you are cutting. So, all you must do is lock the saw in at the measurement you want — up to 600mm — using the built-in measuring scale and then make your cut. With a built-in measuring scale, you do not have to measure and mark each cut, either. Just lock the saw sled at your desired cut width, and you are all set, whether you need to cut one piece or make multiple pieces of the exact same size.
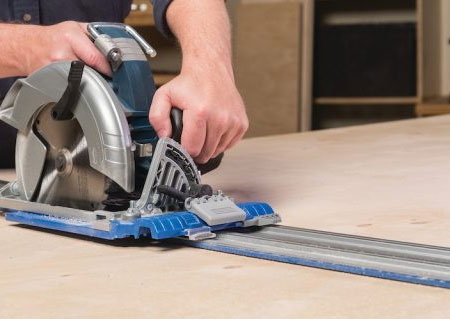
The other option is the Kreg Accu-Cut™ it also guides your circular saw to make straight cuts, but in a different way - it guides the saw along the aluminium track and keeps it moving in a straight line easily. The design makes it simple to set up by just aligning the track with your cut line. The edge of the track rides against your saw blade, so it is easy to tell exactly where the saw will cut. Plus, this tool has anti-chip strips that help eliminate splintered edges, so you get smooth cuts.
The standard Accu-Cut has a 1260mm capacity for crosscutting sheets, while the Accu-Cut™ XL can rip full sheets up to 2520mm long.
For more information on the Kreg BuildSomething free plans and all the videos go to www.buildsomething.com Then enter “Kreg’s 5 ways to end plywood struggles and get better results.“
Kreg is a major international brand from Vermont Sales and is available at leading outlets countrywide. For more information talk to your local retail outlet or contact, Vermont Sales on 011 314 7711 or visit their website www.vermontsales.co.za.