
How to Use Paint and Stencils to Give any Room a New Look
Forget about the hassle and mess of wallpaper and rather think how easy it is to use paint and stencils on a wall to give any room a new look.
08/03/2023
I am not a fan of wallpaper, even though I have used it in the past. Growing up in the UK, wallpaper is the most popular choice for decorating a home but having gone to the effort to apply wallpaper and the mess and hard work of removing it, I think that wallpaper is a mistake. I agree that it can look stunning on a wall but there is always the bottom line that what goes up - must come down and I would rather use paint and know that if I want a change I can simply paint over it.
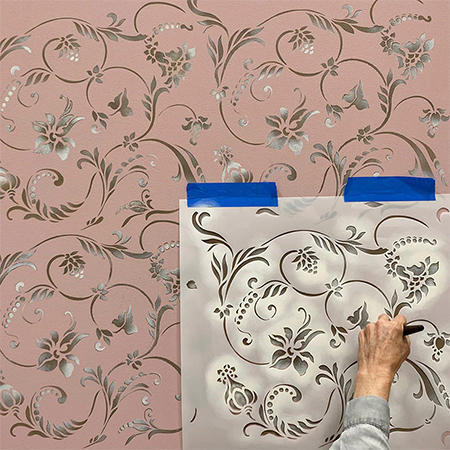
According to J. Butler Property Management team stencils have become increasingly popular in the last decade and decorating enthusiasts are loving what you can do with stencils and paint to transform a room. While there are limited options for stencils locally, ordering and having stencils shipped internationally is not expensive and so worth it! New designs are constantly being added to the range of stencils from Royal Design Studio and, when combined with metallic paints or two or more colours, you can achieve a stencilled wall that is glamorous, colourful and has depth and dimension. As an example of this, we include a 'how-to video' from Royal Design Studio that explains how to achieve a depth of feeling using two paint colours and a single stencil. Here's how:
YOU WILL NEED:
Stencil, we used Flourish Damask from Royal Design Studio
Stencil brushes, 2
Painter's tape
Disposable paper towels
Paint, in light and dark colours
Spirit level
HERE'S HOW:
Step 1
Pour the paint into smaller more manageable containers. Dip the stencil brush into the first colour (base colour) and dab the excess paint onto a paper towel. The stencil brush needs to be almost dry before you apply to the wall.
Step 2
Use painter's tape to affix the stencil at the starting point on the wall. Use a spirit level to ensure that the stencil is straight. To avoid any movement while you work, tape down the corners of the stencil. Do not use masking tape as this may lift the paint when the stencil is moved around.
Step 3
Take the loaded stencil brush and lightly brush over the open areas of the stencil until the entire area is covered. Do not press hard, it is far better to only have a small amount of paint on the stencil brush, similar to dry brushing, and brush this over the stencil in smooth strokes. This will give the design a natural-looking effect.
Step 4
Using the second stencil brush, apply the lighter colour over the base colour and highlight only certain areas. The trick to creating depth with a stencil is using two or more colours and blending them together. Using two colours, one light and one dark, you can use the lighter colour to create highlights that 'lift' the design and create more interest.
You will step and repeat this process over the entire wall. Take your time and don't rush the project. The time you spent will be well rewarded when you step back and enjoy the beauty of a unique stencilled wall!