
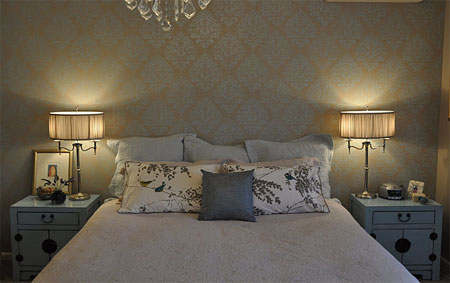
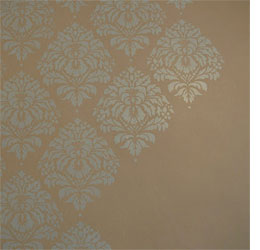
Damask design in metallic paint
I have wanted to stencil my bedroom wall with a damask stencil for a long time. The stencilled pattern I wanted was a subtle backdrop to my bed on a feature wall, for that reason I didn't choose a strongly contrasting paint, but rather a base colour and pearlescent paint over the top to create the damask stencil effect.
So I boosted it up by mixing in some turquoise paint into the beige pearlescent paint about a 50/50 mix.... PERFECT... just what I was looking for, it nicely tied in my new turquoise bedside tables and made it work in the room!
asenseofdesign.blogspot.com
YOU WILL NEED:
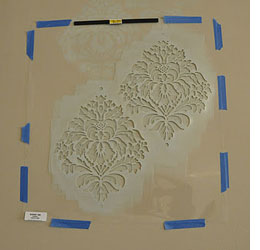
Stencil of choice (make your own stencil)
Spirit level
Pearlescent acrylic paint
Foam roller or stencil brush
Paint tray
Masking tape (low tack)
Paper towels
A step ladder helps too
HERE'S HOW:
Step 1
Work out your colour combination before you start!!! Unlike me! Try it out on a piece of cardboard painted in the background colour, this will also help you get your stencil technique down pat!
Step 2
Mask off the sidewalls, skirting and ceiling. If you are doing whole room stenciling, start in an inconspicuous place because your technique will improve as you go through it. Since I was only doing a feature wall, I started in the top left hand corner and worked down and across.
Step 3
Place your stencil on the wall using your stencil level to line it up and blue masking tape to hold it in place. Load your foam roller with paint then roll it back and forth on the tray to remove a lot of the paint and then again on the paper towels until it feels quite dry. This is important because the last thing you want is for it to bleed under the stencil edge if you have too much on. Use a light to medium pressure on the roller.
Step 4
Reposition the stencil to directly below the first one and you will be able to use part of the design as registration marks for the next print. Keep checking that it is square with the stencil level. Make sure that your paint is dry enough when you move it.
Stencilling is not a perfect art, there will be little discrepancies along the way with spacing etc but that just adds to the charm of it (well that's my excuse anyway!)
Step 5
Once you have finished across the whole wall it is time to go back and fill in the edges and ceiling and base. The corners you just need to take time and do one side at a time, it doesn't matter if you don't have all the detail, you wont notice it.
GOOD TO KNOW
I always keep a damp cloth near by in case I make a mistake, if you act quickly you can wipe it away so be prepared.
I am loving my bedroom now... of course it is not finished, there is still a headboard that needs to be made, chairs that need slip covers, a painting or mirror over the desk to replace the little tiles that I love but are all a wrong colour now.... I'd love to get rid of the air-conditioner but for now it is staying (it does have its benefits!). Thanks to Gina at a sense of design for sharing this project with us.