Setting up a Bar at Home
Social distancing has become a new normal for everyone and if you love to entertain at home, perhaps this might be the best time to think about installing a home bar.
30/12/2021
crate and barrel
With everyone distancing themselves from public places and particularly restaurants and pubs, drinks at home with friends has become the new normal. With this in mind, we look at what you need to do to install a bar in your home and what you will need to set it up.
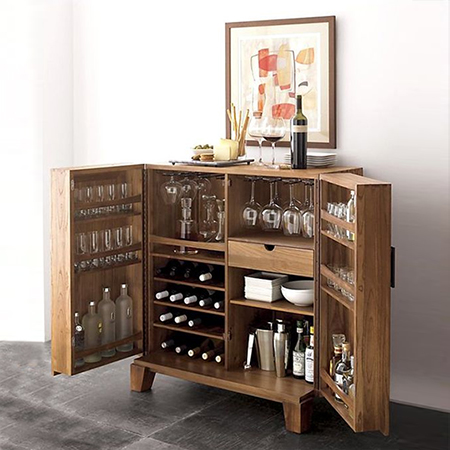
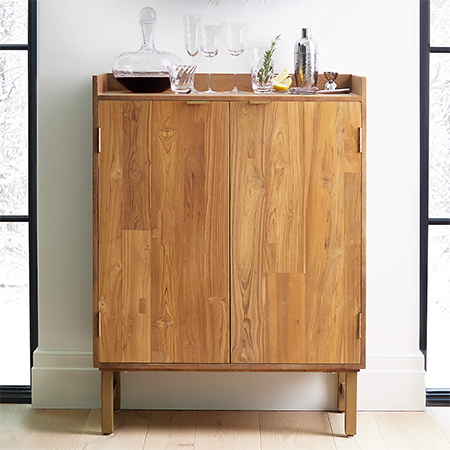
The easiest and most practical solution for a home bar, particularly in an average-sized home, is one that isn't immediately visible but is there when you need it. A home bar in a cabinet will blend with other furniture in the room

1. Finding the space
The first step when you decide you want to install a home bar is to find a space where you can put it. In most instances, you may have to carve out a place that is currently in use or try to find an area where a bar will fit without taking up too much space. And don't forget that a home bar can be indoors or undercover outdoors, so factor this in when it comes to buying materials and supplies. We put together some great home bar ideas that will provide you with plenty of inspiration.
IN THE DINING ROOM
The most obvious place for a bar is close to a dining room or kitchen, as this will allow easy access for water and ice and cleaning up. The dining room is the new focus with more people entertaining at home rather than going out. With a bar close to the dining room, it provides the perfect opportunity for entertaining and wining and dining with family and friends.
If there is sufficient room to install a bar, shop for materials that will complement the existing decor and not distract from the overall decorating scheme. While you may want your home bar to stand out, you also want it to look a part of the home. Use materials that already feature in your dining room, such as a matching wood finish to reflect the look of your dining table.
IN THE KITCHEN
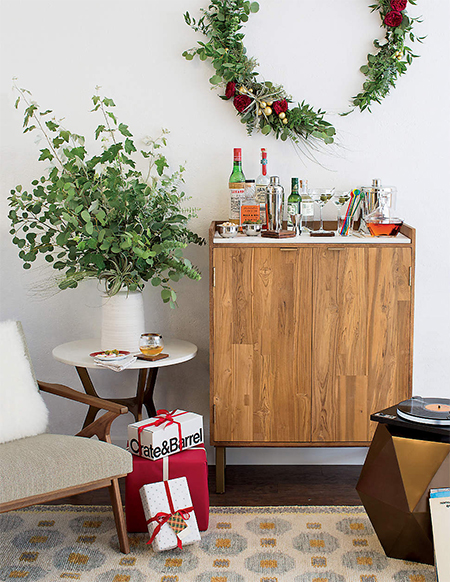
Close to the kitchen has to be the best place for a home bar as it gives you access to your refrigerator and sink, both of which you will find handy when setting up the bar. The home bar on this page is compact enough to fit along a wall without taking up too much floor space.
IN THE GARDEN
I love the idea of installing a bar in the garden or entertainment area and it's the best place if you love to entertain outdoors during the year. Do make sure to use materials that can be exposed to the elements or apply exterior sealer or protection. Pine is an affordable option, meranti is slightly more expensive and the price of hardwood depends on the species you select. To ensure the lifespan, apply an exterior sealer regularly.
Everything you need to assemble a home bar can be found at your local Builders store. Visit your nearest store to check out the options available before you start working on the design plan.
Use the diagrams below to assemble this home bar using pine and laminated pine or choice of hardwood. Builder's stock a wide selection of PAR pine and laminated pine shelving.
You can assemble the home bar using basic butt joints, Kreg pocket-hole jig or biscuit joiner.
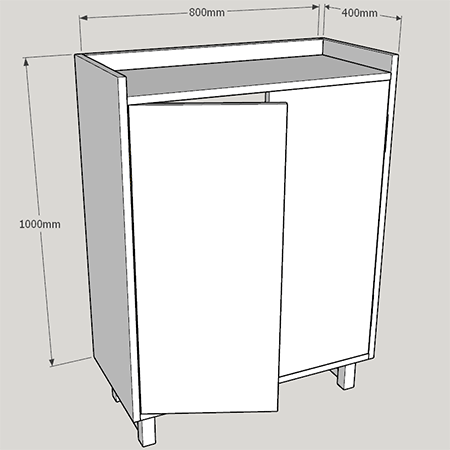
2. Assembling the home bar
You can assemble the home bar using your method of choice be it using basic butt joints and covering screw holes with wood filler, a Kreg pocket-hole jig to have no visible screws or a biscuit joiner.
YOU WILL NEED:
2 of 1000 x 400mm – sides
2 of 800 x 400mm – top, bottom shelf
1 of 800 x 50mm – back apron
2 of 906 x 394mm – doors
4 of butt hinges and 16mm screws
2 of magnetic door catches and 16mm screws
3mm backing board cut to fit
Wood filler
Feet of your choice
Sealer or varnish to finish
Have all the materials required to assemble the home bar cut at your local Builders store.
TOOLS:
Drill plus assorted bits
OPTIONAL: Kreg pocket-hole jig and pocket-hole screws
OPTIONAL: Biscuit joiner and #10 biscuits
4 x 40mm screws
Orbital sander plus 120- and 240-grit sanding pads
Tape measure and pencil
Safety gear
HERE'S HOW:
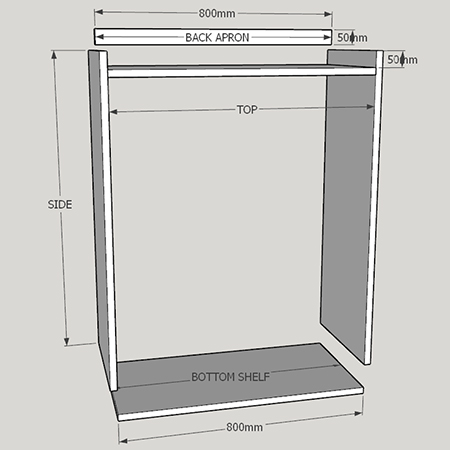
Step 1
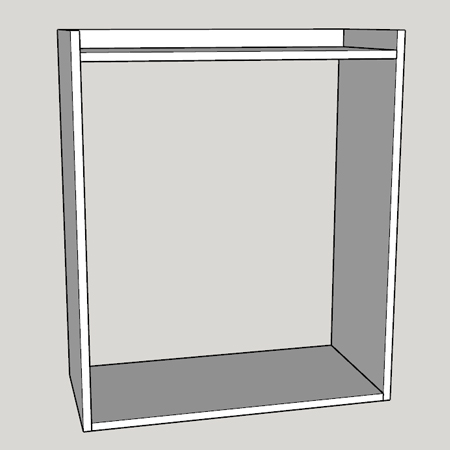
Assemble the frame for the cabinet as shown above. Secure the Bottom Shelf and Top in place and then add the Back Apron. Note that the Top is mounted 50mm down on the Sides to line up flush with the Back Apron.
How the cabinet frame looks once assembled.
Step 2
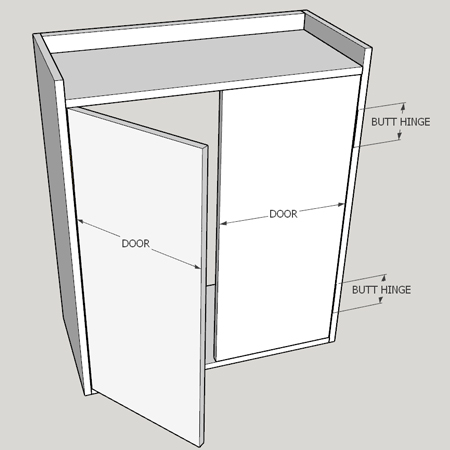
Before attaching the Doors to the frame, secure the butt hinges 100mm down from the top and up from the bottom. Transfer this mark onto the inside of the frame and drill 2mm pilot holes to make it easier to secure the door to the frame. Secure magnetic catches under the Top on both sides and on both doors. There is a 4mm allowance on both Doors, 3mm for the hinge and 1mm at the centre as well as 1mm at the top and bottom of the doors.
Step 3
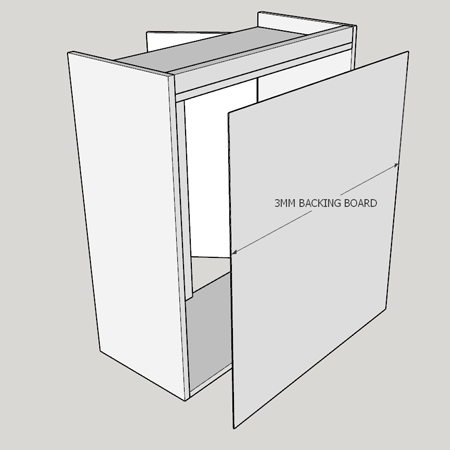
To finish off the cabinet exterior, secure the backing board on the back side of the frame. You can use a heavy-duty stapler or hammer and panel pins to secure the backing board in place.
Finishing
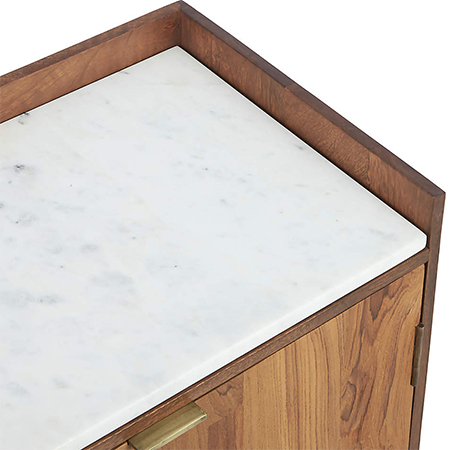
To provide a durable surface on which to work, a composite board is loosely fitted on the top of the home bar. You can substitute this with marble or granite, caeasarstone or quartz depending on how much you want to spend.
The inside cubbies of the bar cabinet are made separately so that they can be removed if necessary when cleaning. You can design any configuration for your storage needs.
To finish off the home bar, choose sturdy feet for the unit. You can even opt for heavy-duty caster wheels for a more industrial touch and to give the bar mobility.
Here is another home bar idea that you might like and that is also reasonably simple to make. Make the cabinet frame in the same way but modify the doors and attach these onto the unit with piano hinges.