
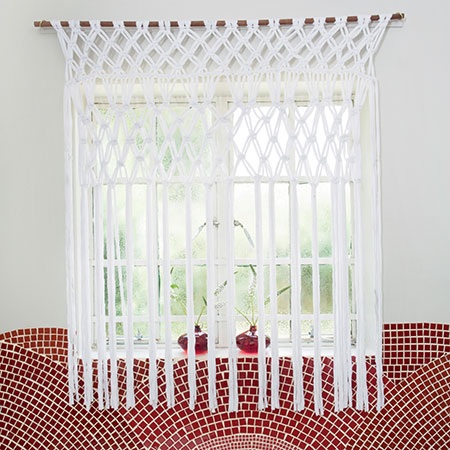
Macramé Window Treatment
Dress up a plain window with an easy macramé window treatment using basic macramé knots and T-shirt yarn or rope.
14/11/2018
gallo images
The lark's head, double-half hitch and square knots are basic knots used in macramé and what was used to make this decorative window treatment for a bathroom window.
While we used t-shirt yarn for this project, you can also use rope that you will find at any Builders Warehouse. Other than that you only need a pine or meranti dowel to hang the macramé above a window.
YOU WILL NEED:
Approximately 3 large balls of t-shirt yarn or top
Pine or Meranti dowel
Scissors
LARK'S HEAD KNOT
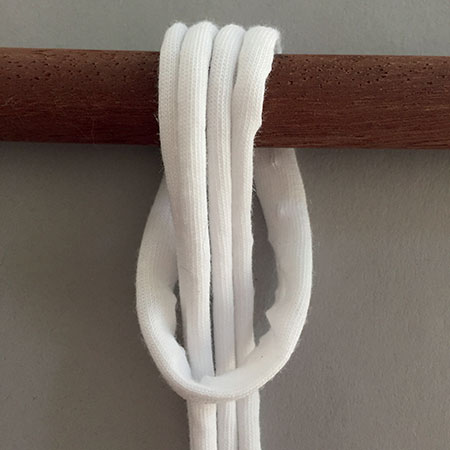
GOOD TO KNOW: Rest the dowel ends on two tables or chairs so you can work with ease with the yarn hanging down.
1. Cut a long length of T-shirt yarn and fold this in half at the centre. Fold the loop to fit around the dowel. To do the lark's head knot, insert the yarn ends through the loop and pull tight to form a knot, as shown above.
SQUARE KNOT
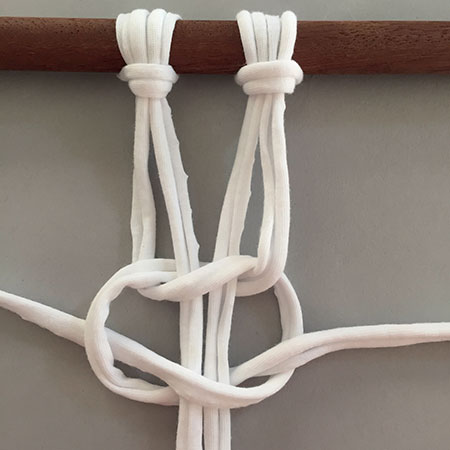
To make a square knot place cord 1 over cords 2 and 3 (the knot carriers). Place cord 4 over the end of cord 1, under cords 3 and 2 and insert through the loop and over cord 1. Place 1 over 3 and 2. Place 4 over end of 1. Insert 4 under 1, 2 and 3, through the loop and out over 1. Pull tight to form a knot.
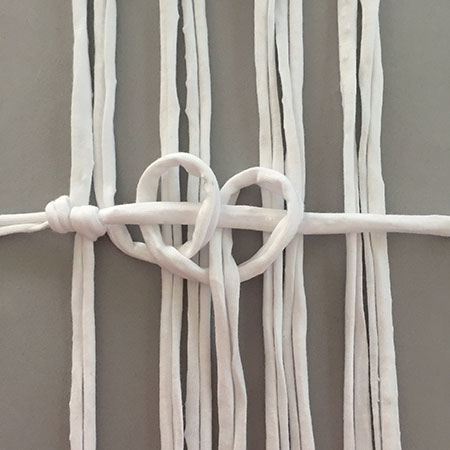
DOUBLE HALF HITCH
MACRAME WINDOW TREATMENT
To determine how much T-shirt yarn or rope you need for this project, multiply the height of your window by 5 and cut 32 lengths of T-shirt yarn or rope according to this measurement.
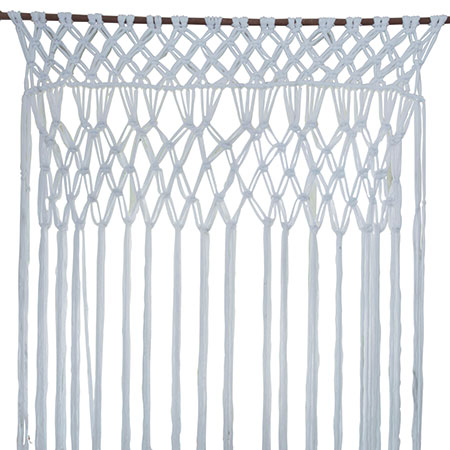
HERE'S HOW:
1. Find the centre of each length of yarn and knot a lark’s head knot as explained above.
2. Row 1: Take the first four cords and make a square knot directly under the dowel.
3. Row 2: Leave the first two cords, take the next four cords and make a square knot 4cm below the previous row.
4. Take the next four cords and make a square knot. Continue in this way to the end of the row so two cords remain.
5. Row 3: Take the first four cords and make a square knot 4cm below the knots in the previous row. Take the next four cords and make a square knot. Continue in this way to the end of the row. The square knots now form an alternating pattern.
6. Row 4: Repeat the steps from row 2.
7. Row 5: Bring in an extra length of yarn from the left-hand side and make double half hitch knots with each cord 2cm below the previous row of knots.
GOOD TO KNOW: The cord that was brought in is left out in all the rows.
8. Row 6: Take the next four cords and make a square knot 8cm below the knots in the previous row. Complete the row in the same way. Leave the last cord.
9. Row 7: Leave the first two cords and take the four middle cords between each square knot and again make a square knot directly below the two previous square knots. Repeat to the end of the row.
10. Row 8: Now make square knots using the four loose cords between the square knots made in the previous row 8cm further down.
11. Row 9: As row 3, but 8cm further down.
12. Row 10: As row 2, 8cm further down.
13. Row 11: As row 9.
Hang the curtain and leave the cords hanging down. Trim the cords to the desired length. More cords and single knots can be added to both sides of the curtain, if necessary.