
Sew burlap art
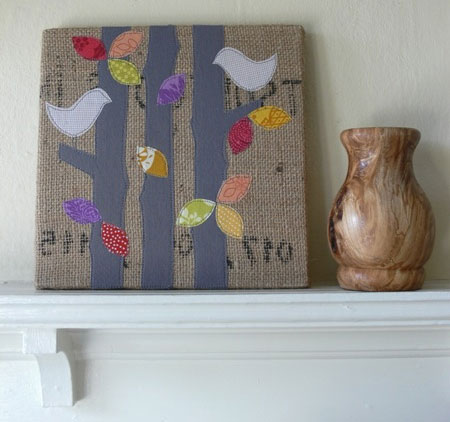
Guest post featured on Whip Up by Jenny Bartoy of Stumbles and Stitches. I love repurposing materials, it’s such a fun and eco-conscious way to create. For this project, I used part of a burlap coffee sack as my canvas and small fabric scraps to create my picture. If you can't source burlap coffee sacks you can also use plain burlap from a fabric store.
Inspired by nature, this design features two birdies calling to each other through the woods at sunset.
stumblesandstitches.blogspot.com
YOU WILL NEED:
Finished size 230 x 230mm
Printed
template PDF
Background - burlap or other fabric, 300 x 300mm (extra material to wrap)
Lining (if using burlap) - muslin, 300 x 300mm
Trees - one piece of fabric, 250 x 180mm
Birdies and leaves - dozen small fabric scraps
Fusible web appliqué paper or iron-on adhesive
Thread, needle, scissors, pen, sewing machine
Canvas stretcher bars, 230 x 230mm
Hammer and panel pins or staple gun and 8mm staples
CONTINUES BELOW
HERE'S HOW:
1. Let’s start by prepping your fabric. If using burlap for your background, you’ll want to line it with a square of muslin. Pin your two layers together and stitch all the way around. I do a straight stitch, then a zigzag stitch around that. Burlap has a way of coming undone if you don’t secure its edges! I’m using the inside of a coffee sack here, where the ink has seeped through from the stamping. The letters are backwards, but I like that it’s a more subtle print than the bold black characters on the front of the sack.
2. Select your fabric scraps for the trees, birdies and leaves. For my version, I imagined these birdies at sunset, so I chose scraps in warm colours like yellow, orange, red and purple. To contrast and create an impression of shadows, I selected a grey solid for my trees and white/beige checks for my birdies. Choose a colour scheme that speaks to you! You could do sunset, or autumn or spring, or even completely neutral on a colourful background. Iron your fabric scraps onto fusible web ( follow manufacturer’s instructions).
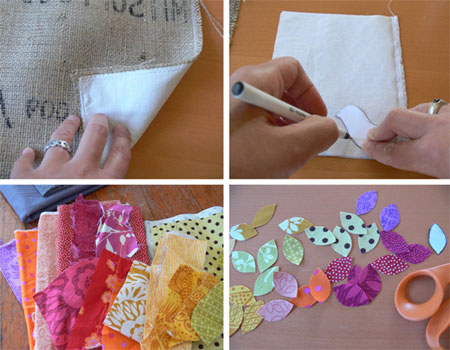
3. Print out template at 100%. Cut out the shapes and trace them onto the paper side of the fusible web, on the back of the fabric scraps you’ve prepped. You’ll need to trace 3 tree trunks (draw them backwards!), 2 birdies (one in each direction) and 12 leaves. Cut out your fabric shapes. I like to cut an excess of leaves from a variety of scraps, then play with the colour arrangement until I’m happy.
4. Place your fabric shapes onto the background fabric. You can follow my template, or change it up! Face the birds away from each other, move the leaves around… Remember to keep all the pieces within a central 230mm - your finished project size. At this point, I like to snap a digital picture of my layout. It allows me to see it from a different perspective and notice what may need to be tweaked. It also helps me remember exactly where I placed each piece before the next step.
5. Remove the birdies and leaves, set them aside. Peel the paper backing from the trees and fuse them onto the background fabric.

6. Stitch around the trees with your sewing machine, or a needle and thread. Your thread colour choice depends on whether you want the stitches to contrast or blend into your appliqué.
I used dark grey thread on everything to create overall cohesion. I outlined each appliqué piece with a straight stitch, roughly 2mm in from the edge – it adds texture to the finished project. Since the fusible web is adhering your pieces to the background fabric, you can skip this step if you prefer. Or you can zigzag stitch around the appliqué, try a blanket stitch, or go crazy with embroidery floss and a needle. Have fun with it, it all contributes to the finished artwork!
7. It’s time to add the birdies and leaves! Follow the same steps as for the trees. When you’re done top-stitching, add legs for the birdies by stitching 2 little sticks under each bird’s belly. You can either machine-stitch or embroider them.
8. Carefully press your fabric art one last time, cut off any errant threads and make sure you’re satisfied with the overall look and details – it’s your last chance! Then it’s time to attach your fabric art onto the canvas stretchers. My method is to lay the fabric art face down on a clean flat surface, then centre the stretcher bars on top. Begin by folding over each edge of the fabric art one at a time, and sticking a nail/staple in the middle of the bar. Taking turns with each side, gently pull the fabric taut and secure it evenly around the canvas with nails/staples. Finish by neatly folding the corners in and nailing/stapling those down.
Ta-da! You are done!