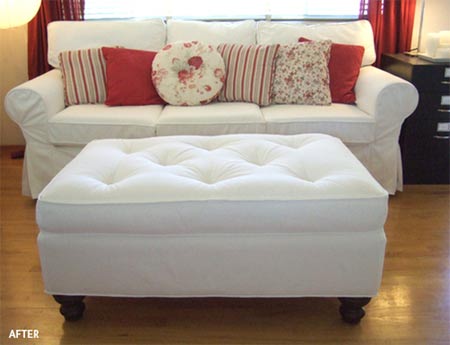
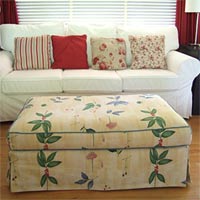
Reupholster an ottoman
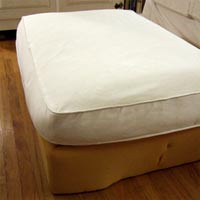
I have been coveting a coffee-table ottoman. You know: the kind of oversized ottoman that you can kick your feet on from nearly any seat in the room and use as a coffee table, but the R3000 price tag is a bit out of my price range. Then I found this secondhand ottoman for R250. The only thing it has going for it is its size, so I’m giving it a makeover.
craftynest.com
1. Because the ottoman is too low to the ground, the first thing I did was remove the casters. I wedged a screwdriver under each wheel and hammered the handle end until the wheel popped out. The old legs were a bit low and I figured the ottoman needed to be about 10cm higher, so I hunted for modern legs.
2. Using a flathead screwdriver and pliers, I removed the staples holding the dustcover on the bottom of the ottoman. With the dustcover off, you can get a pretty good idea of how a piece of furniture is put together. The dustcover was ripped beyond repair, so I’ll replace it later.
3. Using a drill and screwdriver bit, I attached four furniture-leg mounting plates and screwed the hanger bolts right into them. I was relieved that the legs were the perfect height. I’ll need to unscrew them to finish the job, but I left the legs attached for now.
4. I wanted to reupholster it in white twill fabric to match my sofa, so you might have to shop around if you need to match existing furniture.
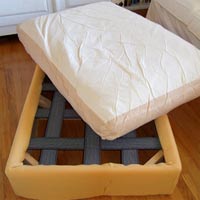
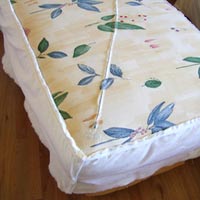
5. After laundering the slipcover, I cut all the seams off and saved the pieces. Using a flathead screwdriver and pliers, I removed the staples holding the existing fabric to the frame. I was happy to discover the foam and batting were inside their own pillow. That will make my job easier.
Then I took apart the outer cover with a seam ripper. No cutting the fabric this time because I’ll use these pieces as a pattern for my new cover. I ironed the old and new fabric pieces, then pinned them together and started cutting.
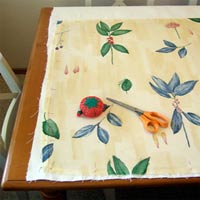
6. After cutting out the fabric pieces using the old pieces as a pattern, I encased the original piping from the ottoman in a long strip of fabric and basted it together lengthwise (to create welting), stopping about 10cm from each end of the piping.
DIY Tips:
Cut your welting strips on the bias (diagonal). The fabric will have more give and will be easier to work with.
Cut your fabric strip about 10cm longer on one side than you think you need. You will tuck that under and sew it later.
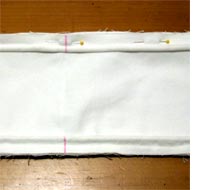
7. Next, I sewed the four sides (which will cover the top cushion) end-to-end. Then I pinned and sewed the welting around the top and bottom edges of the four sides. Fold each piece that you'll be sewing together in half and mark with a fabric marker. Fold in half again and mark. You will then have four marks on each piece to match up and pin in place. Then pin halfway between those marks and so on, until you have a pin every few centimetres.
8. I sewed the bottom sides and welting using the same process from Step 7, except this time I cut the welting strips twice as wide so I would have extra fabric to wrap around the bottom of the ottoman. Then I sewed the original bottom zippered piece to the bottom edge of where the cushion will go. This saved me time and money, and it will be hidden anyway.
9. I unzipped the zipper and stuffed the cushion into the cover while trying to minimise wrinkling of the inner cover, which was quite a workout.
10. Once the cushion was inside the cover, I slipped it over the frame. After straightening and pulling the edges, I folded the fabric over the bottom edge of the frame, stapled it every few centimetres and trimmed the excess fabric.
DIY Tip:
If any of the staples stick up a bit, just hammer them down with a hammer.
Tufting
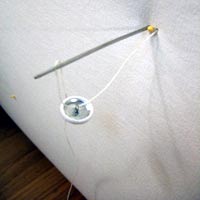
First, I measured and marked with straight pins where I wanted each of my covered buttons to go. Following the package instructions, I made eight covered buttons (using circles cut from leftover fabric scraps).
I threaded a long upholstery needle with waxed twine and pushed it through the cushion from the top down and unthreaded the needle at the bottom, looped the button onto the top piece, and threaded the needle again at the top.
I then pushed the needle through about 5mm from the first entry, so both ends of the twine emerge from the bottom of the cushion. After repeating this on all eight buttons, I flipped the ottoman over and stood on the cushion, straddling each pair of threads (which compresses the cushion). I pulled the threads tight, tied them in a knot, and trimmed the excess length.