
Is macramé back in fashion?
Well, maybe not. But if you've ever given it a go you know how addictive it can be. Here's to a resurgence of tasteful macramé projects for home decor accessories.
I must be honest and admit to being a bit of a macramé junky in my younger days, with macramé plant holders everywhere. I even went as far as making shelf units and window coverings with macramé. The nice thing about macramé is that you can take as long as you want with a project. It's a relaxing hobby that is creative and allows you to use your imagination to design items that blend with the style of your home. Plant hangers and woven chair frames, handbags, mats and wall hangings are all areas where a series of intricately knotted macramé cords make a useful product. Macramé uses rope, jute, string or embroidery thread twisted in various types of knots, with or without accessories such as beads and trinkets. After you have familiarised yourself with the basic macramé knots below, we will show you how easy it is to make stunning home and fashion accessories using macramé.
Basic macramé knots
Use a LARKSHEAD KNOT to attach your rope, twine or string [cord] to a ring or horizontal bar. This is the most common starting knot for a variety of projects.
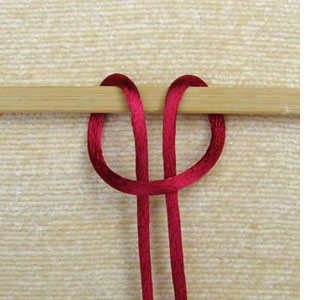
LARKSHEAD KNOT [LK]
A single length of cord is folded in half and looped over a bar, rod or ring and the two lengths of cord are pulled through the loop.
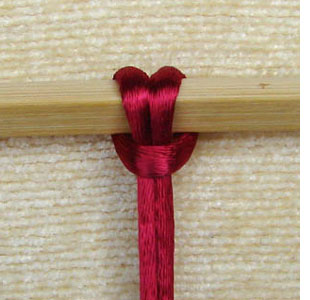
To tighten and 'snug' the two hanging lengths are pulled tightly. As the starting point for any macramé project, you now continue to add various knots as specified by the pattern.
The most common knot to follow on with is a Square Knot.
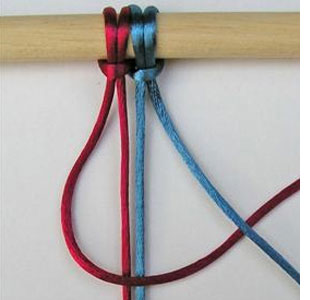
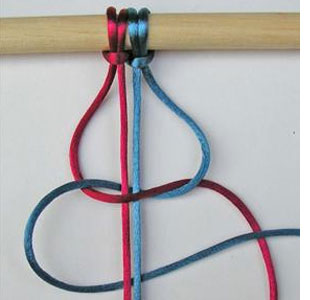
SQUARE KNOT [SK]
You can create a square knot with 2 or 4 cords. This example shows 4 cords being used. Left cord (red) goes over the centre cords and under the right cords.
Right cord (blue) goes under the centre and comes up through the hole on the left.
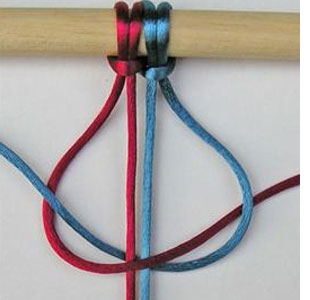
Left cord (blue) goes under the centre and over the right cord.
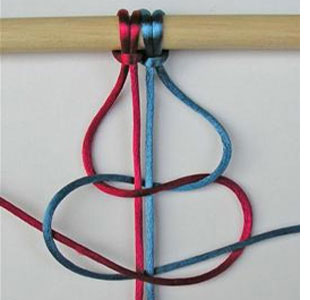
Right cord (red) goes over the centre and dives down into the hole on the left. For the next knot you alternate by placing the RIGHT cord over the centre cords and under the LEFT cords.
HALF KNOT
To create a HALF KNOT [HK] you do not alternate but continue to knot in exactly the same direction to create knots that twist.
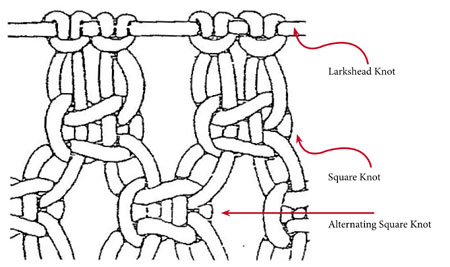
ALTERNATING SQUARE KNOT
To create a Alternating Square Knot [ASK] do not alternate from left to right but continue to knot in exactly the same direction to create knots that twist.
dottie hoeschen