
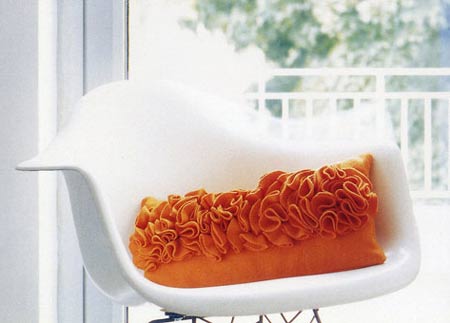
Cushion with rosette clusters
I haven't crafted with felt since I was little, but since picking up a copy of Anne Kyrrö Quinn's book, Felt Furnishings, I have a whole new universe of respect for the material. The techniques she explores in this vibrant craft book truly transform felt into modern, eye-catching home accents.
annekyyroquinn.com
YOU WILL NEED:
Feather pillow insert 25 x 45cm
For the pillow cover: 57 x 47cm orange felt or felted woven-wool fabric
For the folded rosettes: (50 x 45cm orange felt or felted woven-wool fabric
Matching zipper 45cm long — optional
Matching sewing thread
Sewing machine and accessories
HERE'S HOW:
1. If you wish to make a pillow back with a zipper, cut out three pieces of felt for the pillow cover — one piece measuring 27 x 47cm for the front and two pieces measuring 14.5 x 47cm and 15.5 x 47cm for the back. If you wish to make a sewn-in pillow back, cut the back panel to the same measurements as the front. To make the rosettes, cut out 60 felt circles with a 7cm diameter.
2. Pinch each felt circle in the middle, and fold the sides in to form a rosette. Hand-stitch the base of each folded rosette to hold it together.
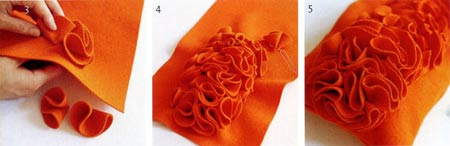
3. Starting at one end of the front pillow panel, hand-stitch the rosettes onto the fabric, stitching neatly and securely through the base of each one.
4. Continue adding rosettes, positioning them very close together to form a dense, wide row of rosettes through the centre of the pillow panel. Make sure that the row of rosettes is straight and that there is the same amount of undecorated base fabric on either side of the row.
5. Make up the pillow back and join the front and back following one of the two options below. Insert the pillow form into the finished cover.
Pillow Back With Zipper
Although sewing in a zipper requires a degree of technical skill, this is still not a complicated way to make up the back of a pillow cover, and it is the method that I would recommend using, as it does mean that the cover can be easily removed for cleaning. The back panel of the pillow cover is cut in two pieces, which are joined together in the middle by the zipper, running horizontally. You will need a metal or nylon closed-end zipper in a colour that matches your pillow cover. The zipper should be the same length as the pillow form.
1. Cut two pieces of fabric for the back cover. Both should be the same width as the front cover (adding a 1cm side-seam allowance); one should be 3cm longer than half the length of the front cover, and the other should be 2cm longer, giving a 1cm seam allowance along the top and bottom edges, and a 2cm and 1cm seam allowance along the inner zip edges respectively. With the fabric wrong side up, fold in 2cm along the inner edge of the larger back piece, and press.
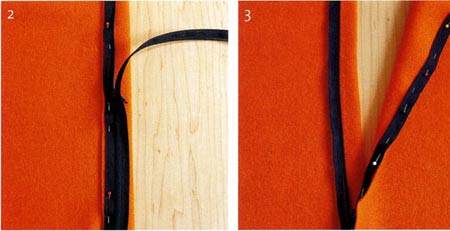
2. With the zipper wrong side up, pin one side of the zipper tape along the cut edge of the fold, with 1cm clear at each end for the side seams. Open the zipper. Using the zipper foot, machine-sew the tape in place along the folded edge.
3. Pin the other side of the zipper tape along the inner edge of the other back piece, with the fabric right side up. Machine-sew in place.
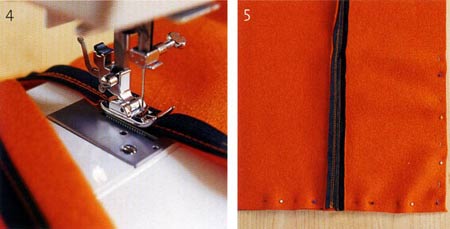
4. Fold the edge over to form a neat fold aligning with the zipper's teeth. Machine-sew in place.
5. With the zipper half open, pin the front and back covers with right sides together. Using a 1cm seam allowance, machine-sew around the edges. Cut the corners; turn right side out, and insert the pillow form.