
Make your own wall art for less
I really just wanted to find a nice way to add some fun and colour to a blank wall and thought it would be perfect to do some stencilled canvas art. All of the art I saw in stores was either too expensive or didn’t go with my space at all, most of the time it was both! Using a stencil I was able to customise my colours and patterns to match my personal style and space perfectly and I didn’t have to pay fine art prices.
YOU WILL NEED:
Framed canvas - or make your own
Stencils - or make your own or
buy online
Acrylic paints, plain and metallic
Stencil brush
Paper towels
Masking tape
HERE'S HOW:
Step 1
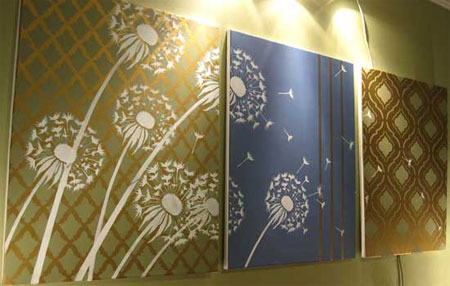
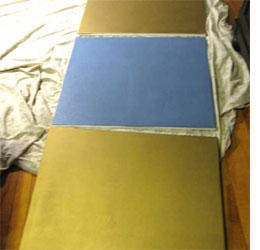
Apply two coats of paint to the framed canvas. For this project we painted two canvasses in a metallic gold colour and the last canvas in a blue. Choose colours that will complement the space where you will hang your new artwork.
Step 2
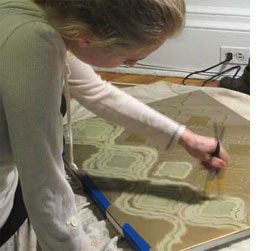
Position and tape down the stencil on the first canvas. Apply acrylic paint using a stencil brush to fill the entire canvas, moving the stencil as you need to in order to fill up the space. The colour used is a matt grey-green colour that works well with the gold background.

Step 3
After stencilling the tulip design on the two gold canvases, I decided to incorporate a dandelion stencil to tie all three canvases together. I think having something organic going over the very geometric background would create a nice effect. I chose to stencil the dandelions in white so that they popped against the background. I purposefully placed the canvases about an 2cm apart and taped the stencil down so that it went from one canvas to the next. I wanted to place each canvas a couple of centimetres apart but didn’t want the dandelions to look elongated once the art was up on the wall.
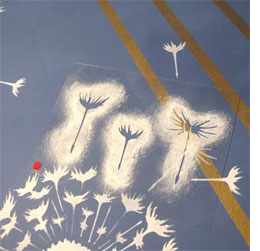
When it comes to composition, I wanted to have the bulk of the dandelions on the left side of the triptych, flowing over into the middle with only the seeds floating on the final canvas. A tip about creating an aesthetic composition, is to have most of the weight not only on one side but also towards the bottom. It also breaks up the composition nicely to have a dandelion only partially showing at the top. Also, don’t be scared to overlap one flower stencil over anther to create a bit more dimension.
Step 4
After laying all three of my canvases next to each other, I felt the centre one needed a touch of gold to tie in the gold from the other two. I decided to go for three thin stripes because my sheets have a striped pattern. Again, love the way I can really customize my wall art so that it ties in all the colours and design elements of my room! To make the stripes, simply take your masking tape and create three thin stripes (I did it by eye, but you can use a ruler for some assistance).
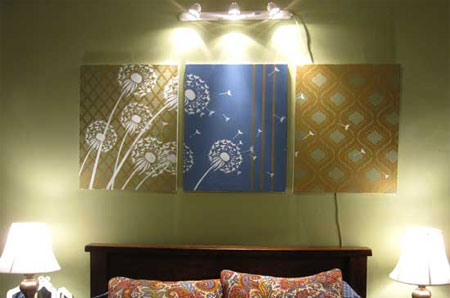
The idea with the floating seeds was to use a nice variety of shapes and sizes and place them in varying directions so it really looked like the wind was blowing them around. The floating seeds provided for free with the dandelion stencil were so great because they are in a variety of shapes and sizes!