
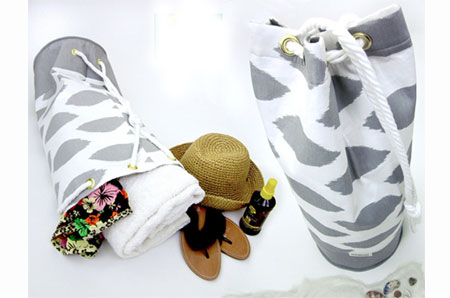
Make a designer beach bag
Here is a great project you can whip out in a weekend. This designer beach bag is a wonderfully tall tube, perfect for loading with all your sun and fun supplies. The soft rope handles are woven through grommets to gather the top and make their own shoulder straps. the bag is lined with waterproof fabric for a lightweight bag, water resistant bag.
sew4home.com
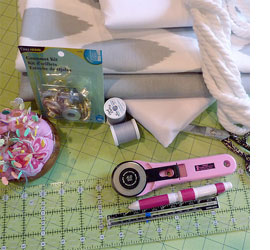
YOU WILL NEED:
2 metres of 150mm wide print cotton twill or similar
1 metre waterproof lining for the bag
2 metres of 1 metre-wide heavy fusible interfacing;
10 of 10cm grommets and Grommet Kit
3 metres twisted soft cotton rope or cord
Sewing thread to match fabrics
Ruler
Fabric pencil
Iron and ironing board
Scissors or rotary cutter and mat
Seam gauge
Seam ripper
Straight pins
Sewing machine
HERE'S HOW:
Cut out the following:
- From the fabric for the main exterior cut [1] 533mm high x 790mm wide rectangle.
- From the fabric for the main exterior cut the following:
[1] 150mm high x 790mm wide rectangle for the exterior base
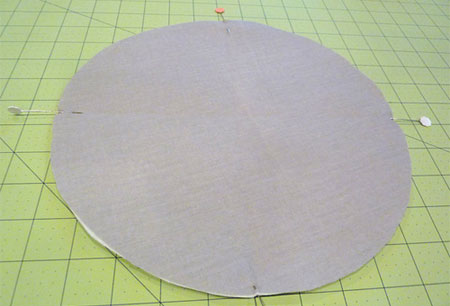
[1] 270mm diameter circle for the base
NOTE: We used a pan lid to make a circle pattern, because it happened to be exactly the right size. - From the waterproof lining cut the following:
[1] 580mm x 790mm rectangle
[1] 270mm diameter circle - From the fusible interfacing, cut the following:
[1] 530mm x 790mm rectangle
[1] 150mm x 790mm rectangle
[1] 270mm diameter circle
Making the exterior
1. Following manufacturer's instructions, fuse each interfacing piece to the wrong side of its corresponding cotton fabric piece. You are stabilizing the main exterior piece, the base exterior piece and the base circle.
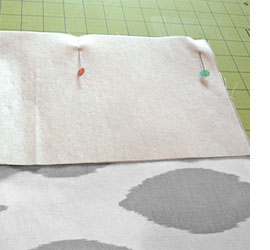
2. Pin the fused base strip to the main fused exterior panel, right sides together along one 790mm side.
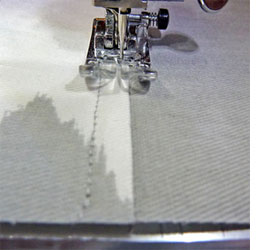
3. Stitch together, using a 12mm seam.
4. Press open and finish as a flat seam.
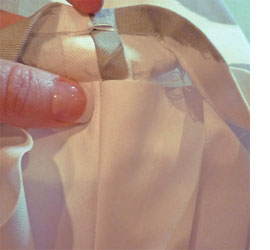
5.Fold the panel in half, right sides together, carefully matching the flat seam. This will be the bag's back seam, which runs all the way from the top to the bottom.
Create and attach the exterior base
6. Find the 270mm base circle, which you already fused with interfacing.
In order to attach the circular base to the bag tube, it helps to make 'quarter-marks' on each piece. To do this, fold the circle piece in half, then in half again. Lightly press at the raw edge to set creases. Unfold and place a pin at the end of each crease.
7. Find these same points on the bag tube. Using the back seam as your guide, fold in half first in one direction (with the seam at the side), then in the opposite direction (with the seam in the middle).
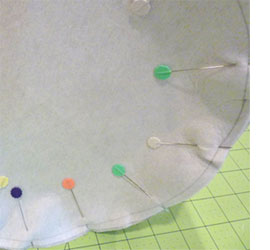
8. Place the base inside the bottom of the exterior bag tube, right sides together. Match up the pins you put in place on your quarter folds. Fill in with pins all around. It's okay to use lots of pins!
9. Using a 12mm seam allowance, sew around the circle. Press the seam open.
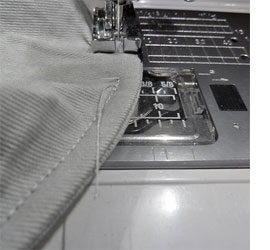
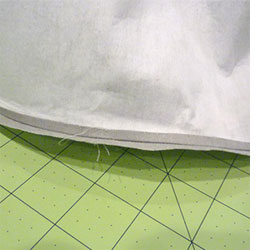
10. Turn the bag right side out. Edge stitch all around the bottom of the bag, using a 6mm seam allowance. Along the top opening of the bag, make a 6,2cm double turn hem. To do this, fold in the raw edge 12mm and press. Fold an additional 5cm and press again. Lightly pin to hold in place.
Create and insert the lining
Find the two pieces of waterproof lining: the 584mm x 790mm rectangle and the 270mm diameter circle.
Construct the lining following the same steps as you used above to construct the bag exterior. The only difference is that the main lining panel is just one piece rather than two, so it only requires a single side seam - no base seam or flat felled seam on the lining.

When the tube and the bottom are stitched together, keep the lining wrong side out and slide it inside the exterior bag. The two pieces are wrong sides together. Line up the back seams. Unpin the top hem of the exterior and slide the top raw edge of the lining underneath it. Topstitch the hem in place. Your seam line should be just shy of 4cm from the top folded edge of the bag.
Mark and insert the grommets
Flatten the bag as best you can and place it on your work surface so the back seam is facing up and centered.
Measure 5cm to the right and 5cm to the left of the back seam. Make a mark at each of these points. These marks will be where the two back grommets are placed.
From the right mark, measure 10cm and place a second mark. From that mark, measure 10cm and place a third mark. From that mark, measure 10cm and place a fourth mark. Repeat this process to from the mark to the left of the back seam.
When complete, you should have 8 marks. The two marks at the front of the bag will be just 4cm apart; this is correct. Centre a top grommet over each mark and trace the inner circle. Using a pair of small, sharp scissors, cut out theses marked circles through all the layers.
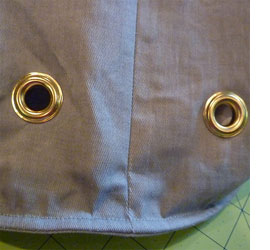
Following the manufacturer's instructions, place all the grommets. You have a number of layers to sandwich between the grommet top and bottom; don't be afraid to whack them the setting post with the hammer. You'll have to put a little muscle into it! You also need to insert grommets at the base of the bag. These should be placed 5cm to either side of the back seam (just as you did above for the grommets in the top hem) and 5cm up from the base edge stitching.
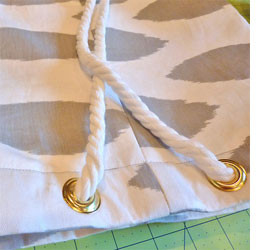
Thread the rope into place
If you got the same soft twisted rope as we used, the ends were likely taped when cut off the bolt. Leave this tape in place; it's the best way to prevent the rope from unravelling, and the ends will be inside at the bottom of bag so you won't ever see the tape. Starting at the front of the bag, insert one end through each of the two front, closely-spaced grommets. Weave the rope in and out, moving around the side grommets, finally coming out the back grommets to either side of the back seam.
Approximately 20cm down from the grommets, tie the two strands together into a knot. Continue down the back of the back inserting each rope tail into one of the bottom grommets. Reach down into the bag and tie a knot in each end to finish. You want the rope to be loose enough to easily gather up the top and still sling over your shoulder.