
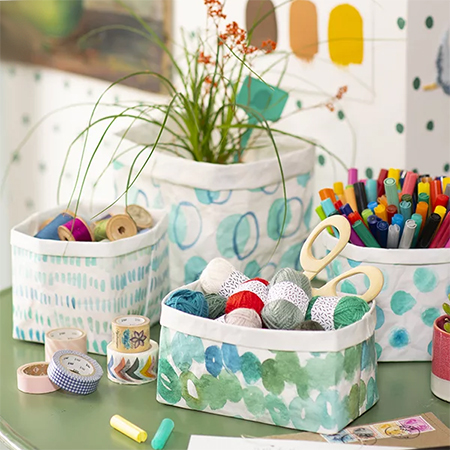
Sew Up these Fabric Storage Baskets
Easy to sew, these fabric storage baskets are made with pretty patterned fabrics and you can make a small, medium or large storage basket.
18/11/2021
marie claire france
Ultra practical and just as easy to sew, these fabric storage baskets are a great idea for all types of storage in the home and you can make assorted sizes as well.
The nice thing about sewing up fabric storage baskets not only introduce colour and pattern but also offer a practical storage solution. Whether you use it to store your sewing accessories, organize your desk or even as an original flowerpot, the storage basket easily adapts to your decorating desires. Thanks to DIY, it is easy to use new or recycled fabric
These fabric baskets can be used as DIY storage as well as a for a wide range of hobby and craft supplies and accessories. Have you decided to switch to washable makeup remover wipes? These small DIY baskets will also be perfect for storing them in your bathroom!

TOP TIP: Instead of purchasing patterned fabric, buy plain cotton fabric and use assorted stamps and stencils and fabric paint to create your own designs.
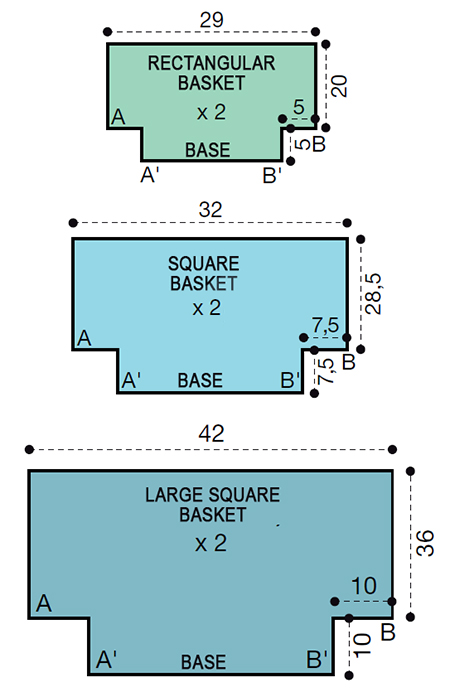
Sewing any one of these storage baskets is a fairly
straightforward sewing project that will even work
well for those new to sewing. With our sewing
diagram (can found below), you
can sew storage baskets in 3 different sizes.
Need a storage bin of another dimension? Do not
hesitate to take inspiration from our tutorial
to create your own template!
Before working, let the vegan leather (Washable paper) soak flat for 30 minutes in a bowl filled with lukewarm water. Crumple and knead the material to soften it and let it soak again for 20 minutes. Lay flat to dry. Iron on the reverse side with an iron set to cotton without steam. For assembly, set the sewing machine to the longest stitch.
YOU WILL NEED:
Patterned or plain cotton fabric of your choice
Pencil or chalk
Dressmaker's pins
Scissors
Tape measure
HERE'S HOW:
Step 1
On the reverse side of your choice of fabric, measure out the elements of each basket as shown in the diagram below. It is easier to use a chalk pencil or dressmakers marker. When cutting out the shapes, cut 1 cm from the marked line.
Step 2
Right sides facing, assemble the middle of the base of the 2 pieces of each basket. Stitch 1 cm from the edge. Fold the seam allowances to one side and topstitch from the right side 3mm from the seam.
Step 3
Stitch the sides of the baskets. Superimpose the marks A and A ’, then B and B’. Sew. Turn right over and fold a double cuff about 2 cm over the opening of the baskets.
Step 4
Add bias or tape around the top edge of your completed fabric basket.